Hot flames dancing in the fireplace for a long time were only the privilege of the owners of their house or cottage, but thanks to modern technology, a fireplace in a city apartment has ceased to be an unrealizable dream. Having building skills, you can easily install a fireplace in the apartment with your own hands.

We make a fireplace in the apartment with our own hands
Installing a real wood-burning fireplace in an apartment will require drawing up a project and obligatory coordination with the supervisory authorities, moreover, due to the complexity of arranging the chimney, this design is not suitable for all apartments, one can even say that this is allowed in isolated cases, only as an exception . However, you can always replace a wood-burning fireplace with an electric one, with imitation of flame and smoke - modern models look no worse than a traditional fireplace, at the same time they do not require complex redevelopment, firewood, do not smoke and do not clog the apartment with combustion products. It is this type of fireplace that does not require coordination and you can easily cope with its creation and installation with your own hands. Which fireplace to choose for an apartment and how to make it right - read in this article.
Content
Traditional wood-burning fireplace, masonry features in the apartment
If you still managed to get permits, read the rules that you must follow!
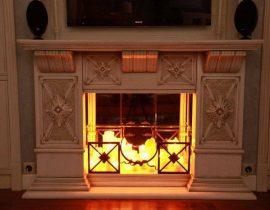
Conservative adherents of the old style, of course, will prefer a fireplace that runs on wood, pellets or other fuels. The smell of smoke, ash and soot does not frighten them at all, as does the need to monitor the delivery and loading of fuel. At the same time, a wood-burning fireplace in an apartment is a pleasure that not everyone can afford. According to fire regulations, the installation of fireplaces is allowed only on the upper floors of apartment buildings or in old houses with a built-in and serviceable chimney. The use of ventilation shafts as a chimney is strictly prohibited!

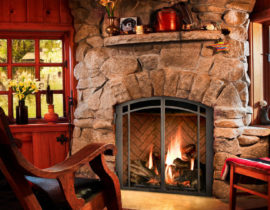
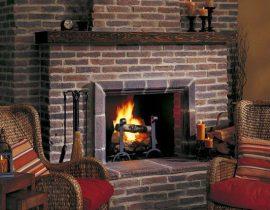
Traditional wood burning fireplace - photo
If you decide to install a wood-burning fireplace in the apartment, you need to perform the mandatory preparatory work:
- The first step will be the installation project, which indicates the material, dimensions, weight of the fireplace, as well as the place of its connection to the chimney. If you are not constrained by funds, it is better to entrust this step to professionals who will calculate all the necessary parameters, including the weight of the fireplace, which should not be more than 800 kg / m2, and if this value is exceeded, the podium area for the fireplace, which redistributes the load, will be calculated.
- After completing the project, you will need to coordinate with the supervisory authorities the redevelopment of the apartment and the reconstruction of the floors, taking into account the installation of a chimney and fire penetrations.
- If the agreement is received, it is necessary to decide on the finish of the fireplace that fits into the overall design of your apartment.
- It is also necessary to provide a place to store firewood or other fuel, a fireproof floor finish near the fireplace, and also consider the need for protective fire-resistant glass covering the firebox.
After all these issues are resolved, you can begin to build a fireplace. Below is the technology for laying a brick fireplace, as more complex. Installing a fireplace in a metal case is much easier and does not require bricklaying skills.
The technology of laying a wood-burning fireplace in an apartment
- Prepare the necessary material: 400 pieces of solid refractory bricks, clay and sand for masonry mortar, valves for a chimney pipe 26x13 cm. The weight of such a fireplace will be about 1.5 tons, and the area, taking into account the layout, will be about 0.7 m2, so you can install a brick fireplace in the apartment only on a pre-made podium. Its role can be played by a reinforced screed with an area of at least 2.5 m2made at the place where the fireplace was installed. To perform the screed, a formwork of boards is installed on the floor, fastening them to self-tapping screws, reinforcing bars with a diameter of 8-10 cm are laid in the form of a grid with a step of 10-15 cm and poured with M200 grade concrete. After the concrete has set, after about 10-14 days, you can start laying the fireplace.
- Laying begins with the preparation of the solution. For laying stoves and fireplaces, a clay-sand mixture is used, diluted with water to a thick dough. Experienced stove-makers advise adding a handful of table salt to the solution to increase its strength, but no scientific evidence has been presented to this day.
- The ratio of components can vary greatly depending on the composition of the clay, so it is necessary to establish it experimentally.The clay is cleaned of impurities, the sand is sifted, after which they are mixed in a small amount in a ratio of 1: 1, a little water is added and the solution is kneaded. They roll a small tourniquet in their hands and try to roll it into a ring. With an excess of sand, the ring breaks. If it was possible to blind the ring, it is left for several hours to dry. The cracks that subsequently appeared on its surface indicate an excess of clay. If the ring retains its shape, then the ratio of the components is chosen correctly, and you can start mixing a large amount of mortar and masonry.

- Laying is carried out in the order shown in the figure. Each brick is lightly tapped with a trowel handle or rubber mallet to remove air bubbles from the top and side. The thickness of the masonry seam is about 5-7 mm, the masonry mortar allows you to correct the masonry even an hour after the next row is completed.
- Rows 1 and 3 repeat each other, as well as 2 and 4. These four rows form the base of the fireplace. Rows 5 to 11 are the walls of the fireplace at the level of the firebox, they are laid with dressing according to the scheme, checking each row for plumb and level. a row of bricks is laid on it. From the 14th row, the laying of the arch of the fireplace and the chimney begins, and if you have purchased a mantelpiece made of natural stone, it's time to install it in place. The laying of the vault is carried out according to the scheme up to the 26th row, after which it is necessary to narrow the pipe and install a valve. To do this, in the 27th row, part of the brick is shifted half the width inside the vault, and in the 28th row the vault is closed by 2/3 and the first valve is installed.The 29th row forms a dressing, and in the 30th row a second valve is placed. From the 31st row, the pipe begins, and its height is regulated by the features of the room and the chimney supply.
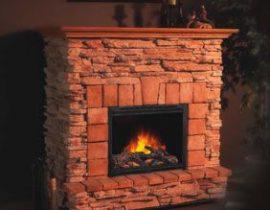
- Finishing the fireplace depends on your imagination. Red refractory brick, laid neatly and with grooves, looks solid and attractive in itself, but if you want to line the fireplace with mosaics or decorative stone, you can do it. The only condition for facing the fireplace is the use of materials with a coefficient of thermal expansion close to fireclay bricks. There are a lot of such materials, and the most popular is clinker tiles laid on refractory glue. You can also plaster the fireplace and paint it in any color.


Video - Device Fireplaces
Video - Laying and ordering the fireplace
Video - How to fold a brick corner fireplace in a living room
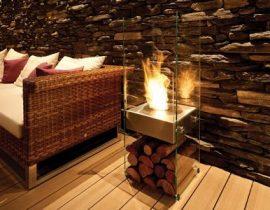
False fireplace or imitation fireplace, what to choose?
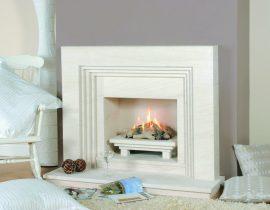
Laying a real fireplace is an expensive pleasure that is not available to owners of standard apartments, especially in panel houses, due to the increased load. In this case, the output could be fake fireplace, running on electricity and simulating the burning of a flame. At the same time, you will not have problems with the delivery of firewood, smoke, soot, and you will not have to coordinate these works with anyone. A modern electric fireplace looks quite natural, the main thing is to make a suitable frame, or portal. It is most often made from an available material - drywall, fixed on a frame from a profile, and then finished to your taste.
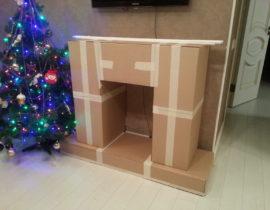
The technology of building a false fireplace in an apartment
- Draw a sketch of the fireplace and select the finishing material - the thickness of the drywall will depend on it.For finishing with decorative stone or porcelain stoneware, it is better to choose drywall with a thickness of 12 mm, for lighter materials, a thickness of 8 mm is also suitable. Indicate all dimensions on the sketch and calculate the amount of material. In the sketch, it is imperative to provide a place for installing an electric fireplace in compliance with the gaps indicated in the passport.
- At the installation site of the fireplace, it is necessary to level the floors if necessary, and also provide for a connection point for the electrical appliance. From a drywall profile, a frame is made according to a sketch, fastening it to metal screws. If it is necessary to make roundings, the U-shaped profile is cut with scissors for metal on the sides and the required radius is bent.
- Pre-cut drywall parts are fixed to the frame from the profile. Drywall is quite easy to cut with a sharp thin knife. Fasten the sheets with hardened self-tapping screws. The seams are puttied using sickle tape. They fix the decoration and decorative elements, stucco molding, mantelpiece. Interior lighting can also give your fireplace a unique style and originality.
- Install the electric fireplace in the "furnace", connect it to the mains, and if there is imitation of smoke - to the water source.


The given technologies, of course, are not a dogma. Your imagination will tell you which fireplace will look more original: corner or classic English, and also tell you how best to decorate it, what accessories to choose and how to decorate the mantelpiece. The main thing is that with the advent of a fireplace, warmth and unprecedented comfort will reign in your apartment.
Video from the ABC of Repair "Do-it-yourself fireplace" from drywall