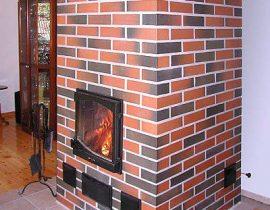
A classic wood-burning fireplace gives the house a unique coziness and charm, but many consider it too expensive, believing that laying a fireplace out of brick with their own hands is a job for professionals.

Do-it-yourself brick fireplace
In fact, this task is not so difficult, just find a suitable drawing or ordering scheme, stock up on material, and a real fireplace with firewood crackling in it will appear in your house.
Content
Choosing the size and shape of the fireplace
Any construction work begins with a project, and before you start building a fireplace, you need to decide on the size and shape of your hearth, because not only its appearance, but also your safety depends on them.
What size fireplace is considered ideal? There is no single answer to this question, you will have to focus on the size of the room, the classic proportions and the standard brick size.
- Determine the dimensions of the firebox. To do this, we measure the area of \u200b\u200bthe room and divide it by 100. For example, for a living room with an area of 30 square meters, a combustion chamber area of \u200b\u200b0.3 meters is enough.
- Finding the depth of the furnace. In relation to its width, the depth should be 1.5-2.5 times less. So, for a selected area of \u200b\u200bthe furnace of 0.3 meters with a ratio of depth to width of 1: 2, the depth will be 37.5 cm - one and a half bricks, and the width of 75 cm - three bricks.
- Find the height of the furnace.It should be 1.5 times greater than the width: for a firebox three bricks wide, we take a height of just over a meter, which corresponds to 14-15 rows of masonry.
- We determine another important parameter - the area of \u200b\u200bthe smoke hole. It should be related to the firebox area as 1:10 or 1:15. The chimney itself can be slightly wider, while the height of the straight section should not be less than 3 meters and more than 5 meters, otherwise it will be difficult to achieve stable draft.
The easiest way is to use ready-made drawings of brick fireplaces - in this case, you do not have to draw the layout yourself and you will be able to avoid unpleasant surprises during kindling. From the proposed options, you have to choose the fireplace that is most suitable in size and shape, after that you can purchase material and get to work.
Ready-made ordering schemes
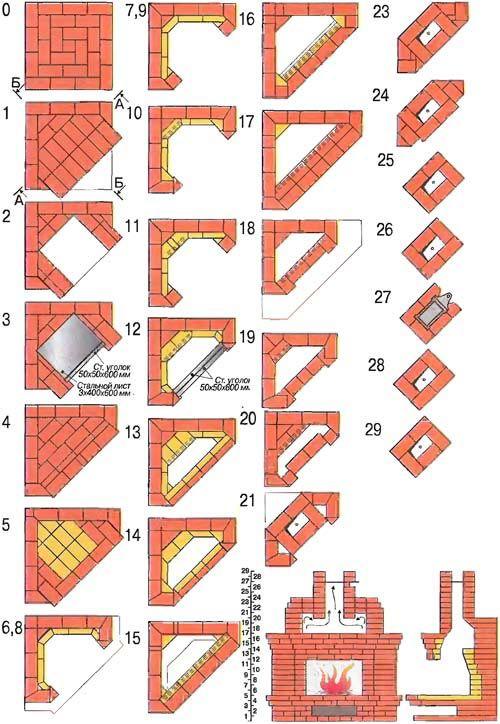
- A brick corner fireplace is usually installed in a small living room or bedroom, because it saves space while effectively heating it. The masonry scheme of such a fireplace is shown in the figure. The dimensions of the fireplace are 1x1 meter. The outer walls are made of ceramic red bricks (200 pieces), the firebox is made of refractory bricks (100 pieces). In addition, you will need clay and sand, cement, concrete for the foundation.

A step-by-step diagram of ordering a brick fireplace - photo
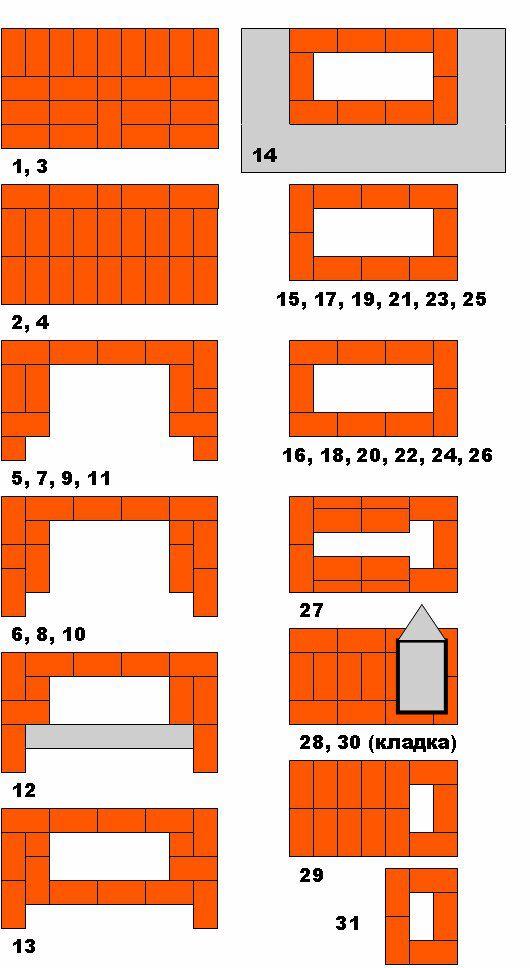
- The simplest brick fireplace scheme for beginner stove-makers is a real salvation, because to install this hearth you will not need much material at all, while it is able to heat a fairly large room - up to 35 square meters. The overall dimensions of such a fireplace are 65x115 cm, the number of ceramic bricks is about 250 pieces, fireclay bricks will need about 100 pieces.Also prepare two bags of oven clay, three or four bags of dry sand, some cement. You will also need a pipe damper and a steel corner for the roof of the firebox. The ordering of a brick fireplace "for beginners" is shown in the figure.
A simple scheme for laying out a brick fireplace
- For a large living room in a classic style, a solid English fireplace is needed. To lay down such a hearth, you need experience with brickwork and strict adherence to the scheme.
Necessary materials:
- red ceramic brick - 300 pieces;
- fireclay bricks - 130 pieces;
- kiln clay or refractory masonry mixture - a couple of bags;
- quarry sand - 4 bags;
- cement - 1 bag;
- metal corner and steel strip - 3 pieces of 1 meter;
- oven door for cleaning the chimney;
- oven damper.
The diagram of a brick fireplace in the English style and its dimensions are shown in the figure.
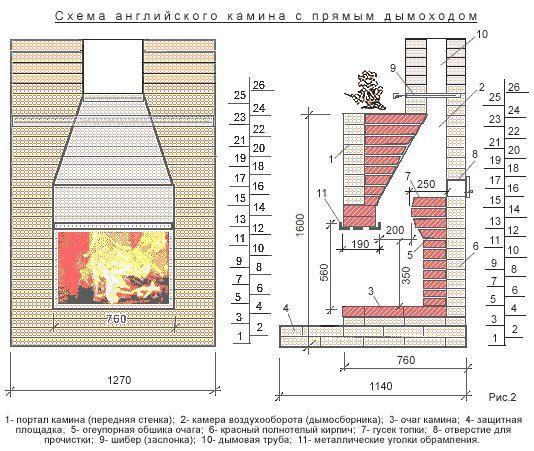
Scheme of an English brick fireplace with a direct chimney - photo
The general techniques for laying fireplaces are very similar, so the article considers the most difficult option - an English brick fireplace with an oblique hood. About how to fold corner fireplace brick, you can learn from articles about corner fireplaces, and laying a simple fireplace for beginners should not be difficult if you carefully study our recommendations.
Fireplace foundation requirements
The stability of the fireplace depends not only on the masonry, but also on the reliability of its foundation. The foundation for the fireplace must be poured separately from the foundation of the building, otherwise seasonal ground shifts may damage the hearth and chimney. If the fireplace is installed near a load-bearing wall, a compensatory sand cushion is made between the strip foundation of the house and the base of the fireplace - they fill it up between the foundations and spill it with water.
The height of the base under the fireplace should be such that the first row of masonry is at the level of the finished floor. The foundation pit can be shallow, while on heaving soils a sand and gravel cushion with a thickness of at least 0.5 meters is required. A layer of sand and gravel compensates for ground shifts and prevents the capillary rise of water from it, which ensures waterproofing of the foundation itself and the walls of the fireplace.
The foundation is poured from M150-M300 concrete with mandatory reinforcement. The formwork is made of boards or plywood, fastening the shields with self-tapping screws. The size of the foundation to be poured must exceed the dimensions of the fireplace on each side by 10 cm. Drawings of brick fireplaces, as a rule, contain the required dimensions, and you can safely use them when pouring the foundation.
After pouring the foundation, it is necessary to withstand the concrete until it reaches its critical strength for about 5-7 days, after which you can start marking and laying the fireplace, having previously laid a double layer of additional waterproofing - roofing material.
Fireplace masonry + instruction and video
The laying of an English-style fireplace with a direct chimney is carried out strictly according to the scheme. Before laying, the wall behind the fireplace is thermally insulated with a metal sheet or thick foil, and the wooden structures are additionally treated with a flame retardant solution for interior work. You should also take care of the fireproof flooring in front of the fireplace, where sparks and embers can get in.
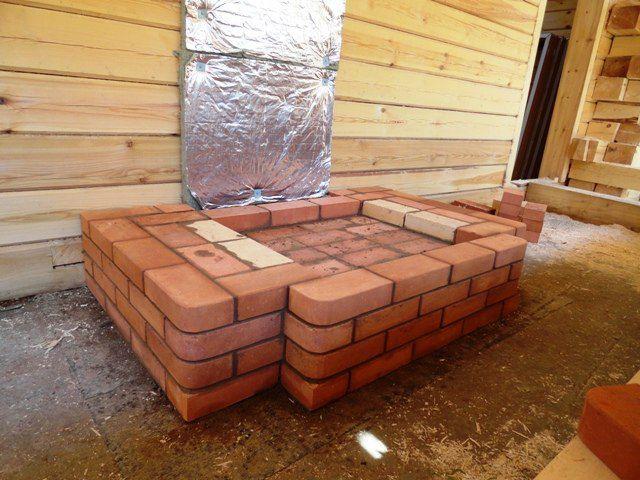
Masonry brick fireplace - photo
Before laying, bricks are sorted, laying aside those that have cracks and chips. They can be used for laying the foundation. Before each stage, it is convenient to lay out the bricks dry, cut them, and grind them.
Before laying, red ceramic bricks are briefly soaked in water, but refractory bricks cannot be wetted; dust and dirt are wiped off its surface with a damp cloth. This measure contributes to a more uniform drying of the masonry mortar. The ordering of a brick fireplace with explanations is shown in the figures.
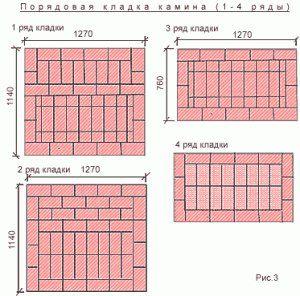
- The base of the fireplace (rows 1 and 2) is made of solid red brick. Its area is 1140 by 1270 mm, two rows of masonry with dressing. Before laying, it is necessary to check the level of the foundation, if necessary, small irregularities can be leveled by increasing the thickness of the seam. The laying of the base is carried out on a cement-sand mortar, the ratio of cement and sand is 1:2 - 1:3. Rows 3 and 4 are laid out similarly according to the scheme, while the bottom of the furnace in row 4 is made of refractory bricks on a fire-resistant mortar. The ratio of clay and sand should be such that the solution does not stick too much to the trowel or spatula, but also does not slip off it.
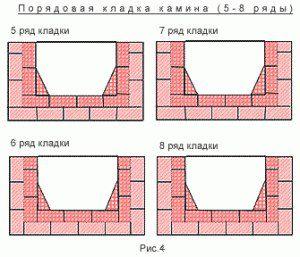
- The next step in laying the fireplace is the execution of the walls of the firebox. They are laid in accordance with the order, and the inner walls are laid out of refractory bricks on a clay mortar, the outer walls are made of ceramic bricks, on a cement-sand mortar or on a mixture of clay and sand with the addition of 10-20% cement. The bricks that form the rear corners of the firebox are cut diagonally with a grinder. This shape of the firebox contributes to better heat transfer.
Ordinal masonry fireplace - the first 4 rows
- Finish laying the firebox. In the twelfth row, to frame the masonry, a corner and a steel strip are installed according to the scheme and order. The back of the twelfth row is made of bonded masonry of brick, cut at an angle so that a vault is formed.
Ordinal laying of a fireplace - 5, 6, 7, 8 row
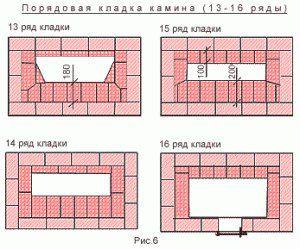
- Rows 13 to 16 form the roof of the fireplace and a gas tooth - a protrusion in its upper front part that prevents back draft and smoke from entering the room. The fifteenth row forms a narrowing of the chimney, due to which increased smoke pressure and increased draft are created. Further, the chimney expands, and in the 16th row a cleaning door is built into it, through which accumulated soot is removed. The inner surface of the chimney is still made of fireclay bricks, the outer one is made of red ceramic.
Ordinal laying of a fireplace 13-16 row - photo
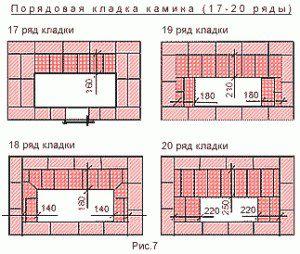
- The next stage is the laying of a gradually narrowing chimney and chimney. It is carried out according to the scheme, while carefully overwriting the seams on the inside with your hand and immediately wiping them with a damp cloth to remove the remaining solution. Any roughness on the walls of the chimney will later lead to the accumulation of soot in this place.
Masonry fireplace 17-20 row
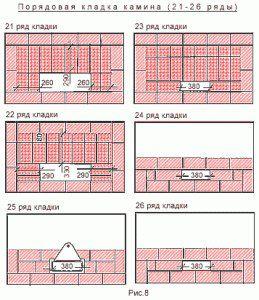
- The last stage is laying the chimney of the fireplace. The lumen of the pipe is narrowed to one brick and blocked in the 25th row with a damper.
Masonry fireplace brick 21-26 rows
- make a brick pipe of the required height. The fireplace is dried for 2-5 days at room temperature, after which they begin to slowly heat, achieving uniform heating and sintering of the clay solution on which the firebox is laid. This will avoid its crumbling and extend the life of the hearth. After laying and heating, you can proceed to fireplace trim.
Video - do-it-yourself brick fireplace