Brick stoves are a source of a healthy atmosphere and fresh air (due to draft and constant air renewal in the room), there is no need for additional installation of radiators, such structures accumulate heat well and heat the air in several rooms at the same time.
Firewood as fuel is cheap, especially if your house is located in a suburban area. And preparing them yourself is very healthy.
During construction, it is necessary to strictly follow all the instructions, follow the masonry technology, monitor the horizontal rows and the verticality of the walls. This will avoid distortion of the structure and possible breakdowns.
The optimal location of the furnace is in the center of the house.
Content
Types of brick wood-burning stoves
- heating;
- For cooking (the forerunners of modern stoves);
- Cooking and heating (a combination of the two previous models);
- Special (the design is intended for special needs - drying clothes, etc.).
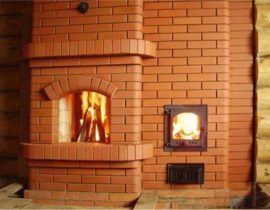
Heating stove with oven - step by step

Construction is desirable to carry out in the summer, at a constant air temperature.
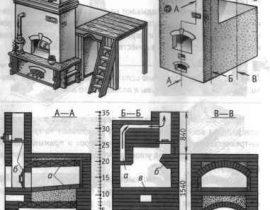
For construction you will need: brick - 220 pieces, three doors for the firebox (13x13 centimeters), a cleaning door (14x14 cm), a cast-iron stove (38x35 cm), an oven (32x28x42 cm), a valve (27x13 cm), an asbestos cement sheet, a grate - a grate (20x30 cm), steel strip 4 mm thick (35x25 cm).
Laying instructions:
Before laying, be sure to build a foundation. We choose the type of foundation after examining the type of soil and the level of groundwater. We are waiting for the complete hardening of the foundation and proceed to construction.

We print out the drawing, prepare a tape measure and a building level. Before construction, it is recommended, as a training, to lay out the oven without mortar in order to avoid mistakes in the future. The rows will be numbered along the masonry for convenience. Be sure to use plumb lines and check the quality of the brick (no chips or cracks). Soak bricks in water.
- The first two rows are laid out according to the drawing, solid. To do this, you need 10 bricks for each row.
- In the third row, we lay the ash pan and install the blower door (we fasten it to the wire and special metal fasteners).
- 4: we build this row, referring to the order, building up the walls.
- 5: we are building a brick ceiling above the blower door, we are laying the grate (do not forget to leave a small gap from the metal grate of the grate to the brickwork, we fill the gap with sand).
- Next, we take an asbestos cord and wrap it around the frame of the furnace door. We are building the sixth row, clamping the fastening of the door with bricks.
- The seventh and eighth rows - we build up the walls, observing the order, again referring to the drawing.
- In the ninth row, we lay bricks on top of the firebox door, creating an overlap above it.In this row, we begin to build a smoke box and finish it by the eleventh row.
- To separate the cooking zone and the smoke exhaust channel, we lay a strip of steel, which will additionally support the bricks laid on the edge. We fix the cast-iron hob (row number 12).
- From the thirteenth to the fifteenth row, lay out the bricks "on edge". Cover the cooking chamber with a layer of asbestos cement.
- Sixteenth row - we build the bottom of the first channel, which will be located horizontally.
- In the seventeenth and eighteenth rows we put a cleaning door, we build up the walls of the furnace.
- Nineteenth row - we block the door from above with bricks. We form a jumper in the center of the smoke circulation.
- The twentieth row according to the drawing (we build the walls of the furnace, bandaging the previous row).
- The next two rows (21-22) are the construction of a cleaning hole and the completion of the smoke circulation masonry.
- After that, we install the oven, and up to the 27th row we make masonry according to the drawing. In the 27th and 28th rows, we leave a space between the bricks to clean the furnace.
- Then we make a complete overlap of the furnace and install the valves (29-31).
- From the thirty-second row we build a chimney and bring the chimney to the street.
How to kindle a brick oven with wood?
We inspect the furnace and pipes for cracks. If they are, cover with a solution of clay. We clean the furnace from combustion products. We prepare firewood. Warm up the chimney. We put firewood in the firebox, leaving the blower door ajar for air access. For uniform burning of firewood we turn with a poker in the process of their burning. Additional firewood is best done after the formation of the first coals.
We make a wood-burning stove for the house: Instructions for building a brick oven


Such a stove is optimal for heating two rooms or a house with an area of 30-40 sq.m.
The furnace has three flue channels arranged vertically. Their length is more than four meters. It has two firing modes - summer and winter.
For work we get:
- full-bodied ceramic bricks M175 - 400 pieces;
- refractory bricks - 20 pieces (SHB8);
- two-burner cast-iron stove 70x40 cm;
- valves 28x18 cm - 2 pieces;
- furnace door 27x30 cm;
- blower doors 2 pieces 15x16 cm;
- masonry tools (trowels, mortar containers, etc.).
We build the foundation for the furnace and proceed to laying out the first row. It is the most important, as it sets the dimensions of the furnace. The thickness of vertical seams is not more than 8 mm.

Second row: we bandage the initial row and lay the foundation for the fire cut.

Third row: we form a chamber for collecting ash and install a blower door.

Fourth row: we continue the construction of the ash collection chamber. And in the future, the combustion chamber will be lined with fireclay bricks. In the same row, we produce fasteners for the cleaning door and the formation of the lower horizontal channel.

Fifth row: we block the blower door with one solid brick, since its length is only 14 cm. We continue the construction of a horizontal channel and a fire separation between the stove and the walls of the house.

Sixth row: we make the overlap of the cleaning door and the horizontal lower channel. At the same time, we see the formation of two vertical smoke channels 12x12 cm.

We denote the left channel with the number 1 (it will be directly connected to the chimney), the right one - with the number 3 (a long channel for the passage of gases and heating the furnace in winter). The dimensions of the outlet channel are 25x12 cm.

Seventh row: we continue to form channels and install the furnace door.

Eighth row: we bandage row number seven and form the second vertical channel of the furnace.

We put the valve of the summer course. If you open it, the smoke will directly enter the chimney without overheating the room excessively. If the valve is closed, flue gases will enter channel number 3 and pass along a long path, heating the entire structure of the furnace and, accordingly, the room.

The ninth row is similar to the eighth. We are preparing a support for installing the locking of the furnace door.

Tenth row: we close the furnace door and connect channel 1 and channel 2. Here, flue gases will pass from the second channel to the first when burning in winter mode.

From fireclay bricks we cut out slots for the grate of the grate and put it inside the furnace. We isolate the back wall with mineral wool.

We continue laying the walls of the furnace and lay the grate.

Next, we produce the lining of the furnace with fireclay.

We complete the pass.

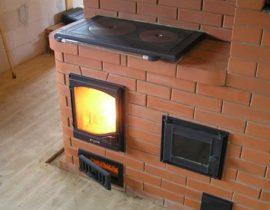
We are laying a cast-iron slab 40x70 cm (11th row).
 for our brick oven")
First, we lay the slab on the bricks “dry”, we make a pencil marking of the perimeter of the slab. We cut a recess in the brickwork for the stove with a grinder. The depth of the recess is 10-15 mm. We lay the seal (asbestos cord). Put a plate on top. We check its horizontality.
12 row: we make a three-channel heating shield.

The 13th row overlaps the previous one and so on until the 18th row. In the 18th row, we install the second valve. 19 row - we continue construction. 20-21 row: we block all channels except the first. 22 row: we begin the construction of a chimney.
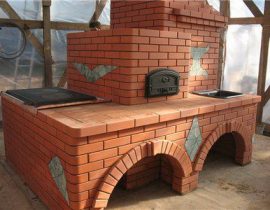
Such brick wood-burning stoves are able to quickly heat the room, and are suitable for cooking.After the construction is completed, it is important to finish the stove with natural or artificial stone, ceramic tiles or plaster the surface.
Laying a brick oven 3 by 3.5 meters: 9 thousand rubles for materials and a week of work