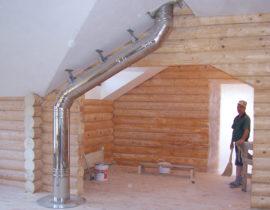
Competent construction of the chimney — the process is the same serious, as well as the construction of the furnace itself.
Do-it-yourself brick chimneys
How correctly and accurately this work is done, the owner will protect his house and household from fire or carbon monoxide poisoning. Therefore, the construction of this element must be taken very responsibly and everything must be done as correctly as possible and according to the instructions. Do-it-yourself brick chimneys can be built, if have experience in this work, but in case when she is a stranger, it is better to trust her professional. If you are not confident in your abilities, it is better not to start.
Content
Types of chimneys
chimney brick pipes can be of two types: indigenous and mounted. In each case, one of them is selected for construction, the one that is suitable for a particular furnace.
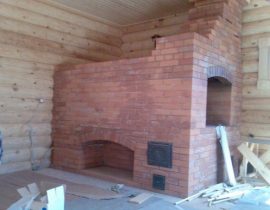
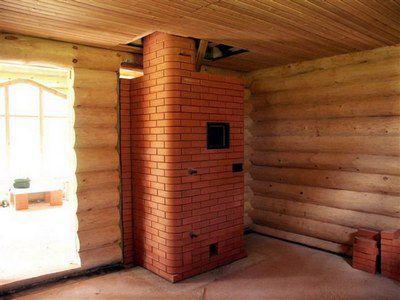
- Root chimneys differ from wall chimneys in that they are not built as a continuation of the furnace structure, but autonomously, near the place where the furnace will be installed, and then connected to it by a pipe.
Typical indigenous chimney
This is a chimney building. fit for cast iron and brick heating appliances, and even two or three stoves can be connected to one root chimney. Naturally, in this case, in its internal section, it must correspond to the necessary parameters for certain quantities connected heating appliances to it.
If a root chimney is installed, to which a pipe from a cast-iron stove or gas-fired boiler will be connected, then installation may be required inside chimney metal pipe channel.
The root chimney is installed on a foundation, separate from the common house and stove. The depth of the foundation pit must be at least 30—50 centimeters, depending on the height and width of the chimney, as well as its perimeter must be 12 more than the base of the chimney structure—15 centimeters.
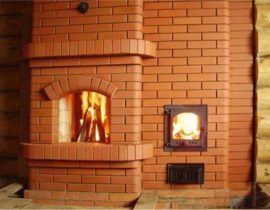
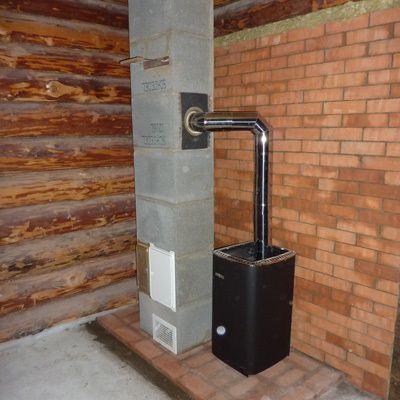
- Chimney pipe — this is a continuation of the design of the furnace, which is her an integral part. Such a pipe is designed to discharge combustion waste only for one furnace, of which it is a continuation.
Overhead chimney
Components of a chimney
The principle of construction of both types of chimneys is the same, but if two or three furnace, it can have several risers and several cuts, the number of which will depend on the number of floors of the house.
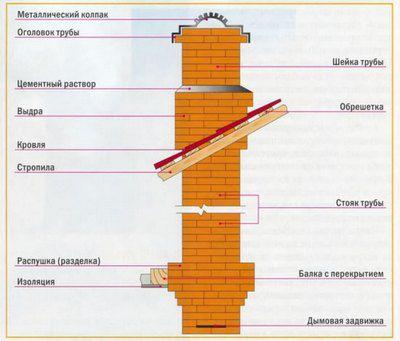
Parts and sections of the chimney
On the given The figure can be considered all parts of the chimney structure, which consists of the following elements and departments:
- Furnace neck — is the part of the chimney that goes from oven to cutting. It has a smoke valve that will regulate the draft required for the intensity of combustion or smoldering of the fuel.
- Pipe cutting or fluffing is arranged at the pipe passage of each ceiling, and is designed to protect combustible ceilings from high temperatures. It has thicker walls compared to the rest of the flue duct. Her thickness must be at least 35—40 centimeters so thus creating around the perimeter insulation from 20—25 centimeters.
- pipe riser — it is a brick pillar with a chimney inside. It is located, how before cutting, and in the attic floor.
- Otter — this part is located immediately above the roof and protects the pipe from moisture - rain, snow, condensation and etc..
- The neck of the tube rises immediately above the otter.
- An otter with a platform, a neck and a protruding cap together make up the head of the pipe.
- A cap or umbrella is attached to the top of the cap to prevent inside channel of various contaminants and moisture. Also, this device is able to create normal draft in the chimney channel.
Chimney masonry
Scheme
The first thing to do — is to carefully read the chimney diagram and figure out how fit each of its rows. You can choose one of many schemes - better than the one on which everything will become extremely clear. When laying a conventional brick oven, fit ordering for a standard brick chimney.
One of the most common chimney arrangements
Construction of the overhead pipe
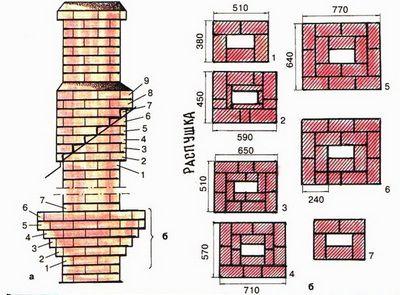
When installing the overhead pipe, the laying of the furnace structure itself ends in 50—60 centimeters to the ceiling, and then the direct construction begins chimney channel. This diagram shows two options for laying the chimney: square and rectangular.
- According to the scheme of the first row, the chimney neck is erected before cutting. In each subsequent row bricks stacked in such a way that the middle brick covered the seam between bricks the previous row.
Laying out three four row according to this scheme of the first row, the removal of the pipe fluff begins.

This is what the fluff looks like...
- The figure of the second row clearly shows that the bricks are stacked with a shift to the outside by one third of the brick. To perfectly fit the piece material, have to use the division of a solid brick into two or three parts along or across.
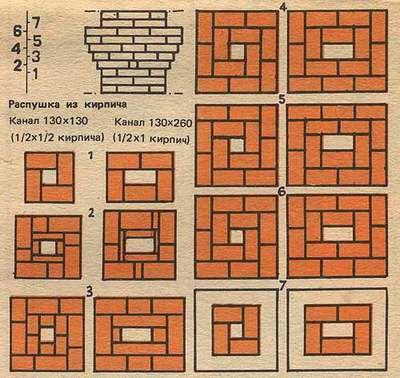
... and this is her order
At everyone In this case, it must be remembered that the chimney channel must retain its original cross section, since the point of thickening its walls is to increase safety for overlapping during operation. Especially since constriction or expansion of the internal cavity can adversely affect draft during combustion.
- Third, fourth and the fifth rows of fluff are also laid out with a shift to the outside, while maintaining the clearance of the channel.
- The sixth row is the same size as the fifth row and is laid out flush with the outer and inner edges of the flue wall.
- The seventh and eighth rows are laid out according to the scheme of the first row.
Having finished laying the fluff, you can proceed to work on the otter, and here you need to try very hard, since each row forms another step and protrudes to the outside, by one third.
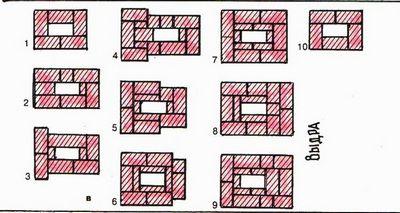
Otter ordering
- The first row is laid the same size as the last row of fluff.
- From the second row they begin to lay out the first step, and goes expansion of the chimney to the outside.
- Further, following the scheme, the remaining eight rows are laid out.
After the laying of the otter is completed, the neck of the pipe is laid out, which it is displayed according to the scheme of the first row to the top two rows of the cap, where the brick is also laid with a ledge to the outside.
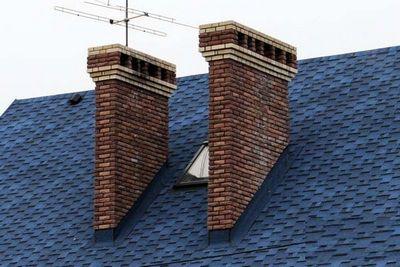
Pipe height above ridge
The chimney must rise above the roof ridge by half a meter, if it is locatedon on one and a half meters from him horizontally.
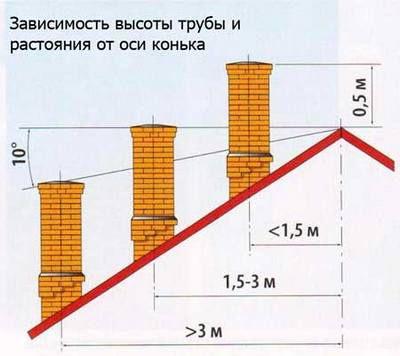
Mutual arrangement of the pipe and the roof ridge
If it is located below the slope, her raised flush with the ridge or lower by no more than 10 degrees at an angle to the ridge. These parameters must be strictly observed, as they ensure the safety of the operation of the heating facility, verified by many years of experience.
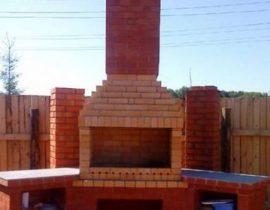
Another, somewhat simplified version of the chimney
Another option for laying a chimney can be a simple straight construction. She is fit for those who do not have experience in performing given type of construction.
- The entire chimney, from the furnace to the head, is laid out in an even column with a channel inside, and all the elements necessary for it are made using formwork, cement mortar and reinforcement with a metal rod with a thickness of four up to seven millimeters.
- In the area where fluffing should begin, formwork is arranged, of the desired size and shape.
- A metal rod or mesh is fixed on the pipe.
- The formwork is coated with a thin layer of clay mortar. It is needed so that formwork boards can be easily removed from the hardened concrete solution.
- Then a concrete solution is laid in the formwork and left until completely solidified.
- After curing cement, the formwork is removed, and all concrete parts, if necessary, are leveled to giving they look neat.
In this way, the complexities of masonry configurations can be bypassed. Of course, this work will take much more time, but it is impossible to make a mistake in it. The main thing — correctly, neatly and evenly arrange the formwork.
Fluff insulation
Despite the thickness of the fluff walls, it is necessary to her when passing through the ceiling, arrange thermal insulation. Her they make felt from asbestos impregnated with clay, or a metal box is arranged, which is covered with expanded clay or sand. Fluff must be insulatedon on the entire thickness of the ceiling.
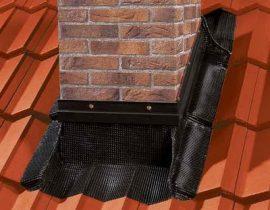
Passage waterproofing
After completing the laying of the cap, you can install an umbrella and proceed to waterproofing the passage of the pipe through the roof.
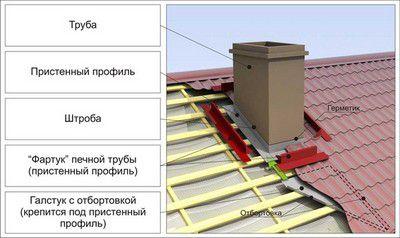
Approximate chimney waterproofing scheme
Waterproofing — this is a very important point in the device of the chimney, and from her depends on the durability and efficiency of its work.
The distance formed between the pipe and the roof must be covered with an apron. Most often, roofing material is used for these purposes, which is fixed to the sealant.
From above, this waterproofing layer is formed with an “apron”, which is made from a wall profile or from a special waterproofing tape. It is also attached to the roofing material with a sealant, and is fixed on the pipe with a bar designed for this.
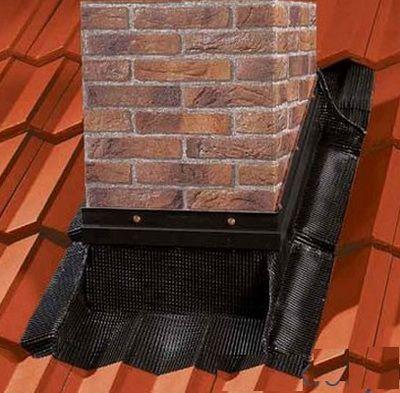
"Apron" for the chimney pipe
Tips from experienced craftsmen
In order for the chimney system to work efficiently, you need to follow some recommendations that professional stove makers always take into account.
- When laying brick rows, be sure to carefully select the excess mortar that will protrude inside chimney channel.These surfaces must be very even so that as little as possible soot deposits settle on them.
- Ligation of bricks in the brickwork of the chimney requires special attention, since in such a construction a large number of non-solid bricks can be used, but their halves, plates, third or fourth parts. To evenly cut or chip off the bricks, you can use the "grinder" (grinder). If you file the desired part with it, it will be easier to separate the fragmentnt trfucking size. Plates that are needed in some rows of masonry, have to saw off completely, as such thin parts can simply break.
- The seams in the chimney masonry should not be too thick - their thickness can be four five millimeters. This must be observed because the solution, even in a solidified state, is more susceptible to destruction when exposed to external factors than tempered brick.
- And, of course, a very important measure in the maintenance of the chimney during its operation is its timely cleaning or periodic preventive maintenance to prevent its clogging.
DIY chimney laying video tutorial
Chimney masonry — a very difficult event, as it takes place at a height and requires maximum care. Therefore, you need to realistically assess your strengths and capabilities. If there is any doubt that this work is feasible to do on your own, then it is better to entrust her experienced craftsman.