In many fairy tales known to us since childhood, a Russian stove appears, on which they rest, bake bread and cook food, cure diseases of the respiratory system, musculoskeletal system. And these functions are not empty tales at all. The brick perfectly accumulates heat, evenly distributing it, so it is always warm and comfortable on the couch.

The Russian stove is beautiful and multifunctional. It is not only good to relax on a stove bench (horizontal overlap of the top of the Russian stove), it is suitable for drying clothes, shoes, herbs and fruits, this becomes especially important in the fall, during the rainy season and stockpiling for the winter.
Sometimes the couch (bed) was made bunk. Adults settled on the lower shelf, and children were laid down on the upper one, where warm air created an atmosphere of comfort. In the oven itself, insanely delicious bread and various food are obtained, which are fried, boiled or simmered. Craftsmen adapted the Russian stove for firing clay toys and dishes. The most interesting use of large-sized stoves is instead of a bath. A vat of water was placed in the firebox, the bottom was thoroughly cleaned, lined with straw, and then hygienic procedures were performed.
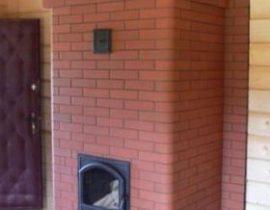
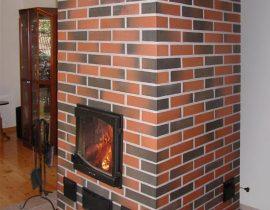
Currently, stoves with a stove bench are being built both in country houses and in cottages. But if earlier, in order to climb onto the stove bench, you had to use a ladder, now the furnace design has been modernized and the stove bench is placed at a height of about one meter from the floor level. This is especially true in families with children and the elderly.
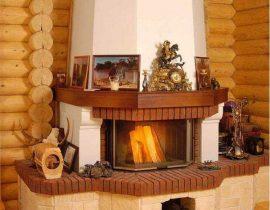
In the modernized designs of the furnace, beautiful fireplaces are equipped.And externally, the decoration is made with decorative embossed tiles - tiles, turning stoves into a real treasure.
Let's summarize the pros and cons of a stove with a stove bench.
Advantages of the furnace:
- - high efficiency;
- - good heat accumulation and uniform heat transfer;
- - ease of operation;
- - safety;
- - long service life - up to 30 years or more;
- - therapeutic effect;
- - with the right location, the stove with a stove bench does not take up much space and allows you to heat several rooms at the same time;
- - the oven retains heat well after heating;
- - the stove with a bench aesthetically fits into any interior.
- Flaws:
- - masonry requires skill and professionalism;
- - solid fuel used in the Russian stove - the cause of the appearance of garbage in the house, takes up space, takes time to harvest it (chopping firewood);
- — high fuel consumption;
- - in the classical design, only the upper and middle parts were warm, while the lower part of the furnace remained cold, which required modernization and improvement of the furnace model with a stove bench.
Content
Description of the Russian stove with a stove bench
Classic oven dimensions: width about one and a half meters (two arshins); length - a little more than two meters (three arshins); the couch was placed at a height of approximately human height - approximately 180 centimeters (or two and a half arshins), the height of the hearth was approximately 45 cm, the height of the hearth was taken equal to the height of the table.
The furnace was erected on a foundation of small fragments of bricks, stones, less often on a log foundation (oak, pine and other species).The structure was erected simultaneously with the house, but their foundations are by no means built together, isolation is required. The stove itself was built either from baked bricks or from raw bricks (in those families where income did not allow using red brick for construction). The first "smokers" (chimneys) were made of wood, then, due to the fire hazard of the material, the wood was replaced with stone and brick.
Furnace construction: crucible - a firebox, a place where fuel is burned; a sixth and a subsheath - an auxiliary table for dishes and a niche under it; under - the bottom of the firebox; hailo - a hole for the release of smoke into the hut; podpeche - space for storing firewood; mouth - a hole for laying firewood, closed by a damper.

Operating principle
The fuel placed in the front part of the combustion chamber releases heat during combustion. To maintain the process of uniform combustion, air enters through the lower plane. Hot flue gases go up into the chimney, bypassing the mouth, shield, hailo and a special threshold in front of the shield, designed to keep hot gases in the crucible. The walls of the structure heat up very slowly and cool down just as slowly.
Russian stove with a do-it-yourself stove bench
Before engaging in the preparation of materials and tools, we prepare drawings in order. The drawings should reflect the number of bricks, fittings, dimensions.
Foundation
Foundation options:
- rubble concrete;
- brick;
- reinforced concrete from blocks 40x20x20;
- monolithic reinforced - the most common and simple.
1. We dig a foundation pit. The size of the foundation is equal to the size of the base of the furnace, plus 15-20 cm.
2. Lay the filter pad. We lay wet sand on the bottom of the pit.We tamp it until it stops settling, periodically pouring a new portion.
3. We lay gravel on a layer of sand, medium-sized pieces of broken bricks, again a thin layer of sand, moisten, tamp. Next, we pour another layer of rubble about ten centimeters thick, we tamp it down.
4. We cover the rubble with two sheets of waterproofing.
5. Install the formwork. To do this, we install boards or plywood in the pit. At the same time, we leave a distance of 10 cm between the walls of the pit and the “box”. We insure the boards with supports and strongly moisten them so that the wood does not draw moisture out of the solution.
6. To lay the reinforcement, pour 4-5 cm of cement mortar into the formwork. While the cement sets, we tie the metal rods with wire strictly perpendicular. The distance from the ends of the rods to the formwork is 1-2 cm.

7. We knead a solution of cement (1 part), sand (3 parts) and crushed stone (5 parts). The solution is poured in layers of 20 cm. We tamp each of them using a vibropress or a manual tamper.
8. When the solution sets, cover it with waterproofing (tarpaulin, roofing felt, etc.).
Important! Be sure to check the horizontality of the filled solution. We use the building level. In case of improper pouring of the foundation, the design of the furnace may warp or crack.
We prepare materials
In order to build a classic stove, you will need: about eighty buckets of cement, the corresponding amount of fine sand, clay, 1700 bricks, a view with a half-door and a valve (the hole inside is 26x24 cm).
Ordinal guide to the construction of the Russian furnace

1) We use refractory fireclay bricks.To achieve the correct dressing (brick seams), we cut each brick by ¾ and install three such bricks in the corners of the masonry so that they exactly adjoin each other.
2) We are building the walls of the future guardianship.
3) In this row, we use four ¾ bricks.
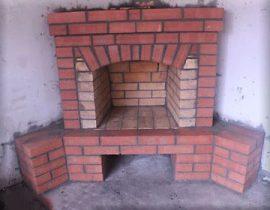
4) We build row number 4 from solid bricks. For those bricks that will be located at the base of the oven, we break off the corners. These bricks will become supports (heels) at the arch. We install a wooden form for laying the arch, then we make the laying of the arch. We bevel the bricks, for accuracy using a thread stretched from the center of the formwork to the upper edge of the brick.
5) In this row, it is necessary to mow 20 bricks at an angle. This angle is necessary for the construction of the vault of the furnace.

6) We make the walls from the sides one brick thick. We lay out the front and rear walls in two layers thick. We insert a wooden semicircular formwork between the side walls. According to this form, we lay out the arch of the furnace. In the future, the formwork will need to be removed, so it must be collapsible.
Let's start laying the vault. We make the gaps between bricks the same, fill them with mortar. For strength, you can put a small piece of brick into the gaps.

7-8) We carry out construction, strictly observing the dressing. We use plumb lines to check the verticality of the faces. In the eighth row we make the base for the cold stove.
9) We build a stove, a row of solid fireclay, at the corners of 1/2 and 3/4 parts.
10) We line up a row, between the walls we fill up a layer of fine sand.
11) We make a continuous laying-overlap on top of the sand backfill.
12) We build under the furnace and hearth. Chamottes forming under the stoves do not need to be fastened with cement. We cover the space (slots) between them with sand.In the left corner of the hearth we make a furnace - a recess for hot coals.
13) We build the walls of the cooking chamber and the walls of the hearth. For the mouth of the furnace, we install a metal perforated arc between the crucible and the hearth. We insert a plastic iron or copper wire into the perforation, which is then embedded in the mortar between the brickwork.
14-16) We build rows of crucible and hearth.
17) We lay the supports for the vault of the crucible - 8 beveled chamottes. We fix wooden formwork on them. We lay out an arch of ½ bricks.
18) We build an arch.

19-22) We lay out solid rows (we build an overlap on which it will be arranged couch). Before 22, we fill up the sand nearby. We leave an open opening above the pole.
23) Building up the walls. On the right we make a hole for the convenience of cleaning the furnace from ash.
24-26) We block the overtube. We leave an opening for the chimney and the view.
27-28) We install a half-door opposite the view.
29-30) We are still building the walls of the overtube.
31) We make a number of additional bricks (3 pcs).
32) We make the overlap of the overtube, on the right we fasten the valve.
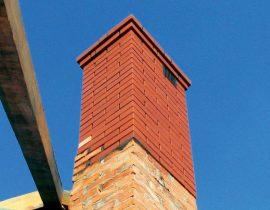
33) Building a chimney. All rows are the same, six bricks each. At the ceiling we make a brick overlap.
After construction, we let the stoves dry, check the draft and produce the exterior finish.
Video - Russian stove with stove bench