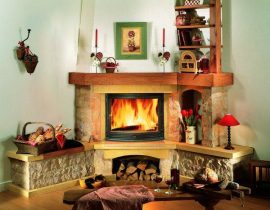
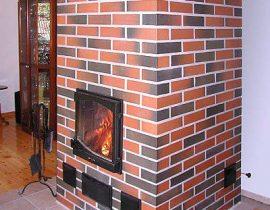
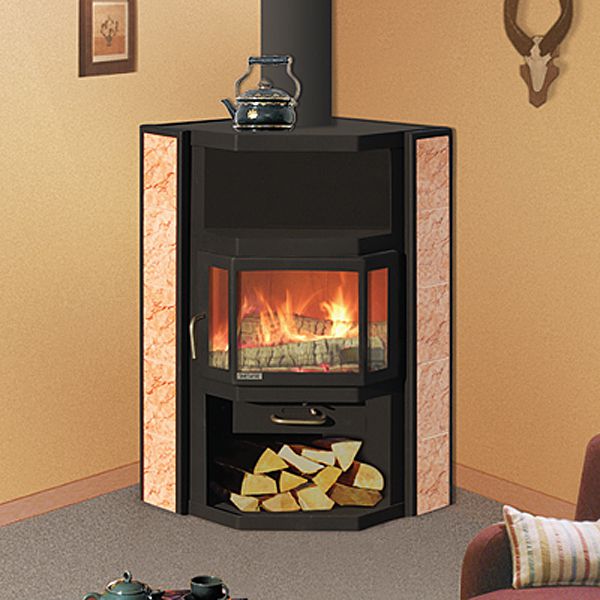
A corner fireplace stove is an excellent choice that allows you not only to quickly warm the air in the country house and cook food, but also save space with a peculiar type of placement. In addition, such a stove differs from a conventional fireplace in a greater heat capacity, which allows you to maintain a comfortable atmosphere.
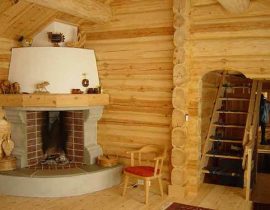
Corner stove-fireplace in a wooden country house
Fireplace stoves can be made of both brick and metal. This article will help you understand the features of each individual type and make the right choice.
Content
Metal fireplace stoves, are they suitable for corner placement?
The main feature of these furnaces is their compactness and high heating rate. The metal corner stove-fireplace is a heater with a firebox covered with refractory glass. Depending on the model, such an oven can be equipped with a cooking stove and a heat exchanger tank for connecting a water heating circuit. The advantages of such ovens include:
- Small size and weight;
- Possibility of installation on any floor, without foundation device;
- High efficiency;
- Attractive appearance;
- Ease of installation;
- Low price;
- Safety.
Is the long burn function useful?
Models equipped with a long burning function are also very economical and have a high efficiency: in this mode, oxygen is supplied to the stove in a dosed manner, and active burning of firewood does not occur. With slow smoldering of coals, the heat transfer from the furnace increases, the fuel is burned without the formation of a large amount of ash. On one full load of firewood in the long-burning mode, the stove can work up to 6 hours, while the sealed door will protect you from accidentally flying coals and sparks.
In addition, in the "long burning" mode, the gases that are released during the smoldering of firewood are actively burned in the furnace. In normal combustion, these gases are removed through the flue system and in no way increase efficiency. If these gases are not removed, but immediately burned, it is noticed increase in productivity by 15-20% compared to conventional ovens. This is not fantasy, just imagine that with this option you need to harvest 15-20% less firewood for the winter than before! Questions about expediency instantly dissipate!
Attention! When choosing the long-burning mode, it is highly recommended not to open the stove door until the firewood of one load is completely burned !!! You let in excess oxygen, which greatly reduces efficiency and eliminates this option!
Fireplace stoves with a water circuit allow you to connect a water heating system to them, due to which a full-fledged heating of the house is created. The stove in the upper part allows you to cook food, boil water, and also creates an additional plane with high heat dissipation, near which it is just nice to warm your hands!
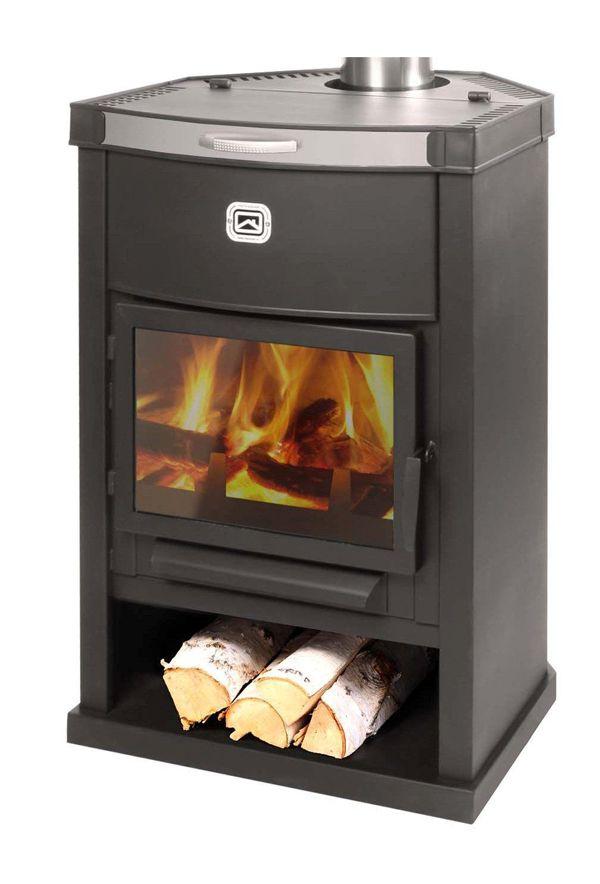
Wood burning stove, which you can buy in the store
The following models of corner stoves-fireplaces are most popular with summer residents:
1. The stove-fireplace "Bavaria" is made of 6 mm steel, lined with fireclay bricks from the inside. The power of the stove is 6 kW, which allows you to heat a house up to 60 square meters. The long burning mode of this stove is 3-5 hours, the stove is equipped with refractory glass, which, thanks to the clean combustion system, is not subject to soot, as well as a thermally insulated door handle, which will allow you not to get burned. The side walls of the furnace are lined with ceramics, which gives it an attractive appearance.

Corner stove-fireplace "Bavria"
2. The furnace-fireplace "Amur" is equipped with a panoramic glass with a blowing system - it does not leave soot and soot. At the top is the hob. The model is made of heat-resistant steel with a lining, the power of 9 kW allows you to heat up to 180 cubic meters of space, which with standard ceilings corresponds to an area of 60-80 square meters. The stove is lined with ceramic panels that improve heat transfer, even with complete combustion of the fuel - the stones will heat you for several more hours!
Stove-fireplace "Amur"
3. The Neva fireplace stove is generally similar to the Amur, but its power is lower - 6 kW. Such a stove can be recommended to owners of small houses with an area of 50-60 square meters. All heating surfaces of the furnace are covered with heat-resistant paint, thanks to which it retains a decent appearance for a long time and does not corrode.
4. The Teplodar corner stove with a power of 12 kW is designed for houses with an area of up to 80 square meters. The case is made of stainless steel and is resistant to burning. The door is equipped with a heat-resistant glass-ceramic window that allows you to admire the live fire. The stove at the top has a hob, a firewood rack in the lower part of the body, as well as an ash pan with convenient extraction.A good choice for connoisseurs of reliability and beauty.
Furnace "Teplodar"
All models can be installed on a finished floor finished with non-combustible materials: metal sheet, tile or porcelain stoneware. Their low weight avoids the reconstruction of ceilings and does not require a separate foundation. Fireplace stoves of this class can be installed on any floor of the house.
When installing a fireplace stove, consider the convenient delivery of combustible material so as not to carry firewood to the second floor!
Brick stoves, fireplaces, is it that simple?
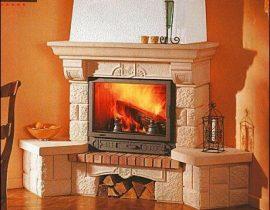
The main difference between brick fireplace stoves is their unique style. Despite the difficulties that arise during their installation - the need to build a foundation, the complexity of masonry - they are always popular with summer residents, because a brick fireplace with crackling firewood is a symbol of comfort and home. The corner fireplace stove has a number of undeniable advantages that their owners love so much, read and think, maybe it’s better to spend a little more time and money and make a capital brick building? Obvious pluses:
- High heat capacity, allowing you to maintain a comfortable temperature for a long time;
- Decent appearance and a large selection of finishes, which allows you to fit the stove into any interior;
- The durability of the fireplace stove, unlike the walls of inexpensive metal stoves, the brick is not prone to burnout and destruction;
- The ability to build a furnace of any thermal power and size, clearly according to your needs;
- The safety of the furnace when touched - in a brick, unlike metal, there are practically no surfaces on which you can get burned.
The choice of models of corner stoves-fireplaces is very large, because a competent stove-maker who is familiar with the laws of thermodynamics and the arrangement of smoke channels can design for you a stove of any configuration that will fit into any corner of your dacha. Of course, this will require additional financial investments, so most summer residents who decide to lay a fireplace stove with their own hands use ready-made ordering schemes. The article presents the corner masonry technology fireplace stove designed by V. Grigoriev. Having mastered the basic techniques of masonry, you can easily make a fireplace according to any scheme.
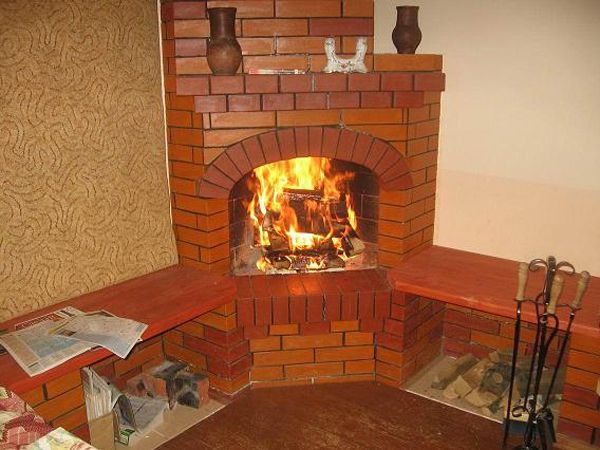
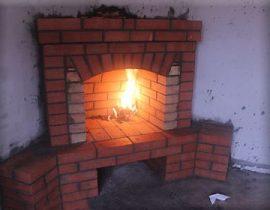
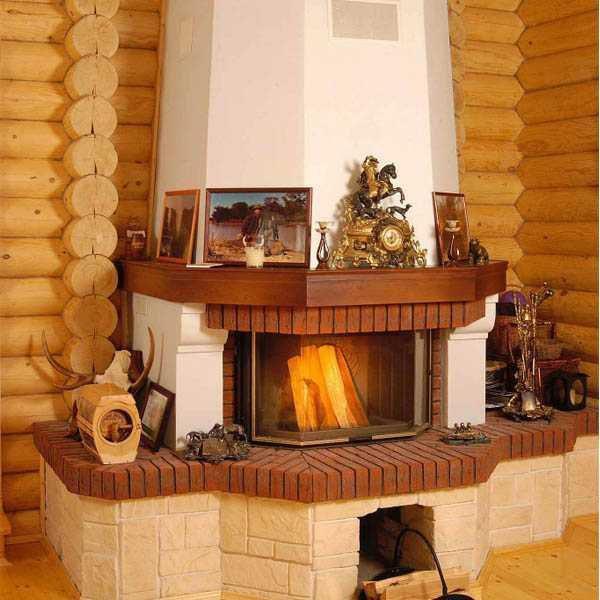
Red brick corner stove
Technology of laying a corner stove-fireplace made of bricks
The corner stove-fireplace for giving the design of V. Grigoriev is a stove with two fireboxes - a fireplace and a stove. The furnaces are located in different planes: the furnace furnace is on one of the sides of the furnace, facing the adjacent room or kitchen compartment, and the fireplace insert is facing the center of the room. This design allows you to admire the live fire from almost anywhere in the room, at the same time, the hob is hidden and does not spoil the appearance, which is very important in modern design!
From the possibility of the stove, it is worth noting the possibility of separate or simultaneous use of both fireboxes, while flue gases are discharged through a common chimney. Smoke channels are united in the upper part of the furnace and blocked by valves - this eliminates smoke when using one furnace and tipping of the draft. Furnace dimensions - 1270x890 mm. The necessary materials and furnace equipment are indicated in the table.
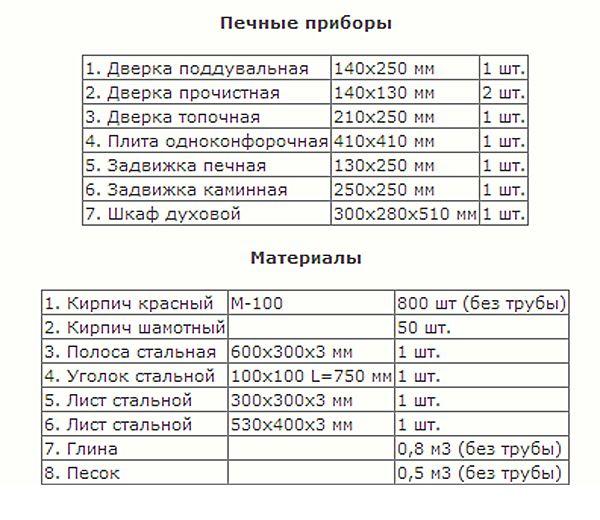
Materials for a fireplace stove, table 1
Masonry scheme - ordering and general view of the furnace are shown in the figures. The laying technology for each row is described below.
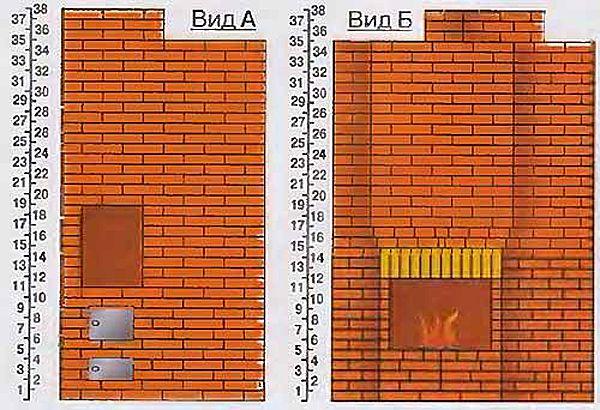
General view of the corner stove for giving
Foundation
The foundation of the furnace is made of monolithic concrete with reinforcement. The dimensions of the foundation must exceed the dimensions of the hearth of the furnace by 10 cm on each side. The technology for its implementation is described below.
1. Mark the future foundation. At the same time, it must be borne in mind that it is strictly forbidden to combine it with the common foundation of the house, this can lead to the destruction of the furnace!
2. Dig a pit of a suitable size, its depth should be equal to the depth of the foundation of the house. Country houses are usually placed on a shallow strip foundation, its underground part is deepened by no more than 50 cm.
3. The bottom of the pit is covered with a ten-centimeter layer of sand, watered with a volume of water sufficient for complete wetting and carefully rammed. This can be done by trimming a log or a special tool.
4. Formwork is made from boards 25 mm thick or plywood. It can be made fixed, in which case it is recommended to waterproof it.
5. Reinforcement is laid from the D8-D12 bar in the form of a 15x15 cm lattice, at the intersection of the bars they are tied with wire. With a foundation height of more than 20 cm, it is necessary to make two layers of reinforcement - above and below.
6. Knead concrete from cement grade not lower than M250, crushed stone and river sand in a ratio of 1: 2: 2, add enough water so that the solution is of medium density. Pouring concrete into formwork. It is better to do this at a time, without waiting for the previous portions to solidify. If it is not possible to knead such an amount of concrete immediately, it must be laid in layers with an interval of 2-3 days, while the previous layers are cleaned with a metal brush.
7. The height of the foundation should be 15 cm below the level of the finished floor. The top layer is leveled, covered with a film and left for 3-5 days - during this time a set of critical strength occurs.After that, you can get to work.
Masonry process (ordering)
The laying of the furnace is carried out according to the scheme-order. The general procedure for laying each row is as follows: lay out a row of dry bricks and without mortar, adjust, if necessary, a brick that requires trimming, after which the bricks are briefly soaked in clean cold water and laid out on a furnace mortar. For the first rows, leveling the foundation with the floor level, use a cement mortar (1 share of cement for 2.5-3 shares of sand). For the remaining rows, a solution based on refractory clay is required. Ready-made dry mixes containing fireclay clay are sold in hardware stores, you can also take high-quality clay mined in a quarry.
1. Lay out two rows, completing the foundation and leveling it with the floor level, from solid ceramic bricks on cement mortar.
2. Rows 1 and 2 form under the stove. They are laid out according to the scheme of solid ceramic bricks, indicated in the diagram in red, cutting the bricks.
3. In the 3rd row, the installation of doors begins: a cleaning one from the side of the fireplace insert and an ash pan door from the side of the furnace insert. When installing the door, it is necessary to fix its frame with metal rods, for which holes are drilled in the brick of the lower row according to the size of the pins and through the holes in the door frame they are fastened to the brick. Instead of pins, you can use ordinary nails.
4. In the fourth row, the doors are additionally fixed to the holes in the frame with wire, after which they are embedded in the masonry at a distance of at least 30 cm. A steel strip is placed over the ash pan of the fireplace insert - a support for the brick of the upper row.
5. The fifth row covers both doors, the laying of the smoke channel begins.In the 6th row, a steel strip is placed to separate the channel - a support for the partition.
6. Rows 7 to 9 form the furnace insert and the walls of the fireplace insert. The door of the furnace firebox is fixed in the same way as the door of the ash pan. In the back of the fireplace insert, a fireplace tooth is made - a bevel of the back wall of the furnace cut at an angle.
7. The tenth row forms the exit from the furnace to the smoke channel - this can be seen in the diagram. In the eleventh row, a hob is installed on top of the firebox, for this a row is laid out dry, the plate is tried on and a line is drawn for its fit on the bricks, after which the bricks are numbered, disassembled and grooves are selected in them with a grinder for laying the plate of the appropriate thickness. The plate is placed on a heat-resistant solution. In the same row, a steel strip is placed - a support for covering the fireplace insert. Continue laying the chimney tooth.
8. In the 12th row, they begin laying the floor of the fireplace insert from fireclay bricks - in the diagram it is indicated in yellow. Block the part of the smoke channel extending from the furnace. From the side of the furnace firebox and the hob, only the side wall is laid out, separating the stove from the wall of the house.
9. In the 13th row, a valve is installed in the smoke channel, and the laying of the fireplace floor continues. In this row, the fireplace insert narrows as much as possible; it is the last row of the fireplace tooth.
10. Rows from 14 to 18 are generally similar, they form a smoke channel, a wall at the hob, an extended part of the fireplace smoke box, and in rows 16 and 17 they also make a mantelpiece. They are placed according to the scheme.
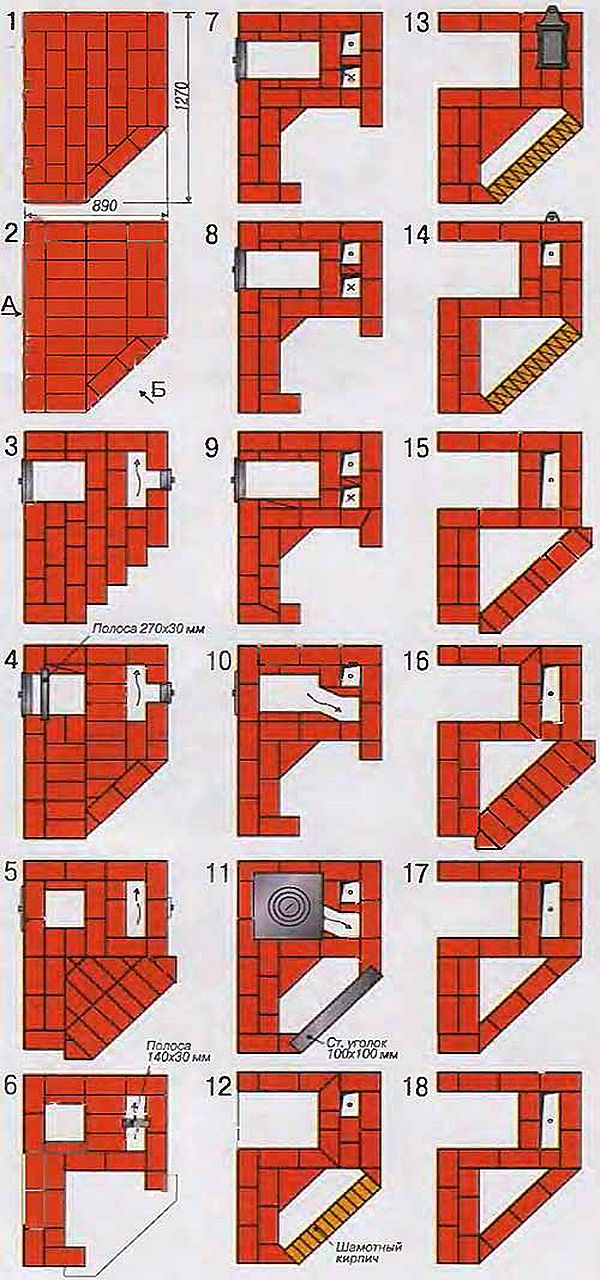
Ordering the fireplace stove: rows 1 to 18
11. In the 19th row, the space above the hob is covered with a metal sheet, and in the 20th and 21st rows it is laid with a brick. From the side of the fireplace, the laying of the smoke box and the smoke channel is continued according to the scheme.
12.In the 22nd and 23rd row, the smoke channel is expanded, and a cleaning door is installed on the side of the fireplace insert. In the 24th row, a metal spark cutter is installed above the expansion of the smoke channel. A metal strip is placed on the back of the fireplace smoke box. 25 and 26 rows are laid according to the scheme.
13. In the 27th row, a valve is placed above the fireplace smoke collector. In the 28th row, another cleaning door is placed, and in the 29th row a steel sheet is laid - the ceiling of the furnace, supporting the bricks of the 30th, 31st and 32nd rows.
14. In the 33rd and 34th rows, the fireplace smoke channel is covered, only the common chimney remains. In the 35th row, a decorative brick side is made along the edge of the furnace, as a result, only the chimney remains by the 36th row, this can be seen from the diagram. Continue laying it to the desired height, shifting the bricks to form a dressing of rows.
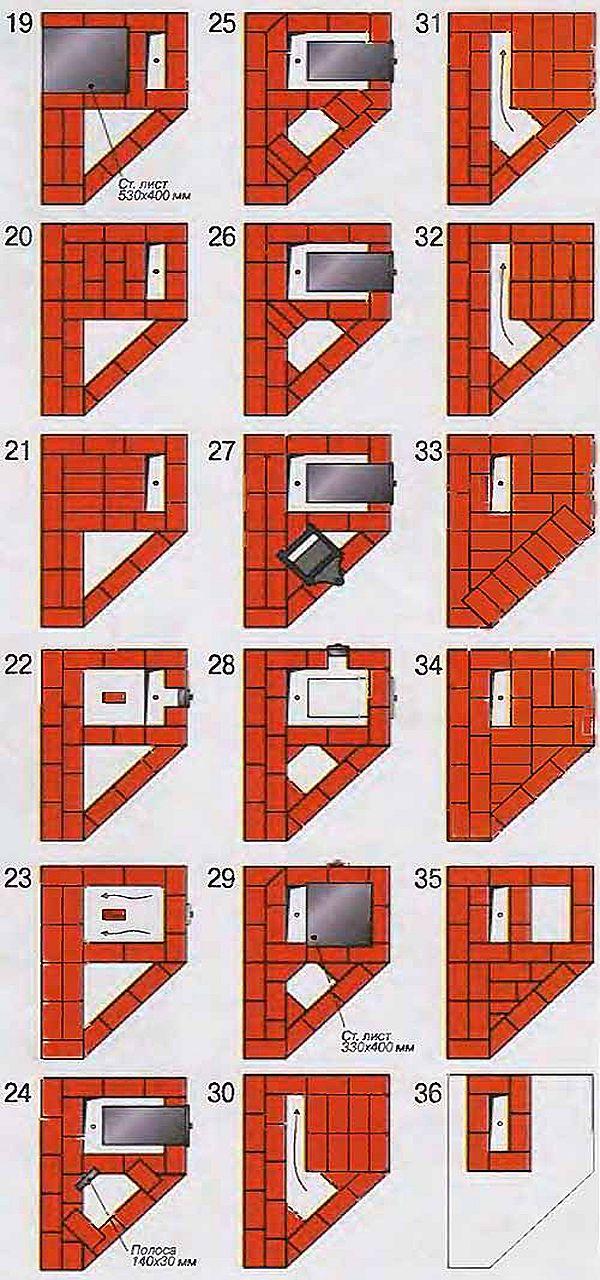
Ordering the fireplace stove: rows 19 to 36
Corner stove masonry technology - video lesson
The laid out oven is dried at normal temperature for a week, after which they begin to gently heat. Clay mortar burns when heated and becomes very hard, but it is important not to overheat the furnace to avoid cracking, do everything gradually. In the future, your fireplace stove will serve you flawlessly, provided it is regularly cleaned of soot and ash. And your cottage will be transformed, it will become as comfortable as possible, and your children will have a favorite corner! How to clean the chimneyto avoid blockages and poor traction, read our article.