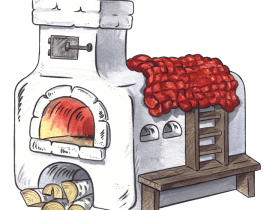
If you are building a house and want to give it the charm of a Russian hut, a stove with a stove bench is the best solution.

If you are building a house and want to give it the charm of a Russian hut, a stove with a stove bench is the best solution.

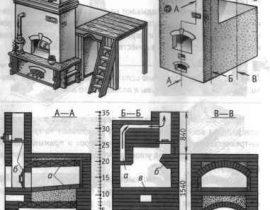
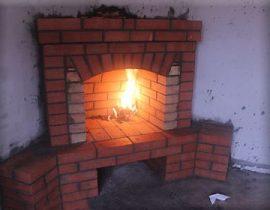
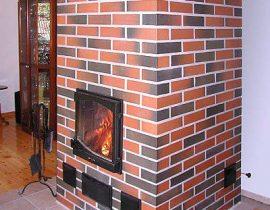
Structurally, the furnace consists of firebox, niches for storing dishes (cold stove), and an adjacent stand for hot pots and pans (sixth), niches for storing firewood (custody / undercare), a kind of oven for cooking and baking bread (crucible), chimney, beds (beds). The lower part of the furnace is called under, it is built at an angle so that it is more convenient to put heavy dishes with dishes inside. Above the sixth is located retrumpet and chimney, which is always equipped with a valve - view.

In modern modified designs of Russian stoves, such shortcomings as: uneven heating have been eliminated; high fuel consumption; oven heating time.
Content
Foundation for the Russian stove
For furnaces, the foundation is made in the form of a slab, which is isolated from the foundation of the building. Before determining the depth of the pit, they make drawings of the furnace with dimensions, determine its location in the house, evaluate the type of soil and its level of freezing, as well as the height of groundwater. For example, in the Moscow region, the level of soil freezing is about one and a half meters. Therefore, it is recommended to make three rows of FBS (with a block height of 60 cm).
The foundation of buta and reinforcement is cheap, reliable, but it is necessary to let it dry for two to three weeks. Another variant - FBS foundation (foundation block wall). It is convenient, durable, but somewhat more expensive than a concrete foundation.
Important! Waterproofing is laid in two layers. The first is located directly in the trench, the second is slightly below the floor level.
- We calculate the number of blocks. We compare the dimensions of the foundation and the dimensions of the blocks that are indicated in the marking (24-4-6, respectively, the length, width and height are indicated in decimeters).
- Digging an oblong pit. Its depth should be 25 centimeters more than the depth of soil freezing.

- We lay waterproofing in the pit, then a layer of crushed stone (10 cm) and sand (5 cm), compact them.
- We knead the concrete and pour a thin layer, no more than two centimeters. We are waiting for the concrete to dry.
- Next, you need to build a foundation that will protect the structure and prevent the foundation from sinking. We lay out a series of pillow FBS, starting from the corners. We fasten the joints with a solution of cement.
- We check the construction level for the absence of distortions.
- In subsequent rows, we put each new block at the junction of two lower ones. In the case of the formation of voids in which the block does not fit, we lay bricks there.

Preparation of mortar for laying the furnace
Choosing clay
- for red brick we take clay and sifted sand in a ratio of one to two;
- if it is planned to use refractory bricks, the clay must accordingly be refractory;
- for fireclay, fireclay powder (3-4 parts) and refractory clay based on bentonite or kaolin (1 part) are mixed;

- when erecting pipes, bricks are laid on a mixture of cement and sand.
We soak the clay in a barrel or iron tub for two days.The volume of water from the ratio of 1 part of water to 4 parts of clay. Then add sand to the mixture. It is very convenient to mix the composition with your feet in rubber boots. The solution must be homogeneous, without large inclusions and lumps.
Do-it-yourself Russian stove "Teplushka"
The model of this stove is based on the classic Russian, but has its own additions. Developed "Teplushka" Joseph Podgorodnikov, engineer. This design is able to heat up to 35 square meters of space.
Differences from legacy models:
- - complete heating of the entire masonry, including the space under the firebox;
- - for cooking, there is no need to heat the stove completely, you can use the stove (after closing the crucible with a damper), which saves fuel;
- - the design of the water-heating tank is thought out.
Important! When laying, it is necessary to remove all excess mortar with a trowel. In no case should clay mortar be applied to the inner surface of the masonry, this will worsen thermal conductivity and lead to increased deposition of soot on the walls.
Ordinal masonry scheme
water heating box made from steel sheets. We do markup. We cut out the walls and bottom of the box with a grinder from steel. After that, it is necessary to cut a hole closer to the base of the box and weld a water tap there, through which it will be convenient to pour water from the tank. We fasten them with welding. We clean the seams. The tank must be closed with a lid of a suitable size, we make it in the same way, cutting out the tank roof and a rectangle from steel, which will serve as a lid, weld handles from reinforcement to it.

1-2. We build the initial rows solid.The first row can either be laid out entirely of bricks, or a frame can be built, which will account for the bulk of the furnace, and the inner space of the frame can be filled with a brick battle in the form of halves and quarters of bricks. The second row - two walls: one is laid out one brick thick (a), the other is twice as thick (b, c). Subsequently, over the areas laid out in two bricks, the following will be erected: a stove, a compartment for storing dishes, an overtube (figure b), as well as a heating shield (figure c), between these elements we will place a crucible - a niche for cooking and a stove bench (roof).
3. Next, we lay out the blower channel, the blower itself, we make the bookmark of the firebox.
4. We continue to build walls. We close the cleaning hole with a half brick.

5. Bricks cut by a grinder at an angle (a) will come in handy here. These bricks will serve as a support for the vault, which we will build further. After this row is built, we take sheets of plywood and cut out several semicircular patterns from them. We fasten them together with slats and self-tapping screws, we get a semicircular masonry shape (2), which will support each brick during the construction process.

1-beveled wedge-shaped bricks; 2-formwork made of plywood; 3-boards; 4 - arch masonry.
6. We lay a metal box for water (a). We begin to lay out the arch of the furnace.
7. we make an overlap over the horizontal heating channel of the shield.
8. We install the grate (a) on the beveled bricks. We make the angle of inclination of the bricks in such a way that the coals freely roll down to the platform (b). The vault (arch) is gradually covered with sand.
9. We put the firebox door, clamping the mount in the brickwork and additionally strengthening it with wire. Add a layer of sand to the vault.

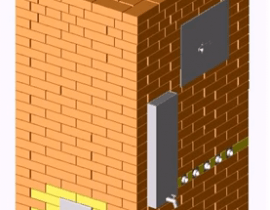
ten.In this row, we leave a hole (a), through which we will clean the shield channel (b), located horizontally. We cut the bricks at an angle of 45 degrees and block the water heating tank with them, leaving access to the lid and faucet.
11. We continue construction, based on the drawings. We pour and compact a layer of sand between the walls of the furnace. At the same time, we achieve a slope towards the mouth.
12. On the sand, compacted with a bevel, we begin laying the hearth (a). After the row is laid out, we cut out recesses above the firebox and install a cast-iron plate (b) there. There should be a small gap between the edges of the slab and the bricks. Pour sand into gaps.
We close the brickwork in front of the stove with a metal corner, protecting the bricks from crumbling in case of accidental blows.

13. Cut out a strip from a steel sheet. Bend the edges to one side. We bend the strip itself into a radius. It will serve as a form for the mouth of the furnace and at the same time protect it (a). We block the horizontal channel of the shield, leaving a space between the bricks (five windows - a, b, c, d, e). From these windows we will erect the channels of the heating shield strictly upwards.
14-16. Further laying without changes. In the 16th row above the metal arc we put two bricks cut at an angle.
17-18. We begin to lay out the arch (a) above the metal strip. To do this, each brick is cut to the required angle. We make the markup from the center. The bevel angle is determined by a thread stretched from the center of the arc to the top of each brick. When the arch is ready, we lower the formwork, cut out of plywood in the form of semicircles, fastened together with wooden bars, into the crucible. After that, we begin to lay out a vault from solid bricks. In the gaps between the bricks, directly into the solution, we insert small fragments of bricks.This will give strength to the vault (b). Next, in the eighteenth row we make the overlap of the hearth.

19. On the left in the masonry we make “heels” of beveled bricks. We will build an arch separating the stuffing box from the hearth.
20. We lay out the arch again according to the previously described technology. On the right side we make the base of the overtube.
21. We block the crucible.

22. We form a couch. We make a laying of a stuffing box (a) and a box into which soot will fall (b).
23. We make an overtube and at the same time five channels going up.
24-26. We raise the masonry up.
27. We put two functionally different valves (for summer and winter operation of the furnace) - a, b.

28. We make the overlap of the overtube.

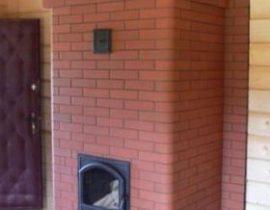
29. We make installation of a half-door designed for a view.
30. We make the union of smoke channels.
31. Lay out the channel from the air vent (b) (horizontally).
32. We begin to make a complete overlap of the overtube. To do this, you can use metal corners as a support. Leave a hole for the pipe.
33. Completely block the heating shield with bricks. Next is pipe laying.
Video - do-it-yourself Russian oven