Today, one can count more than a dozen different types and designs of stone ovens for cooking, but the Pompeian oven occupies a special place among them.

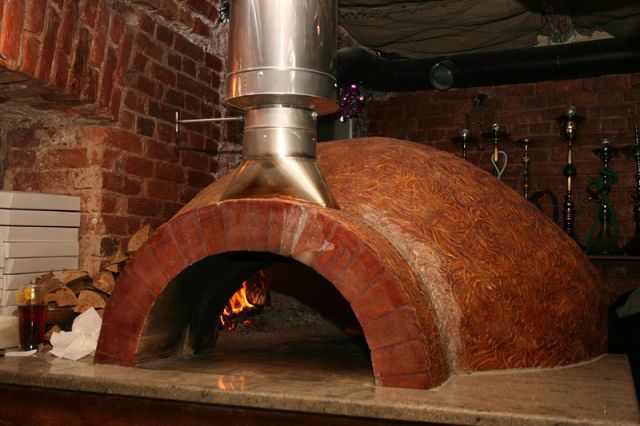
Pompeii oven
Compact, efficient and beautiful - it will not only allow you to cook delicious food, but will also look stylish on any suburban area. How to lay out a Pompeian oven with your own hands, and what technical nuances should be taken into account, we will talk in this article.
The standard Pompeian oven is characterized by certain proportions that must be observed regardless of the shape and size of the structure. So, the height of the entrance is approximately equal to 50% of the total height of the dome. This allows you to optimize the workflow as much as possible, create normal traction and reduce heat losses.
Content
- Design features
- The principle of operation of the Pompeii oven
- The financial and economic aspect of building a Pompeian oven with your own hands
- Basic rules for the arrangement of the Pompeii oven
- How to fold the Pompeian stove with your own hands?
- Step 1. Schematic design.
- Step 2. Preparation of materials.
- Step 3. Arrangement of the foundation.
- Step 4. Construction of the base from concrete cinder blocks.
- Step 5. Table top.
- Step 6 We are building a furnace.
- Step 7. Building a chimney.
- Step 8. Furnace insulation.
- Step 9. Furnace lining.
- Step 10. Testing the furnace and the first kindling.
- Video. Making a Pompeian oven.
Design features
Due to the special internal structure of the oven, it heats up quickly and retains heat for a long time. Historians claim that the Pompeian oven appeared on the Iberian Peninsula and was originally used specifically for making an open cheese pie, where the structure was not needed to heat the room.
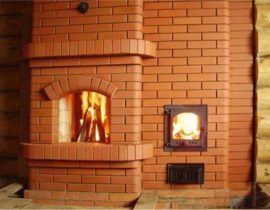
Decoration of the Pompeian oven
Later it spread throughout the world. It is also called the Neapolitan, Italian oven, tandoor.
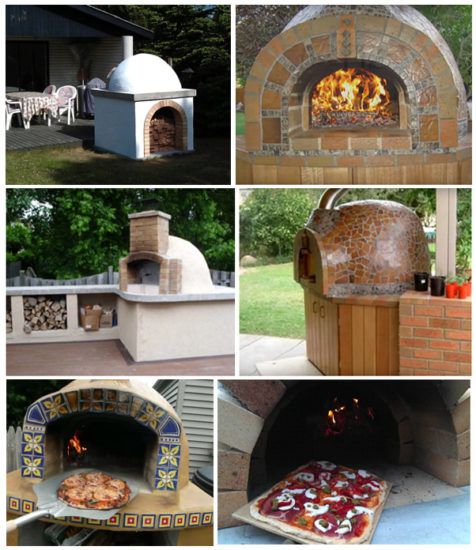
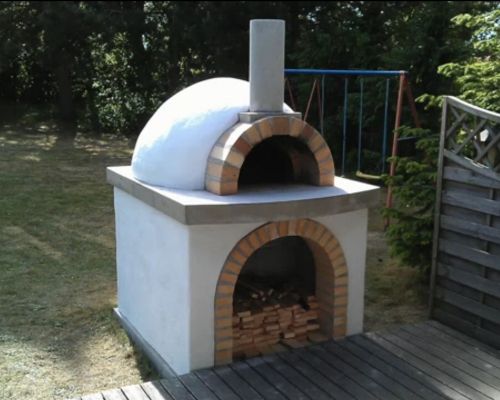
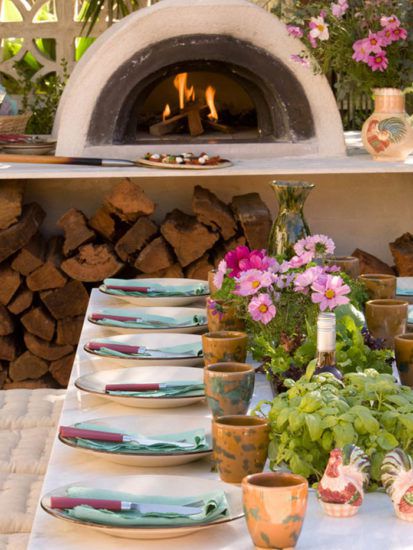
The Pompeian oven will not only be an ideal design for making pizza, pies and bread, but will also decorate any suburban area. In combination with a gazebo or barbecue, it becomes a real landscape decoration, becoming a favorite vacation spot for the whole family.
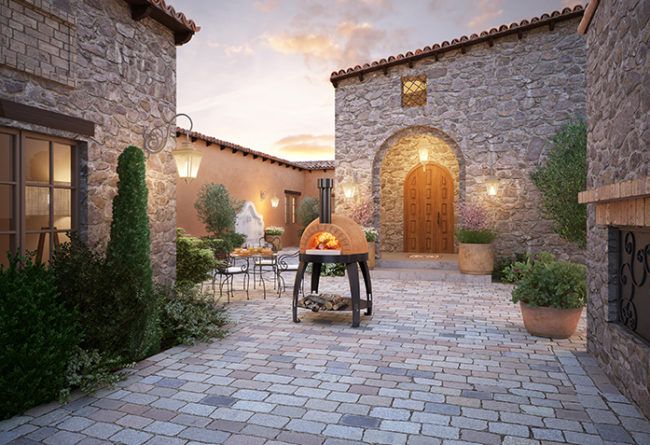
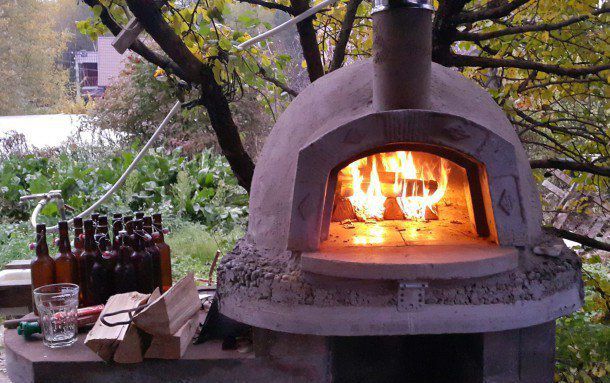
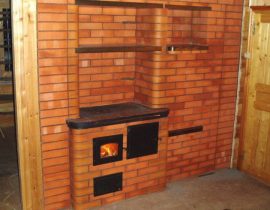
Oven in the yard
Basically, such a stove is installed in suburban areas on the street, in a barbecue area, in an outdoor garden, but if desired and some technical improvements are made, a Pompeian stove can also be built in the house. To do this, of course, it will be necessary to provide not only a reliable solid foundation, but also a chimney.
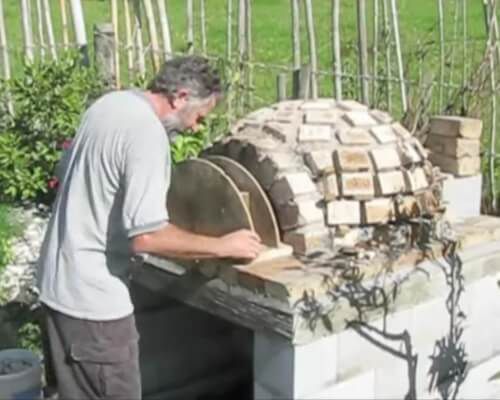
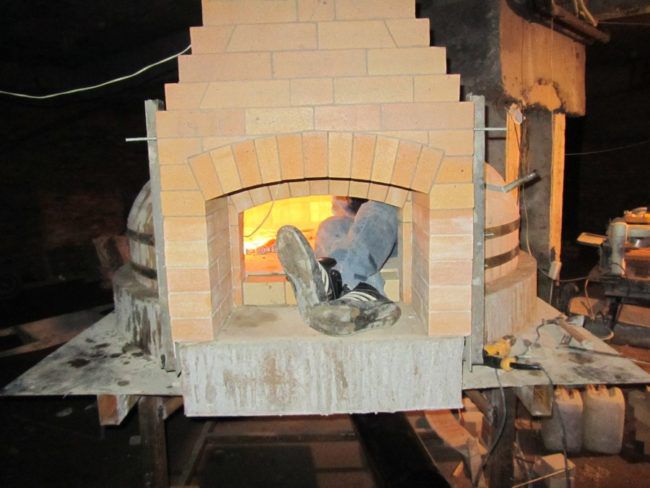
In this article, we will look at the classic option for building an Italian outdoor stove. Before proceeding with the step-by-step instructions, I would like to warn you that the laying of the Pompeii oven is a very difficult and expensive undertaking.
But if you do everything right, then such an oven will delight you for decades, giving an authentic look to the cottage and helping to cook delicious homemade cakes. Thanks to our clear and simple instructions, even a beginner can master the laying of the Pompeian oven with his own hands.
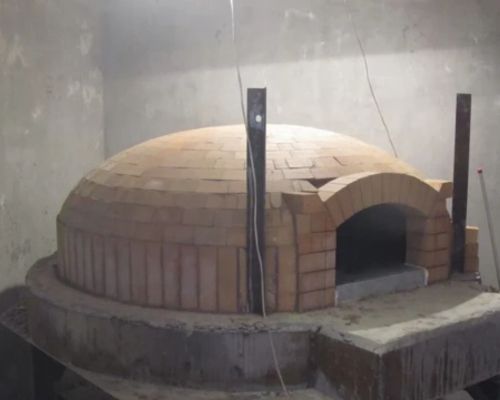
The device of the Pompeian oven is somewhat similar to the design of the ancient Slavic oven.
Construction of the Pompeian oven
But, unlike the traditional Russian stove, it heats up much faster. You can cook pies in it literally 30 minutes after heating, while the Russian oven will take at least 3-4 hours before reaching the optimum temperature for cooking.
Such a heating rate in the Pompeian furnace is achieved due to the lower thermal mass. The layer of brick that is heated is only 12 cm. Already 45 minutes after kindling, the temperature in this oven reaches 260 degrees, and an hour later - 370 degrees.
How is the temperature distribution in the Pompeii oven?
| In 30 minutes | After 45 minutes | After 60 minutes | After 90 minutes | |
|---|---|---|---|---|
| The outer part of the vault | 150 | 260 | 370 | 370 |
| The inner part of the vault | 315 | 370 | 370 | 370 |
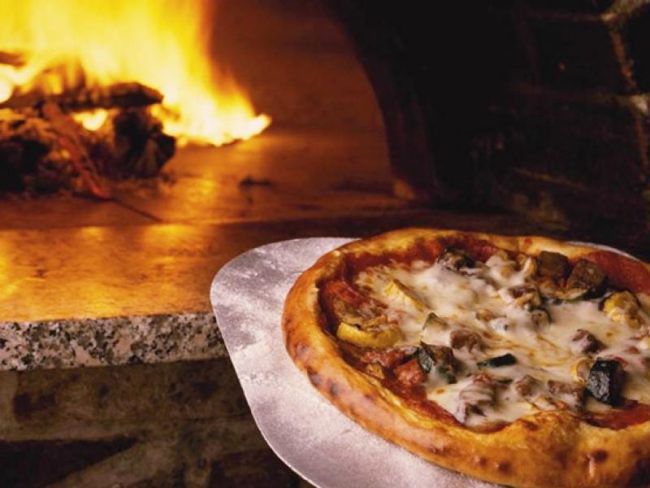
The peculiarity and main advantage of the Pompeii oven is that almost any dish can be cooked in it in a short time. Due to the high temperature that is reached inside the vault, pizza and bread are perfectly baked in it. Smoke gives a special piquancy to baking.
The principle of operation of the Pompeii oven
The efficiency of the Italian pizza oven is due to the technical design features.

Principle of operation
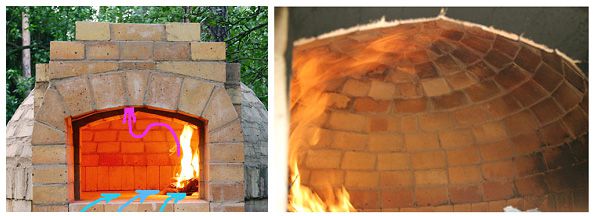
During the combustion of solid fuel, two streams of hot gases appear inside the dome:
- Convection flow that comes from the firebox itself.
- The reflected flow comes from the walls of the dome.
It is also noteworthy that the temperature in the Pompeii oven is self-regulating.
Movement of cold and hot streams
The more firewood burns in the oven, the more gases are released. Rushing upwards with a powerful stream, they block the flow of oxygen in the cross section of the pipe mouth. Consequently, the intensity of combustion also decreases, and hence the temperature also decreases.
When the temperature has dropped, the flow of hot gases also weakens, again opening access to oxygen.
This cyclical process helps to regulate the optimal temperature in the oven, which is necessary for the preparation of bread, pies, pizza and any other food.
As can be seen from the figure, it is the dome that is the main element of the furnace, accumulating thermal energy from fire.
After analyzing the principle of operation and design of the furnace, we can summarize and highlight the main pros and cons of the Pompeii furnace.
Benefits include:
- Fast heating. Already 30 minutes after kindling, raw food for cooking can be loaded into such an oven. While the heating time of a classic Russian stove is at least 2 hours.
- Good heat dissipation. Even after burning firewood, the heat in the Pompeian oven continues to be maintained for several hours, which allows you to "stew" food.
- The compact dimensions of the unit allow you to organically fit the stove into almost any suburban area.
- Stylish appearance.
Stylish appearance
The disadvantages of the Pompeii oven include:
- The complexity of the design. Unlike the traditional laying of a brick oven for a summer residence, skill is required here to correctly lay out the dome, which is an essential attribute of the unit.
- High cost of materials.
- The need for arranging a powerful foundation, since the furnace is not light in weight.
The financial and economic aspect of building a Pompeian oven with your own hands
What is the reason for the high price of such a furnace?
- The Pompeian stove is laid out from fireclay bricks, which cost an order of magnitude more than usual.
- The design of the furnace has a fairly large weight, and for ease of use it must be raised to a height of 80-100 cm. To do this, you will have to lay out a brick stand on which the furnace itself will be erected, which means you need to think of a good foundation.
To slightly reduce the cost of building a furnace, any materials that are on the farm are suitable for the stand: blocks, ceilings, old bricks, etc.
Building a pizza oven
Another disadvantage is the lengthy process of laying the Pompeian oven. A rather complex design, which involves the presence of a foundation, a pedestal, the oven itself, a large countertop, indicates that the whole process will take at least a month.
In addition, you will need significant technological breaks to harden the concrete for the foundation, etc.
If you come to the dacha only for the weekend, then the whole masonry process can be rationally divided into several stages, calculating that the technological break for “seizing” the materials just falls on your absence.
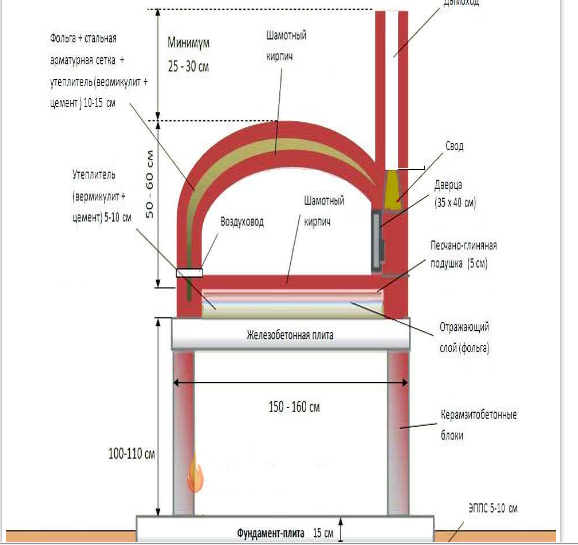
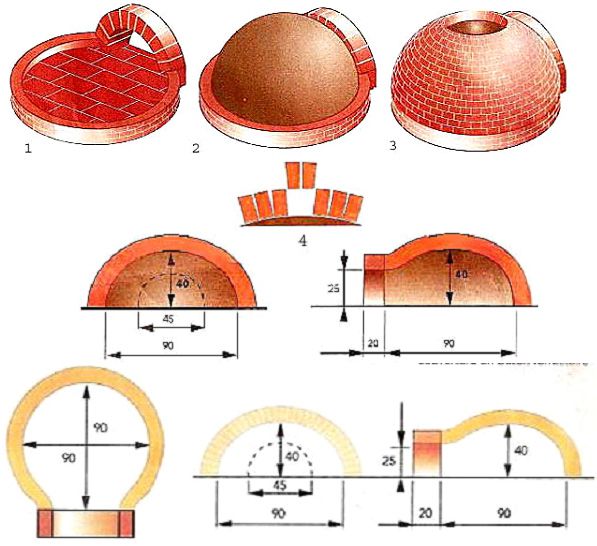
Traditionally, the Pompeian oven has the following scheme:
- solid foundation;
- pedestal under the oven;
- bake.
Pompeii pizza oven
The oven itself, in turn, consists of four parts:
- base (furnace bottom);
- dome (vault);
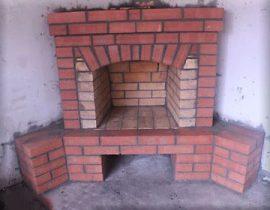
- entrance arch;
- chimney.
The base (pedestal) is made of small cinder blocks, 20*20*40 cm each.
The tabletop is a monolithic slab made of reinforced concrete with a thickness of 10 cm.
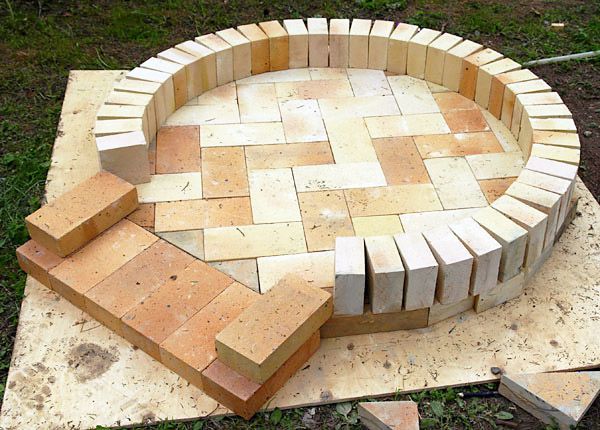
table top
Unlike the traditional stone oven, here the chimney is at the front. This is one of the main design differences. The fire rises up along the dome, heating the vault.Thanks to this, heating is carried out simultaneously from above and below, which contributes to the rapid preparation of food.
The Pompeian stove has undergone many changes over the years of its existence, and today you can find several of its varieties.
Neapolitan oven
There are Tuscan and Neapolitan stoves. The Tuscan stove has a higher vault and is more versatile. In it you can bake not only pies, but also cook stews, meat, soups.
The Neapolitan oven is traditionally used for baking pizza and has a small vault that is approximately equal to 80% of the total height of the dome.
Tuscan oven with a higher vault
As for the shape and size of the oven, the most optimal design is the one with an inner diameter of 80-110 cm. It is not recommended to make the oven smaller than this.
The spherical vault of the stove serves for maximum heating and heat storage, and the arched entrance is used for laying firewood and the food itself.
The size of the stove may vary, but in any case, a strict proportion should be adhered to: the height of the arch should be approximately equal to 60% of the total height of the dome.
The width of the entrance for laying firewood should be equal to the total height of the dome.

Layered dome of the Pompeian oven
The vault itself has several layers:
- the inner surface is made of fireclay bricks;
- clay coating;
- 1st layer of basalt wool (thermo insulating);
- 2nd layer of perlite;
- Facing layer of cement mortar.
In this case, the thickness of each layer should approximately have the same size of 5-10 cm. The more the heat-insulating layer is laid, the longer the furnace will cool down.
The facing layer can be made of any moisture-proof and water-repellent materials, since its main purpose is protection from atmospheric precipitation. If the furnace is carried out in the house, then this protection can be omitted.
In addition, the facing layer also performs a decorative function, so you can make it to your taste: decorative plaster, painting, mosaic, etc.
Basic rules for the arrangement of the Pompeii oven
Following the step-by-step instructions and the layout of the Pompeii oven, even a beginner can handle the work. But in order to avoid mistakes, it is necessary to adhere to the following basic rules when performing work:
- The furnace inlet must necessarily have a spherical shape. In this case, the width of this entrance should be equal to the height of the dome. Whatever shape and size you decide to make the oven, be sure to adhere to these proportions.
- Thanks to the spherical design of the inlet, maximum heat is maintained in the oven and smoke is collected.

Keep the proportions of the entrance and the dome
- For the Pompeian stove, use only straw or wood (pellets are only allowed during the first test firing). The requirements for firewood are quite high. It is better not to use firewood from coniferous trees, as the resins emitted during the combustion process can adversely affect the further operation of the stove, and even the taste of food.
- From ordinary bricks, you can only build a base and a chimney. And under and the dome itself must be made exclusively from fireclay (refractory) bricks. If the Pompeian oven is being built outdoors, then it will not be superfluous to build a small shed.Although it is lined with a hydrophobic material, constant precipitation can adversely affect its technical characteristics and strength.
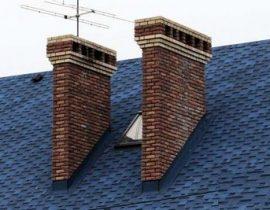
- The chimney is located on the front of the furnace, especially in the cold climate zone.
How to fold the Pompeian stove with your own hands?
Work on the arrangement of the Pompeian oven will take place in several stages:
Step 1. Schematic design.
Before starting construction work, be sure to make a drawing of the furnace. Consider not only its size, location, but also observe the proportions of the vault and dome.
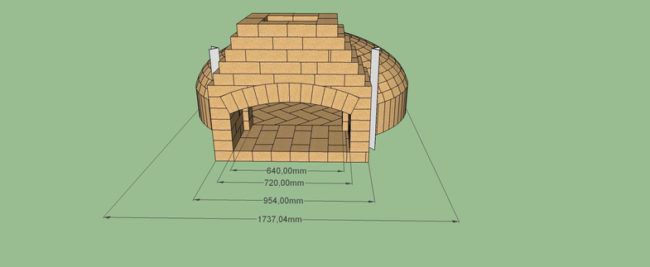
Drawing of the Pompeian oven
Decide for yourself which option suits you best: Tuscan or Neapolitan, and correctly calculate the height of the dome and the width of the entrance.
Step 2. Preparation of materials.
Before you begin construction work, you need to stock up on everything you need.
We will need the following tools:
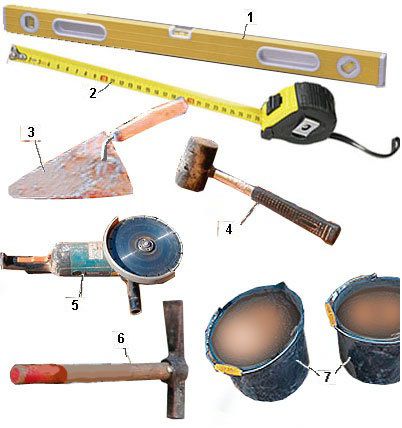
Furnace masonry tools
- building level;
- construction roulette;
- Master OK;
- hammer for laying bricks (kiyalo);
- Bulgarian;
- hammer for the construction of formwork;
- container for mixing the solution;
- shovel and bayonet shovels;
- construction slope.
- goniometer;
- putty knife;
- drill with a nozzle for mixing;
- chisel.
From the materials before starting work should be purchased:
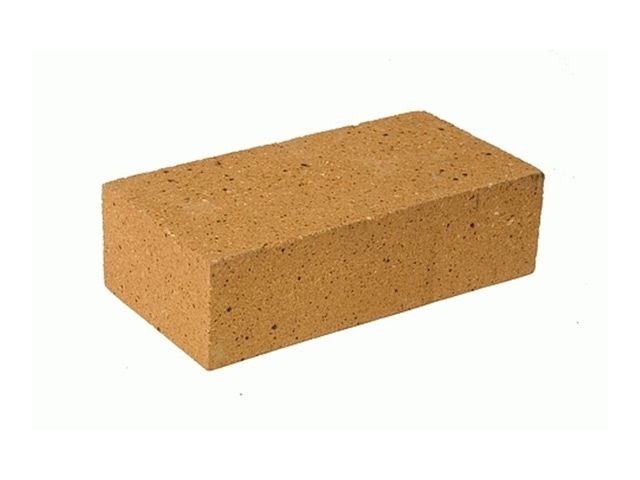
- fireclay brick;
fireclay brick
- masonry (fireclay) mortar for SHA-28 furnaces, but you can do it yourself;
- facing brick (for the arch);
- mineral wool (to create a thermal insulation layer of the vault);
- perlite (insulation);
- metal corners;
- boards for creating formwork;
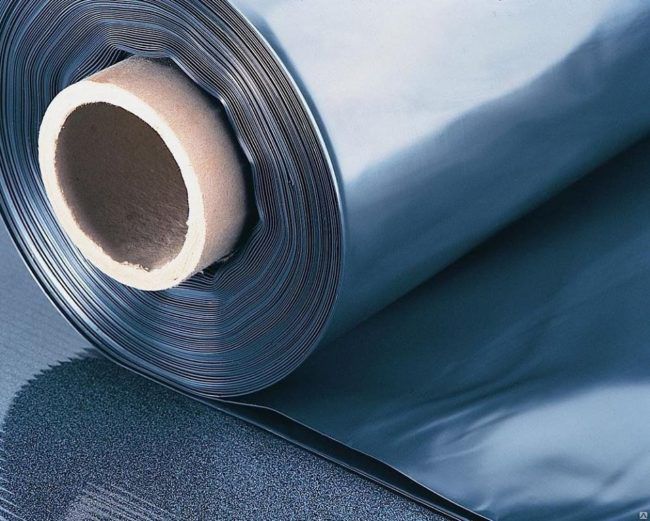
- polyethylene for waterproofing;
Foundation waterproofing polyethylene
- concrete blocks for the pedestal;
- foundation cement;
- sand, gravel.
Step 3Foundation arrangement.
The foundation is the basis of any construction, and the strength of the entire structure depends on how firmly and thoroughly it is executed. Given the rather large dimensions and massiveness of the Pompeian oven, you will have to work hard on the foundation.
It is better to start work in the summer or early spring, since it will take you at least 3-4 weeks to dry and set the cement mortar. If the work is not completed before the start of the seasonal rains, then it is necessary to cover the oven with a thick layer of polyethylene and tightly bandage it.
After cold weather, in the spring, you should carefully examine the structure to identify weaknesses. If necessary, grease again well and finish the job.
The level of groundwater is also important. This should be thought about in advance, even before laying the furnace.
If the summer cottage is located in an area where there is a high level of groundwater, then around the furnace it is necessary to perform a drainage system at the foundation construction stage.
In addition, it will be necessary to use hydrophobic mixtures for arranging the foundation.
If the soil, on the contrary, is very dry and dense, then a small pit can be used for the foundation, which must be filled with crushed stone, brick and poured with concrete.

We build the foundation
We offer a standard scheme for laying the foundation for the Pompeian oven.
- Mark out on the ground where the 150 * 150 cm oven will be located. Keep in mind that the size of the foundation should exceed the size of the oven by 10-15 cm on each side.
- According to the marking, dig a pit at least 35 cm deep to build a solid foundation for the furnace. To do this, use a bayonet shovel.
- We build a wooden formwork, which performs the function of a skeleton. It is the formwork that forms the foundation. To do this, you can use plywood boards, old ceilings, etc. This will not affect the quality and strength of the foundation in any way. Measure the length and width of the dug hole and cut the boards to this size. Using nails, put together the formwork.
- We perform formwork waterproofing.
Foundation waterproofing
We take dense polyethylene, and with a construction stapler around the perimeter we attach it to wooden boards.
- Now you can start pouring the cement mortar, but before that you need to create a solid cushion that retains moisture. At the bottom of the pit we pour crushed stone of the middle fraction and pour 10-15 cm of sand. Top with polyethylene for waterproofing. Thus, the cement mortar will not sink down.
- We fill the foundation with cement mortar to the height of the formwork. Filling the solution in stages (divide the total depth of the pit visually into 3 parts) and let each layer “set” for at least 2 days.
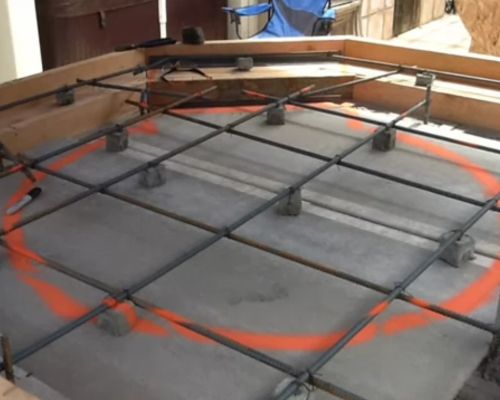
- We lay a reinforcing metal mesh on top. Level the top well with a shovel and check with a building level how even the surface is. Now you have to wait 3 weeks. Do not rush and do not lay the stove before this time, otherwise it will deform in a few weeks.
- Check with the building level how smoothly you have completed the foundation. The general form of the further construction depends on this.
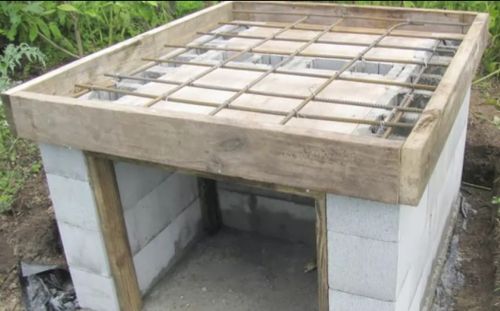
Step 4. Construction of the base from concrete cinder blocks.
Stages of arranging the furnace
After the foundation is completed, we proceed to the laying of the base of the furnace, on which the countertop and the dome will be located.
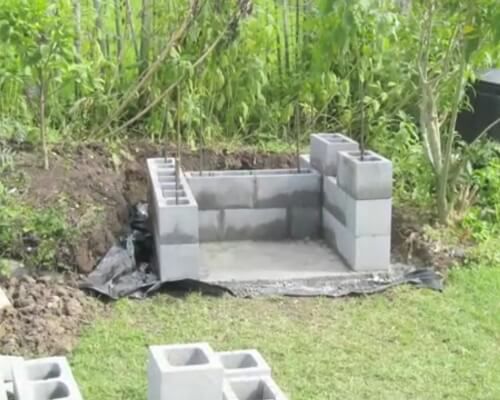
Foundation erection
The height of the stand (pedestal) is 80 cm.If the foundation is above the ground, then the height of the base can be slightly reduced. In general, the height of the pedestal should be selected taking into account the convenience of further operation for the cook, so you can vary this parameter.
The shape of the pedestal will visually resemble the letter “H”, where the sides are 120 cm. Considering that each concrete block has a length of 40 cm, we need three cinder blocks on each side.
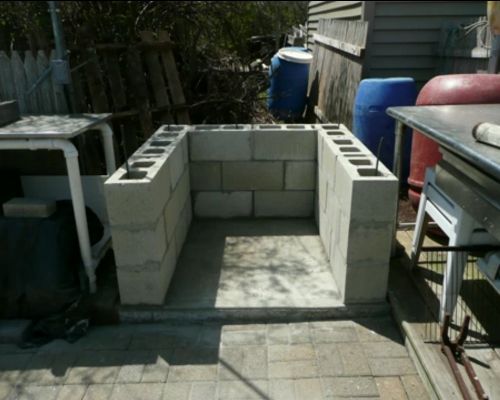
Building a prop
In some masonry schemes of the Pompeii oven, it is recommended to make the shape of the letter "P", but our option has its advantages. Given the heavy weight of the dome and tabletop, the transverse wall will take on the additional weight of the structure, guaranteeing its strength and reliability.
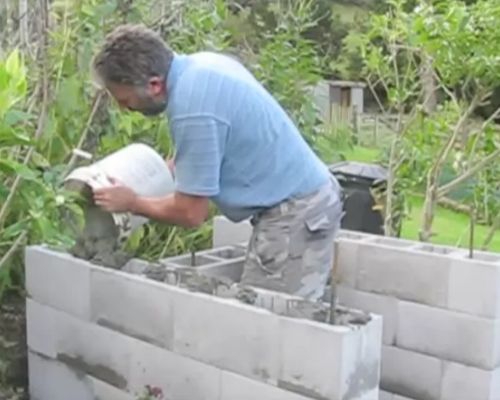
- We will stack the blocks on top of each other using the “dry” method, which consists in fastening the material together with the help of reinforcing wire, which is inserted into the hole in the blocks.
This will give an additional guarantee that when pouring concrete, the blocks will not budge.
- We check how evenly the concrete blocks are laid using the building level. Angles can be checked with a protractor or plumb bob.
- We pour the cement mortar into the holes of the blocks and wait for it to dry completely (approximately it will take 2-3 days).
Pouring cement mortar into the base
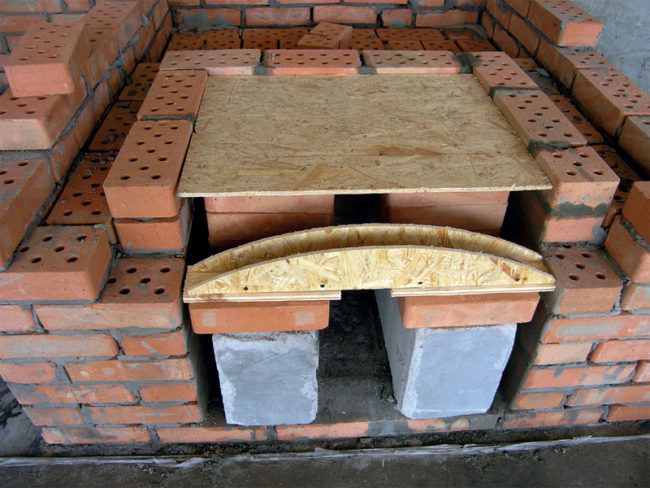
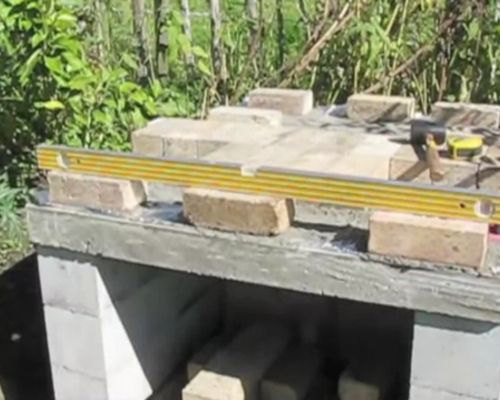
Step 5. Table top.
A special feature of the Pompeian oven is the countertop. It must be strong and reliable, so its construction should be approached with all responsibility.
Any error and unevenness, cracking or poor drying can lead to the fact that the unit will not work as it should.
- In order to make a monolithic concrete countertop, it is necessary to build a wooden formwork.The size of the table top is 140*120 cm.
table top
Saw off the boards to this size and chop them together with nails, reinforcing the corners with metal staples. The height of the boards should be at least 15-20 cm, otherwise the tabletop may be fragile.
- Lay moisture-resistant plywood at the bottom of the formwork. You can simply lay a layer of dense polyethylene or roofing felt.
- We put a reinforcing mesh and make supports with a gap of 5 cm.
We reinforce the countertop
- Where the tabletop will go beyond the edge of the pedestal, it is necessary to strengthen the support in the form of additional reinforcement from a metal rod.
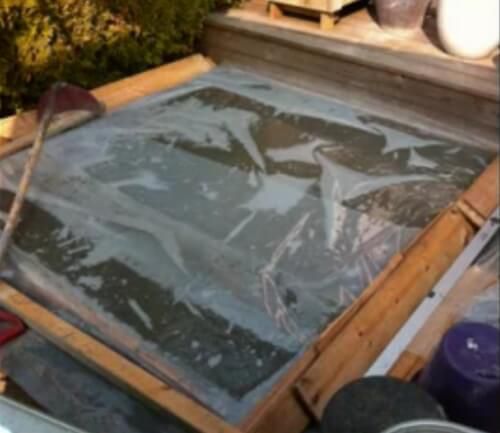
- Pour the concrete mortar, evenly distribute with a spatula or rule. We check the building level horizontally. Spray well with water and cover with a layer of polyethylene.
Countertop waterproofing
We make a technological break of 7-8 days so that the countertop becomes completely solid. Ideally, let it “settle” for 2-3 weeks. If the stove is placed on an under-dried countertop, then cracks may appear on it during operation.
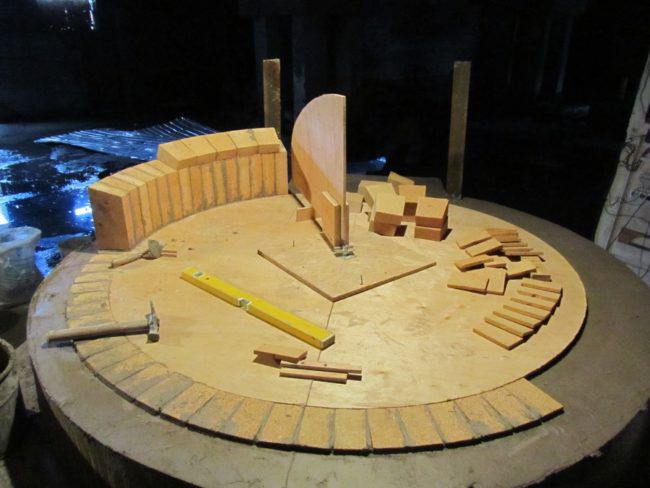
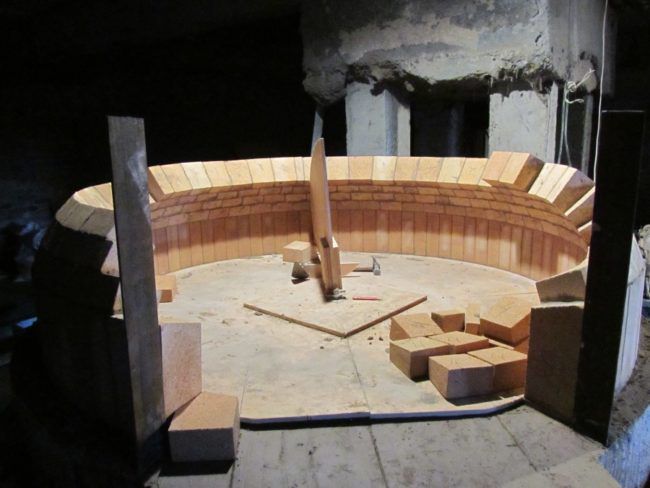
Step 6 We are building a furnace.
Video. Masonry of the dome of the Pompeian furnace.
- On the surface of the tabletop, we draw an even circle with chalk, the diameter of which, depending on the width of the tabletop, is 90-105 cm. Laying out the dome is perhaps the most difficult part of the entire construction.
Draw a circle on the tabletop
- On the countertop we lay out refractory bricks in a continuous row, which are formed under the furnace (base). For the construction of a hearth, it is necessary to take perfectly even ovens. If you are using a non-new masonry material, it must be ideally sanded, because under it will be a work surface where the hostess will bake bread, pies and pizza.Use a zigzag laying method to avoid cross seams.
Run this row “dry” right away to clearly determine which part of the bricks will need to be hewn. Number these bricks with chalk or a building marker so that you don’t make a mistake later when you start laying them on the mortar.
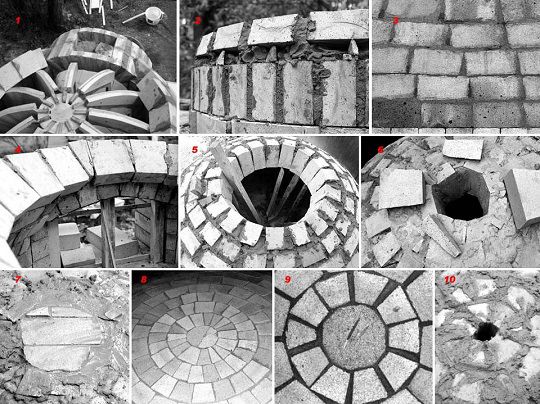
The order of the code
- We lay out the heat-insulating material from calcium-silicate plates on the countertop in one layer, and put bricks on top of the mortar according to the previously indicated scheme.
We begin to lay out the brick in a circle
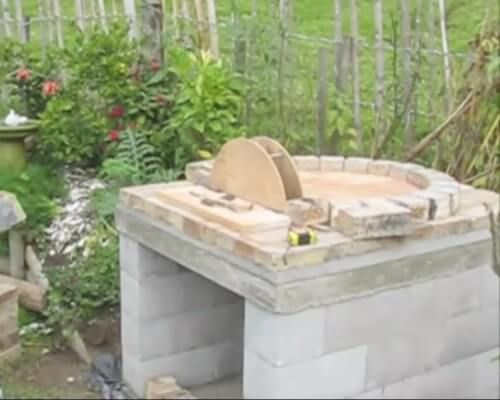
- We determine the entrance of the furnace, through which firewood and food will be laid in the future. We lay out 6 bricks in an even row in a horizontal line, forming a kind of entrance rim.
Masonry 1 row
- We install bricks along the borders of the arch, which will serve as the starting point for the formation of the dome. To fix the bricks, use masonry mortar. Keep the gaps between the bricks to a minimum, otherwise it will break the aesthetics in the future.
We build up the brickwork of the dome
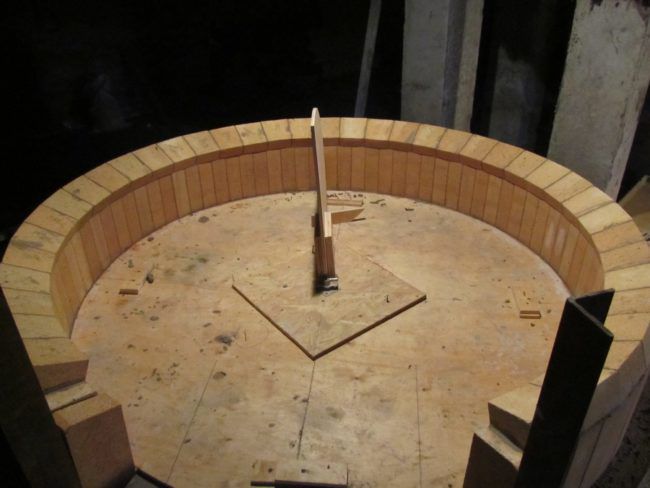
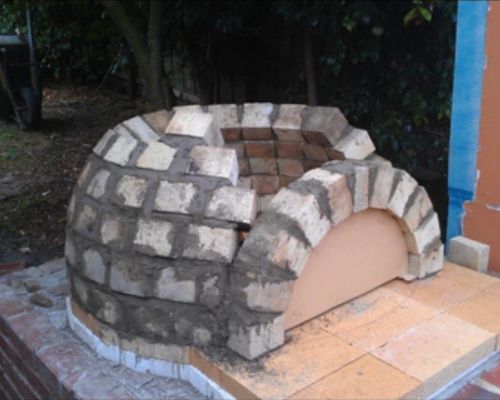
- We form the inlet arched opening of the furnace.
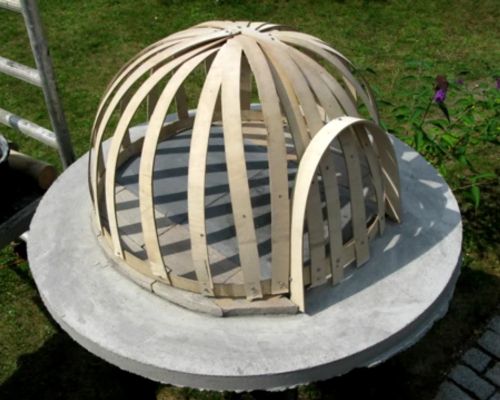
We make a dome model from plywood
To do this, you must use a template made of cardboard or plywood. Cutting a template is not difficult - you can make it not in the form of a semicircle, but make it from two shares of ½ of a circle. Fasten these parts together with the help of bars and place them at the base of the furnace.
Dome Plywood Template
- Put dry bricks on them. So you will know exactly how much material you will need to lay the arch.
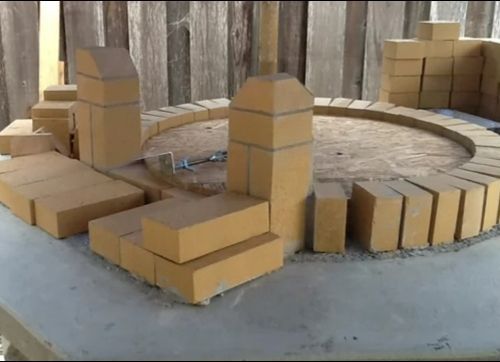
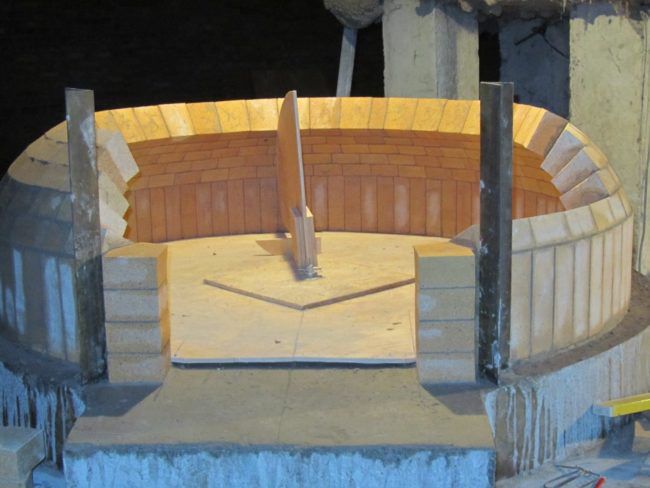
We form a pivot arch
To make it easier for you to navigate in size, let's recall the following parameters of the Pompeii oven:
- The height of the furnace dome is equal to the radius of the entire circle.
- The height of the arch will be 60% of the total height of the dome.
- The width of the arch is equal to the total height of the dome.
If you are laying out a large diameter oven, then to save heat, you can make a slightly smaller entrance diameter. But don't make it too small. Firstly, through this entrance it will be necessary not only to lay firewood and put food, but also to shovel the ashes with a shovel.
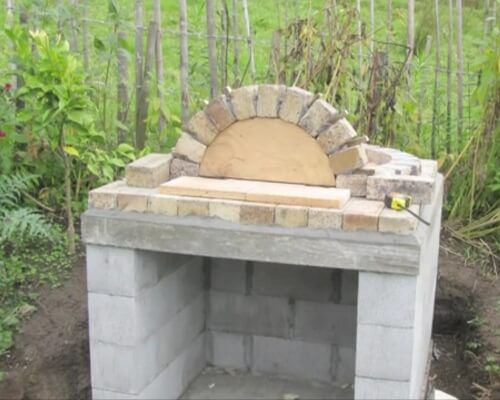
An arch is laid out according to a plywood template
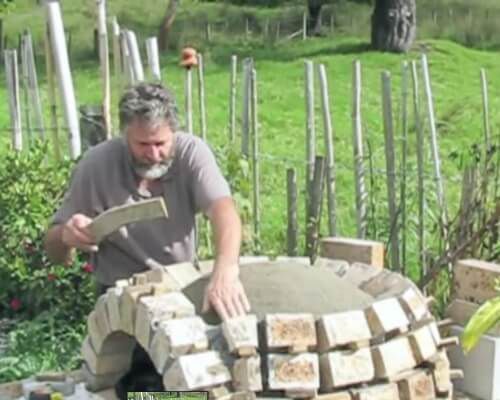
- We begin to form a dome in a circle. The thickness of the dome over the entire height will be 12 cm. At the same time, lay out the rows from the beginning of the entrance, bringing them to the center of the back of the furnace.
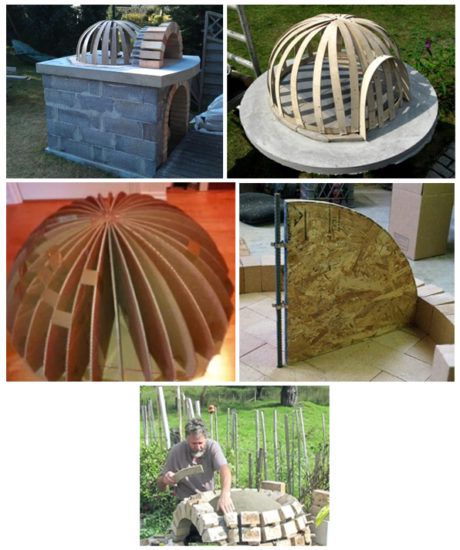
For beginners who will be laying out a Pompeian oven for the first time, we recommend using a wooden frame, which will help to form the masonry of the correct shape in the form of a dome.
There are several variants of the dome model. They can be assembled from plywood, from wooden boards. After the frame is laid out on them, it will be necessary to remove them.
Forming a dome
This is a rather complicated process purely technically, since you have to lick inside the vault in order to dismantle the plywood frame. Before you remove it, make sure that all the bricks are "grabbed" and tightly fixed to each other.
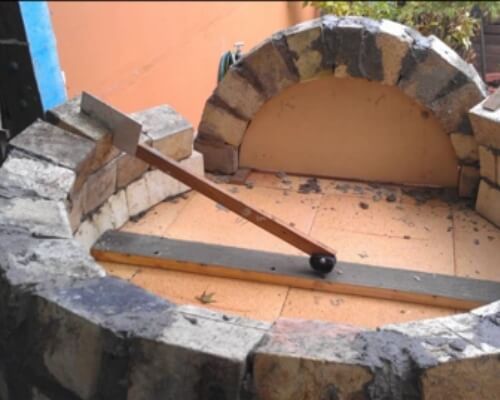
An articulated arm helps to check the correct laying
Attention! To arrange a brick, you will have to “cut” it and split it. Pay attention to how to do it correctly so as not to spoil the material.
Another interesting dome idea is to create a hinged base that will determine the slope of the dome.
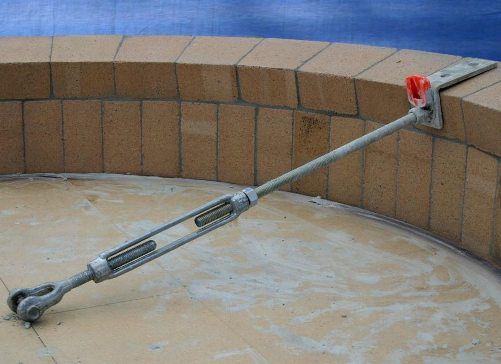
articulated arm
The dome of the Pompeian oven is a kind of multi-layer cake:
- The inner part is made up of refractory bricks, which will take on the maximum combustion temperature.
- Next comes a layer of clay refractory coating.
- Thermal insulation layer made of mineral wool.
- The outer layer is made of cement-sand plaster.
Attention! For the arrangement of the dome, you will need many halves of fireclay bricks. It is better to use a grinder for cutting, having marked a groove in the center of the brick in advance.
With each row, the distance between the bricks will increase to keep the spherical shape of the dome. To evenly control the row, it will be necessary to put wedges between the bricks.
Wedges between bricks
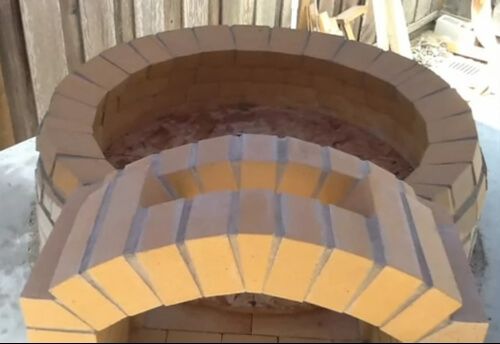
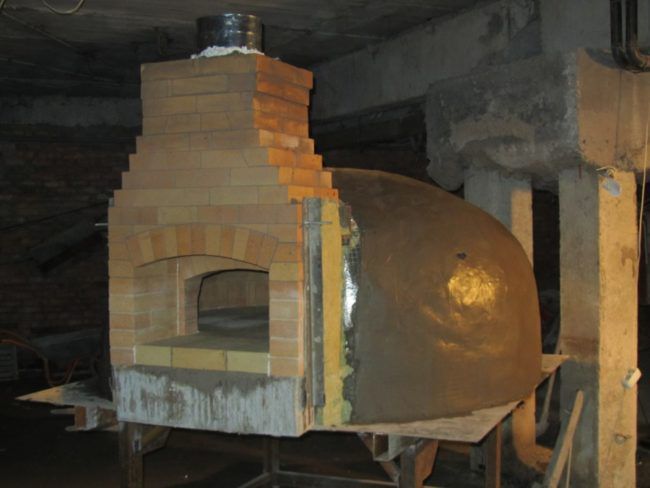
- After the dome of the furnace is laid out, it is necessary to make an external vaulted arch, which will form the entrance part of the furnace.
To do this, we also make a blank of plywood of a larger diameter than the inner arch and lay out bricks on it. On top of this arch there should be a hole for the chimney.
We lay out the outer arch
Step 7. Building a chimney.
In the Pompeian furnace, the chimney can be laid out of ordinary brick, since the temperature of the exhaust gases here will not be too high.
Chimney hole
To reduce construction time, the chimney can be made from prefabricated metal or ceramic pipes.
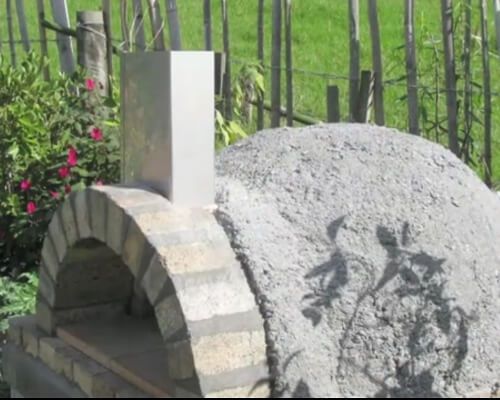
Chimney made of galvanized steel
The choice of the shape and material from which the chimney will be made remains with the owner.
As for the height of the chimney, everything here also depends on the design and location. If the furnace is built under a canopy, then it is better to make the pipe higher so that smoke is not created under the canopy.
If the furnace is being built completely in an open area, then the height of the furnace can be reduced.
The final touch of the masonry of the dome and chimney will be the sealing of all seams.
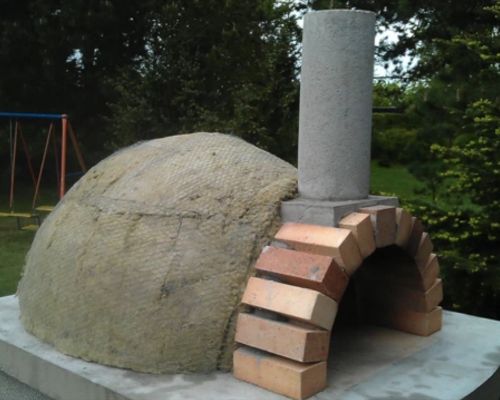
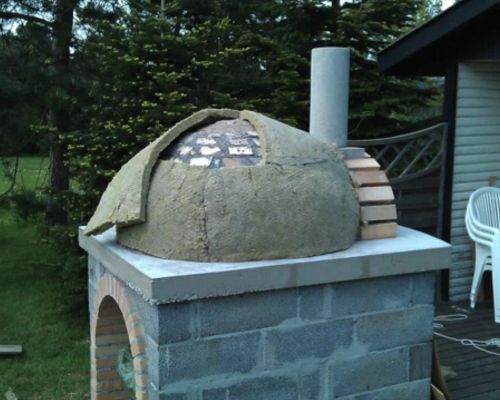
Step 8. Furnace insulation.
This step is also the most important stage of the work, which distinguishes the design of the Pompeian oven. Considering the open part of the furnace and the location of the furnace on the street, only good thermal insulation can ensure uniform heating of food and maximum heating of the unit.
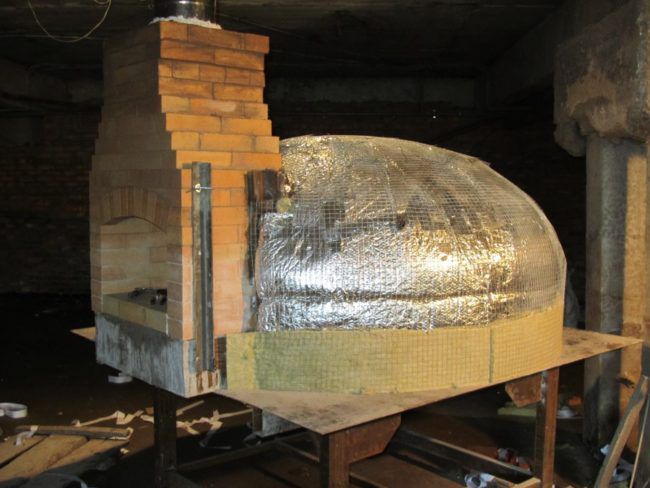
Laying the thermal insulation layer
The heat-insulating layer can be made of mineral wool or based on calcium silicate boards.
A heat-insulating material is laid out along the contour of the dome, and at the same time it is immediately necessary to lay out the material “dry” in order to fit it in shape as accurately as possible.
The final masonry of the dome
Cut out the required piece of material and use flame retardant mastic (or fire retardant glue) to bond to the dome.
Dome thermal insulation
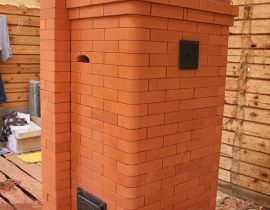
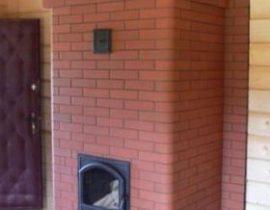
Step 9. Furnace lining.
After the dome is laid out, the plywood frame is dismantled and the heat-insulating layer is laid out, it is necessary to clad the furnace.
Plaster, clay, mosaic can be chosen as a finish. It all depends - on your imagination, on the general style of landscape design and the technical aspects of arranging the stove.
The initial stage of finishing the furnace
If it is not intended to install a furnace under a canopy, then it is better to finish it in 2 layers:
1 layer is heat-resistant plaster, which will protect the top layer from cracking during operation. Lay out this layer at 12 mm. Wait for the complete “setting” and drying of the layer.
2nd layer is moisture resistant plaster. 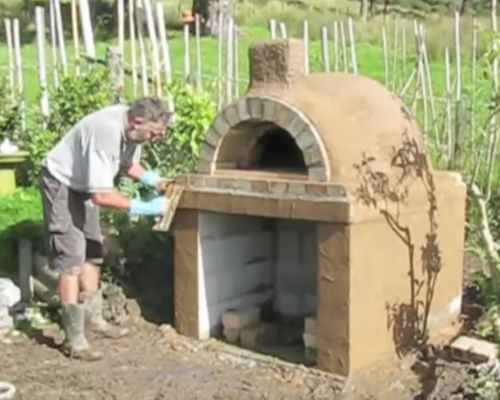 We spread it in 4 mm. Moreover, it can be decorative, have any color.
The technological break between the end of the construction work of the furnace and the first kindling should be at least 2 weeks. If precipitation occurs during this period, then it is necessary to cover the oven with polyethylene.
Step 10Furnace test and first kindling.
Once the oven is laid out and well dried, it is time to fire it up for the first time.
Don't forget to remove the plywood dome that helped you form the vault.
Dismantling the plywood frame is a complicated matter
Do not rush to do this immediately after laying. The mortar on which you laid the brick has not yet hardened and the stove may crack at the first kindling.
Test kindling should take place in 5-6 stages, only after that it can be considered ready for everyday use.
1 kindling. Take 1.5 kg of paper (not glossy) or 2 kg of straw. Ignite and wait for complete combustion.
2 kindling includes 2.5 kg of straw and 0.5 kg of brushwood.
Kindling 3 consists of burning 4 kg wood chips. You can use pellets, but this only applies to test use. In the future, the stove can only be fired with wood.
4 kindling - you can already connect small logs that will give an intense flame.
5, 6 heating - the furnace is operated in its normal state. Already large logs can be used as fuel. The ideal raw material for the firebox of the Pompeian oven is olive or cherry wood.
After the oven is dried and tested, you can start using it. In order to cook pizza in it, you do not need to use any special substrate. The cake is placed directly on the bottom, which gives the food its characteristic smoky flavor. If you want to cook grilled meat in such an oven, then you need to shovel the coals to the side and put a metal grate on the base.
Furnace acceleration
In order to make it convenient to use the Pompeian stove, you can build a small firewood shed nearby, which will reliably protect the firewood from precipitation and become a kind of decoration for the yard.
Pompeii oven in the courtyard
Well, at the end of this article, we recommend watching a video that will help you understand the principle of laying a Pompeian oven in the country.
Video. Making a Pompeian oven.

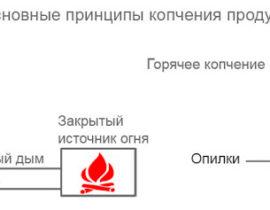


The diagram shows an air duct on the rear wall, and in the description it is mentioned as an important component of self-regulation of the temperature in the furnace. I didn't see it anywhere in the examples. What's wrong?
Hello, the air duct is an important, but not a mandatory component - quite often they don’t do it. I will try to find images of options with an air duct and add them to the site.
The furnace frame does not have to be pulled out - after all, it is needed only 1 time, you can simply burn it at the first fire.
Also, since ancient times, basket-type wickerwork was made as a frame, for example, from willow twigs. On top of it, you can directly smear it with a clay-sand mixture to the desired thickness, and it will already become fixed - then, after the oven has dried, this frame is simply burned out
Hello! Please write :
1. What kind of fireclay brick is better to make under so that the dough does not stick to the hearth !?
2. Is it possible to make a furnace from used fireclay, which was used in the form of a pipe at a silicate plant, after dismantling the pipe itself, has been lying on the street for more than 7 years. On the brick in the circle it is written: B-1, under the line below Q-6, what brand of fireclay is this, can I use it?
Thank you