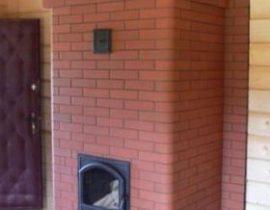
The advent of modern heating devices has made it possible to increase the comfort of life in a country house and in the country. With the advent of new technologies, ancient stoves, it would seem, should go into oblivion.

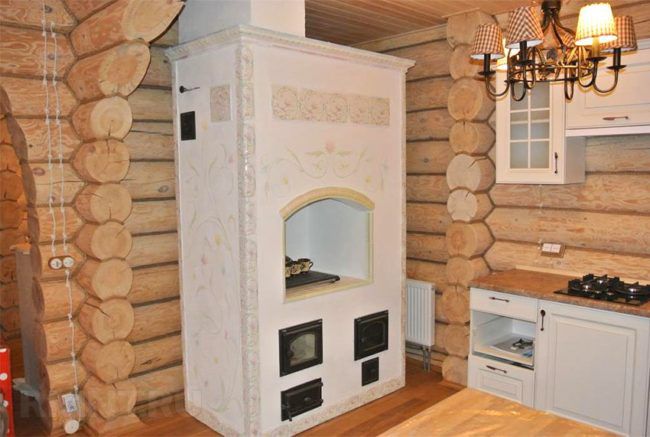
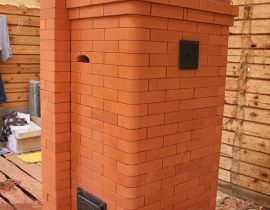
Swede oven with hob and oven
However, a different trend can be observed today.
Increasingly popular are stone ovens, which allow you to heat the house and cook a hearty meal for the whole family. Today we will tell you what a Swedish oven with an oven and stove is. What are its technical features, the principle of operation and how you can make this compact and efficient oven with your own hands.
Content
- A bit of history
- The principle of operation and design of the Swedish oven
- The main advantages of the Swedish
- Types of swedes
- General recommendations for the choice of building materials
- How to make a Swede oven with your own hands: step by step instructions
- Useful tips for masonry swedes
- Video. Do-it-yourself instructions for installing a Swedish oven.
A bit of history
In our country, the Swedish stove is quite popular as a fairly efficient and economical heating design.It can be used both as a home heating and for cooking, heating water.
Swede oven in a country house
In terms of performance, it is in no way inferior to the classic Russian stove, which has been used in our country for centuries to heat the house and cook food. But in terms of fuel economy, and in terms of small dimensions, it can leave the Russian stove far behind.
Therefore, if now you are thinking about what design to heat your house with, pay attention to the technical details of the device of this stove and carefully study its advantages.
As the name implies, this oven model was invented in Sweden. Some sources indicate that the new masonry technology was brought by Peter I to Russia, while others claim that it was invented much later.
Swedish stone oven
One way or another, the Swede was designed by Swedish engineers according to all the requirements and subtleties of the local climate. This model is very similar in design to the Dutch stove, but its main difference is the presence of a wall, which allows you to place the heating structure in two rooms at once.
Given the cold and damp climate for most of the year, the oven had to not only heat, but also dry clothes overnight, because in the morning hunters and fishermen, who were the majority of the local population, had to start working again and, in order not to get sick, clothes should was to be well dried and warmed up.
Another notable feature of the Swedish stove is the combination of two functions: space heating and cooking. A large cooking surface allows you to cook dinner for the whole family, and heat the water.And in the oven, which is usually equipped with a Swede, you can bake bread.
Swede between kitchen and living room
In addition, the peculiar shape of the furnace - in the form of a cap - allows you to efficiently burn fuel and keep the firewood smoldering for a long time, which increases the efficiency of the furnace.
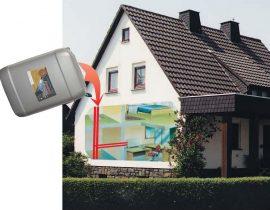
A small Swedish oven with a hob and an oven is designed to be placed in the wall between the kitchen and the living room. It is this placement that is traditionally used in northern countries.
Due to this arrangement, the kitchen warms up quickly, it is convenient for the hostess to cook food, and the residual heat that is generated for cooking effectively warms up the whole room. Thus, with one bookmark of firewood, you solve two problems at once: the house will be both warm and satisfying.
Swede with a bed
In the old days, such stoves were equipped with additional deck chairs that protected from the cold at night. Now in modern homes you can find small and compact Swedish stoves with an oven and a hob, which are both a functional design and a stylish interior decoration.
Today on sale you can find a wide variety of Swedish stoves of various designs: with a water circuit, with an oven, with a hob.

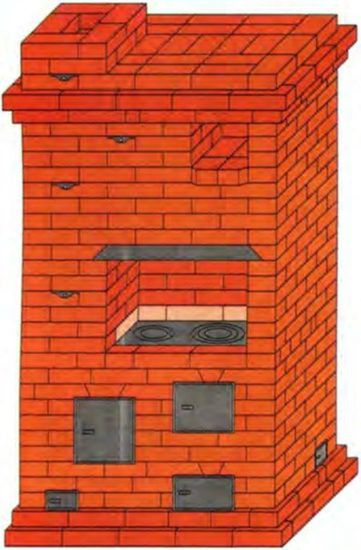
Example of a Swede with two ovens
And you can build it with your own hands, having elementary experience in laying the furnace.
The principle of operation and design of the Swedish oven
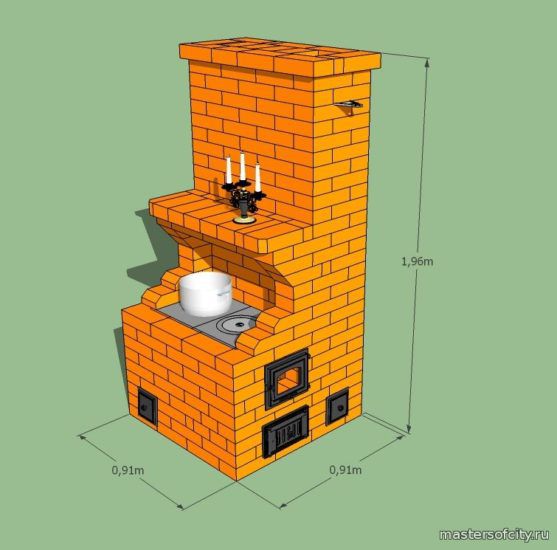
The compact dimensions of the stove (1020x885x2030mm) allow you to place it in a small country house, in the country. But despite the small size, such dimensions of the Swede stove are enough to effectively heat a room with an area of 30-35 square meters.
Depending on the type and type of Swede, the designs will also differ.So, for example, to equip a Swede with a sunbed, it is necessary to equip horizontal channels with a winter / summer mode. Thanks to a special valve, which is installed in a straight vertical channel, it is possible to block the latter.
In winter, such a valve closes, and the heat moves in a large circle, warming up the entire stove along with the lounger. And in summer, the damper opens a direct outlet for warm air into a vertical pipe through which the gases go outside. This makes it possible to use only the hob and oven without heating the room.
Swede oven
The "Dutch" scheme was taken as the basis of the Swedish oven. This model was already very popular, but it did not allow for efficient heating of the room, and the fuel consumption was too high.
Given the harsh climate of Scandinavia, the developers improved the Dutch model and added a hob with an oven. Thus, elements were added not only for cooking, but also for heating water and drying clothes.
Whatever the design of the stove - with a sunbed, with an oven or just a stove - the principle of its operation will be the same: channel, like the "Dutch".
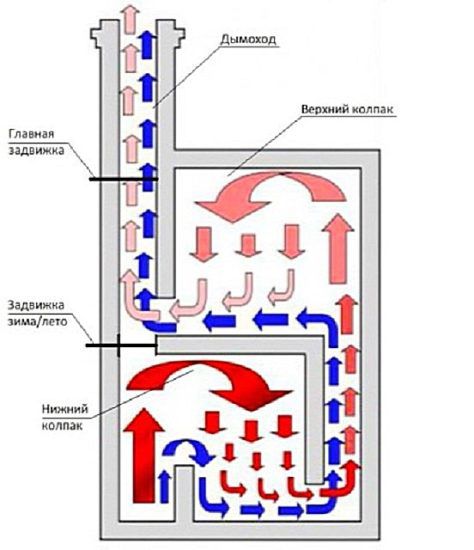
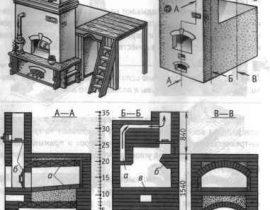
Swedish: scheme
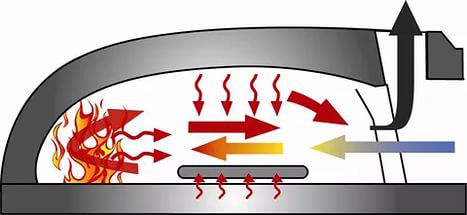
The metal oven is located on the side of the firebox and is designed to transfer heat directly into the room. But cooking and baking is not the main function of the oven.
After kindling firewood, it warms up in just 5 minutes. The figure shows, due to which such a rapid heating of the furnace occurs.
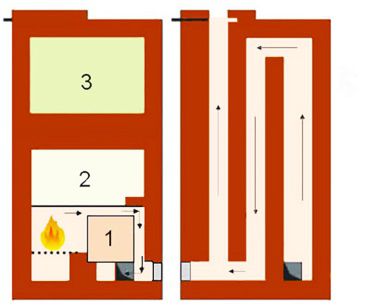
Swede design
Before going down, the combustion products heat the oven at the top and side. On the other hand, the stove is heated by a firebox. The stove warms up from the firebox, heating the room itself.
The top part was originally designed to dry clothes, it is heated by the stove and by the channels running at the back. The channels, going around the entire oven, go into vertical channels and transfer heat to things that are hung out to dry.
The principle of operation of the Swedish oven
The design of the Swedish stove is the result of improved engineering. Unlike Russian and Dutch stoves, it has a more complex device with high efficiency. It has a significantly higher thermal power and heat dissipation.
If we take the same amount of material and add up the “Dutch”, then we will get a power of 2500 kcal / h, while the Swede will give out all 3500 kcal / h. At the same time, it will be enough to lay only 2 portions of firewood per day so that the house is kept warm.
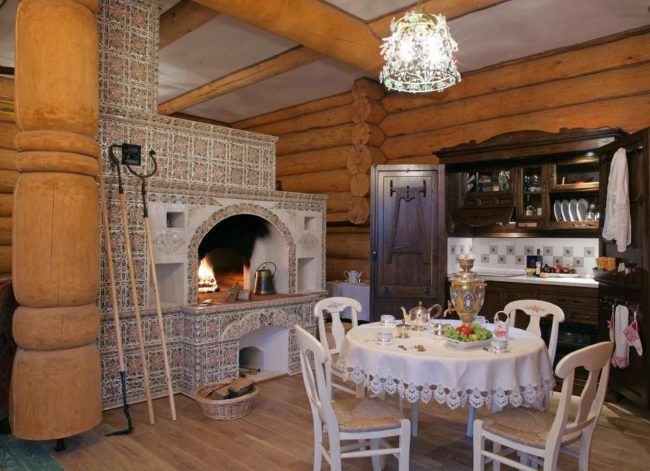
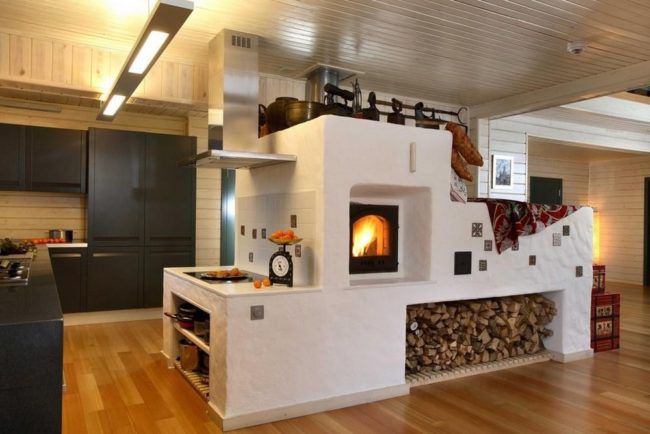
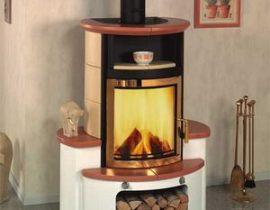
Swedish in a modern interior
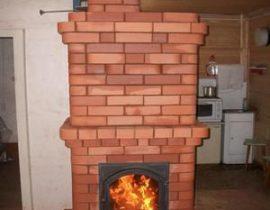
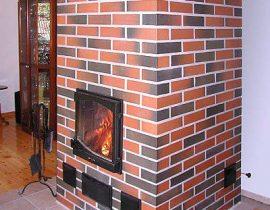
If in Scandinavia Swedes were traditionally installed between the kitchen and the bedroom so that it would warm the room on a cold winter night, today in stylish and modern houses you can increasingly find a stone structure that stands between the living room and kitchen.
At the same time, it performs a dual function: it serves for cooking and is the main decorative decoration of the living room. On the one hand, it can be equipped with an oven, and on the other hand, with an open fireplace decorated with an openwork forged damper.
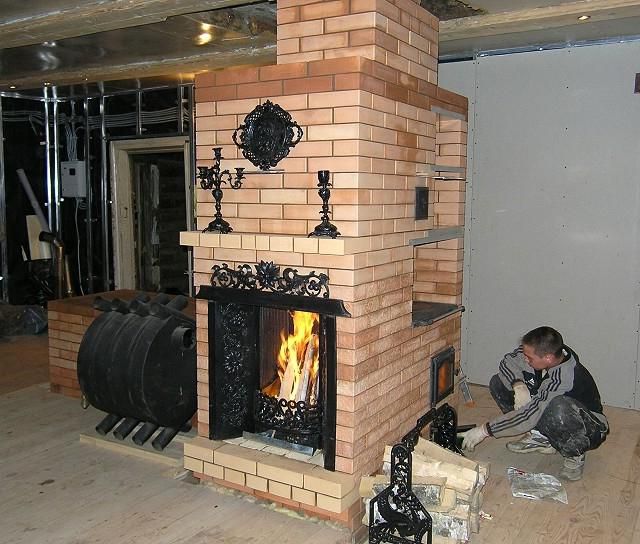
Swede with a fireplace
High profitability and efficiency of the stove is due to a complex chimney system, which makes it possible to rationally use the heat generated by burning firewood. One of the undeniable advantages of the design is the ability to create winter and summer versions of the furnace.
The fact is that each type has its own path for the passage of smoke.This makes it possible to cook food without heating the room in summer.
Many summer residents are familiar with the situation when, with the beginning of the heating season, when the stove is kindled, the room is smoked. A separate smoke exhaust system is also provided here, which allows you to effectively use the stove with different functions both in winter and in summer.
The main advantages of the Swedish
The design of the Swedish stove is most attracted by the efficiency of fuel combustion.
Thanks to a successful technical design, coal, firewood, reeds or small wood burns in the furnace, forming a large mass of thermal energy.
Unlike the traditional Russian stove, which takes a long time before it starts to give off heat, the Swede warms up very quickly. Thanks to this, already 10-15 minutes after laying and lighting firewood, the room is filled with heat.

Swedish: advantages
At the same time, it not only quickly warms up the room, but also retains heat. To do this, after the extinction of firewood, it is necessary to tightly close the valve. Otherwise, all the heat that has accumulated in the furnace will quickly come out.
Like the popular Dutch, the Swede is very compact and does not take up much space in the house, which is indispensable in small country houses, where the location of a large Russian stove simply does not make sense.
In addition, the cooking hob and oven provide additional comfort and increase the functionality of the oven.
Advantages of the Swedish:
- compact dimensions;
- functionality (hob, oven, water heating, etc.);
- economy of fuel consumption;
- the ability to heat two rooms at the same time.
But, speaking about the merits of the Swede, it would be unfair not to notice some of its shortcomings.
The design of the Swedish stove is very demanding on the choice of material. If an ordinary fireclay brick is suitable for creating a Russian stove, then it is necessary to stock up on very high-quality materials, otherwise the efficiency of the heating apparatus will be greatly reduced.
In addition, the design of such a furnace is quite complex and requires certain knowledge and a very fine, scrupulous approach. After installation and launch, it will be very difficult to eliminate your mistakes.
Types of swedes
There are several popular types of Swedish oven.
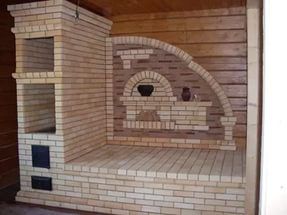
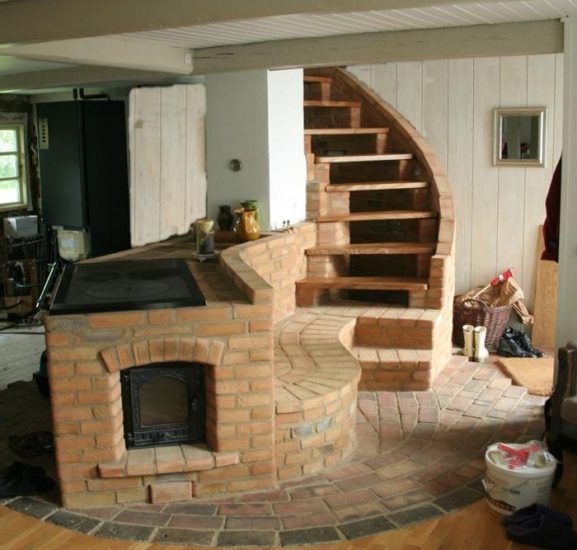
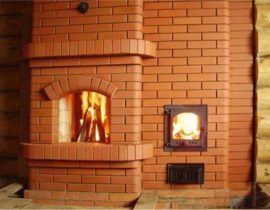
- The stove in the form of a fireplace is designed in such a way that the hob goes to the kitchen, and the decorative part with a firebox and a fireplace portal goes to the living room.
- Swede, equipped with a sunbed. This stove design is quite complicated, but in winter it functions as a very cozy and warm bed.
- Swede, equipped with a hob and oven. The back of such a stove heats the room, and the functional front is located in the kitchen.
The choice of furnace design depends on the area of \u200b\u200bthe room and the functional tasks that it must solve. If the stove is needed exclusively for cooking in the country and it is not supposed to heat the house in winter, then you can opt for a compact design.
Swede with one plate
If the stove is equipped as the main heating device, then it is better to choose a model that can heat several rooms at once.
It should be said that the Swedish stove design is ideal for a small country house, in which the owners live not only in the summer.
Of course, it is also suitable for a small cottage. But the Swede quickly dampens, which means that it requires constant operation.Otherwise, it will have to dry for a long time each time before being put into operation, and this significantly reduces its efficiency.
With regular use, such a stove, equipped with a comfortable hob and a functional oven, will become an indispensable household helper and give warmth and comfort in the house.
General recommendations for the choice of building materialsin
Taking on the construction of a Swede stove with your own hands is only worth it if you already have at least some initial masonry experience. This is a rather complicated design and should not be chosen as the first experiment.
If you have elementary bricklaying skills and have already dealt with the installation of furnaces, then our detailed step-by-step instructions will allow you to master this process. Follow the instructions exactly and build each row in accordance with the indicated scheme.
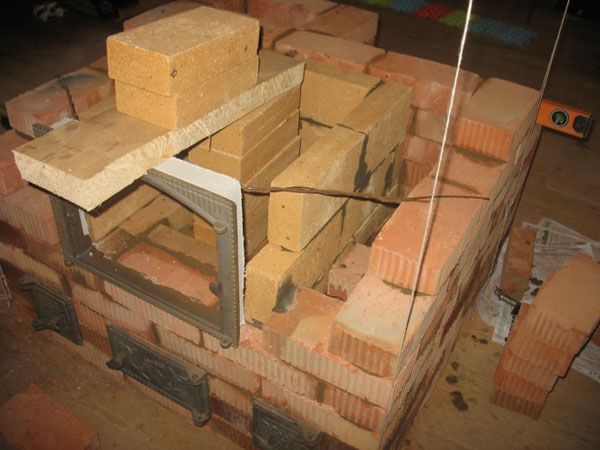
Do-it-yourself Swede oven
As mentioned above, the Swedish oven requires a very careful and accurate approach. Unlike a traditional Russian or Dutch stove, a used brick will not work for it. The efficiency and productivity of the Swede directly depends on the quality of the material. It is better to take fireclay or red brick.
Important! It is unacceptable to take silicate or hollow bricks for the construction of the furnace.
You should also pay attention to the choice of solution. For the construction of a firebox, it is necessary to knead a solution of special chamotte clay, which can withstand high temperatures. Clay should be smooth, medium fat.
To check if the kneading is done correctly, take a thin layer of clay and apply it to a vertical surface. It should not drain and the consistency should resemble thick sour cream.In no case, lumps or unmixed solution should be present in the mixture.
Ordinary clay is suitable for facing the heating structure. If you make a chamber for igniting fuel from it, then it will crack, and the integrity of the furnace may be in jeopardy.
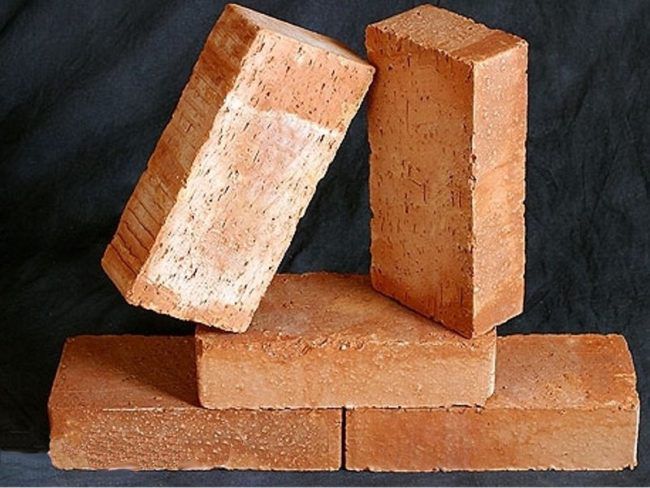
fireclay brick
Separately, it should be said about the foundation for the Swedish stove. Given its large weight, the base must be made powerful. It takes at least three weeks for the concrete monolith to harden. If you rush and start laying on a fresh, not completely frozen foundation, then the stove can deform under heavy weight.
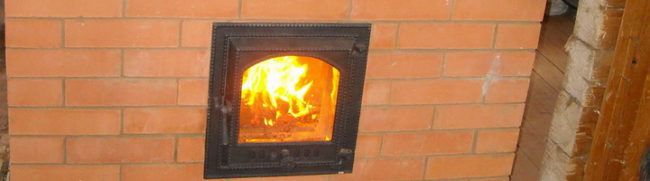
One of the weak points of the Swede is the furnace door. If you take a budget door from a stamped sheet, then it will quickly loosen and fail. Therefore, it is necessary to take a cast door with a mustache, which during masonry will need to be securely walled up.
You can vary the size of the stove and oven within 5-10 cm, but the thickness of the oven is of great importance. If you cook the oven yourself, then use steel, which does not conduct heat well. If you take a thin roofing iron, then such an oven will cool down quickly.
How to make a Swede oven with your own hands: step by step instructions
Before you begin construction work, stock up on the following material.
Also keep in mind that all construction work must be carried out in the warm season. After all, to harden the foundation, the temperature must be at least 50FROM.
Material for the construction of the Swede oven:
- Clay for bricklaying. It is not worth saving on it, since the durability and reliability of the furnace will depend on the quality of the solution.
- Chamotte brick GOST 530–2012.This is a special refractory brick that is used for laying furnaces. Do not take ordinary brick, which is not able to withstand prolonged exposure to high temperatures. After a few months of operation, it may crumble or crack from the high temperature of the furnace.
- Metal door for the combustion chamber, damper and valve. This is an essential attribute of the oven. It is better to take cast iron products that ensure the durability and reliability of the furnace.
- Boards for creating formwork (the size depends on the size of the foundation).
- Asbestos cord and sheet. These materials will be needed to create a fireproof layer between the furnace and the walls of the house.
- Blower door (14*14 cm).
- Grate - 1 pc.
- Gate valve for chimney channels (3 pcs).
- Oven 45*36*30 cm and hob 41*71 cm.
- Metal corner.
- Cast iron grate.
- Decorative plaster or red brick for lining the stove. Ordinary clay, artificial stone can also act as a topcoat.
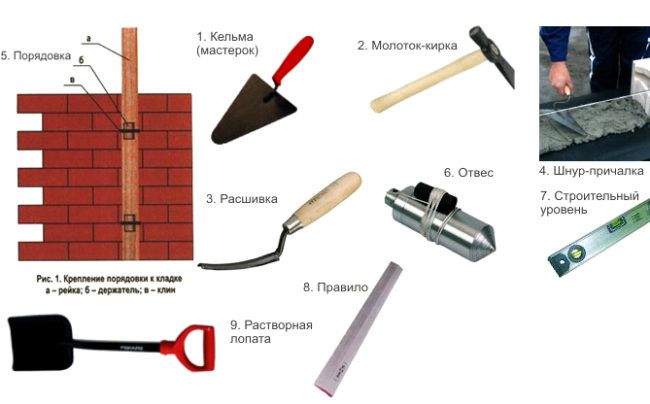
Furnace masonry tools
What tools might be needed?
- bayonet and shovel;
- construction mixer (for mixing mortar);
- container for mixing the solution;
- metal sieve;
- Master OK;
- rubber mallet;
- construction stapler;
- building level;
- marker and measuring tape;
- plumb.
Swedish do-it-yourself
Step 1. Determine the place where the Swede will be located.
It depends on a number of factors: the location of the doors, the area of \u200b\u200bthe room, the characteristics of the roof, etc. It is important not only to consider where the stove will look more spectacular, but also immediately take into account the installation of the chimney system.

Sample oven with hob
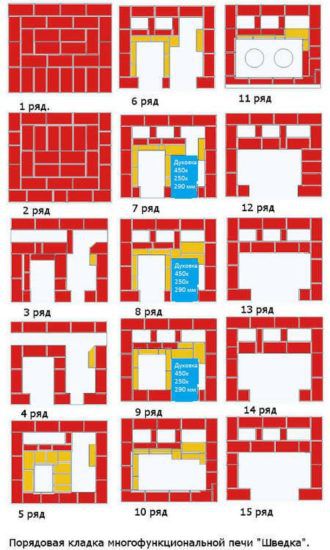
- We draw a plan. This is a very important stage in the construction of the furnace.In order to understand how the stove will be arranged, how the channels will be located and how much material you will need for masonry, you need to draw a detailed plan.

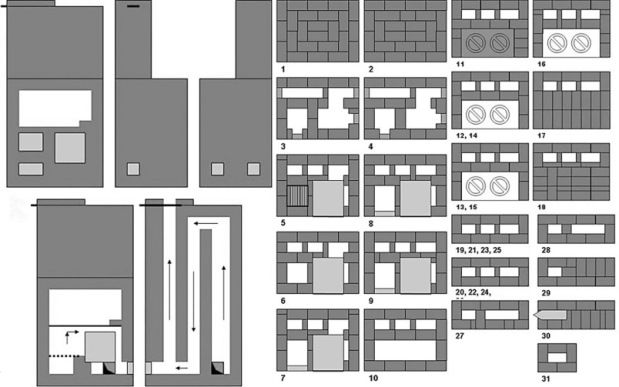
Swede ordering
- Lay out all the bricks “dry” according to the scheme to see if you have enough material and finally decide on the placement of some elements. Please note that after laying a brick on a mortar, it will be very difficult to correct errors.
Attention. Despite the fact that you will perform a “training” dry layout of the entire oven, it is better to lay out each new row dry too, in order to prevent mistakes that will then be difficult to correct. Even very experienced craftsmen use this method.
Step 2. Arrangement of the foundation.
Whatever type and design of Swedish stove you choose, the foundation is one of the most important stages on which the efficiency and durability of the stove depends. The ideal solution would be to equip the foundation for the stove at the stage of laying the house.
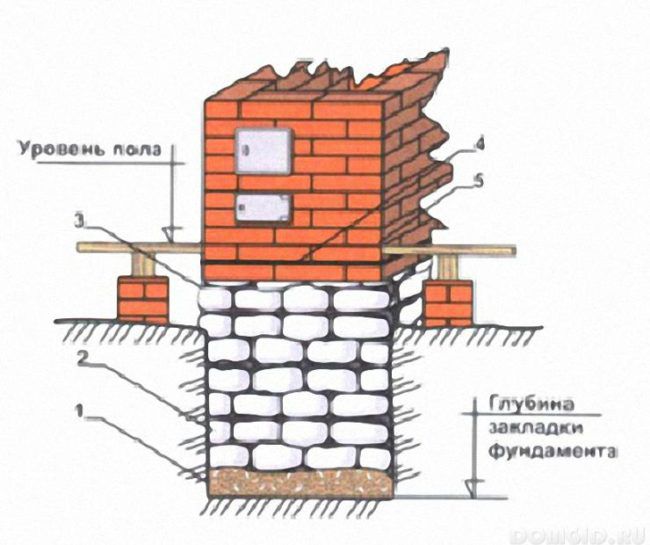
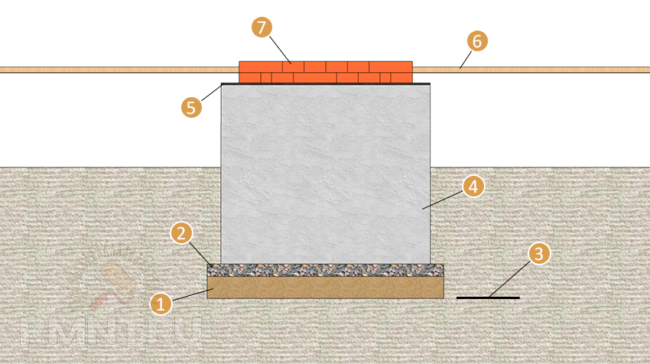
Approximate scheme of the foundation for the furnace
If the decision to build a Swedish stove has already been made in a finished house, then it is necessary to create a solid foundation, separating it from the main foundation for the house. This is done for security purposes. If over time, the foundation of the house shrinks, then it will not pull the stove along with it.
Concreting process
The foundation for a Swedish stove with an oven and a hob should be deepened into the ground by 70-80 cm. We take the most difficult option: building a stove in an already finished house with a wooden floor.
- On a wooden floor, we make markings with a construction marker for the location of the stove. Having clearly measured the dimensions of the oven, add 10-15 cm on each side and mark with a line.Thus, the foundation will be wider than the base of the furnace by these 10-15 cm.
Cutting a hole in the floor
- Using a grinder or a saw, we cut out a hole in the wooden floor according to the markings.
- Now we mark the ground, which is under the main floor screed.
We build the foundation
- We swarm a pit of the right size with a bayonet shovel.
- The bottom of the pit is well tamped and covered with sand. Pour with one bucket of water and once again tamp the sand well. Be guided that the thickness of such a sand cushion should be at least 10-15 cm with a pit depth of 70-80 cm. If you dig a foundation pit to a greater depth, then the height of the sand cushion should be increased.
- The next layer is poured crushed stone (by 10 cm) and also tamped well with the help of a bayonet shovel.
- Strom wooden formwork under the foundation. To do this, you can take used boards. From this, the quality of the foundation will not suffer. We lay polyethylene around the perimeter of the formwork and nail it to wooden boards using a construction stapler. Also, waterproofing can be performed using roofing material.
base for oven
- We raise the formwork to the floor level. If you do not plan to make a brick base for the oven, then the formwork can be raised to the level of one brick above the floor.
- Now you need to prepare a mixture for pouring the base of the foundation. A mixture of coarse crushed stone, cement and sand is ideal. This portion should be enough for you to fill the bottom of the pit, for a thickness of 10-15 cm.
- Fill the base of the pit with the resulting mixture by 15 cm.
- To strengthen the base, it is necessary to take metal reinforcement and insert it into a fresh solution.
- We are preparing the main solution for pouring the entire pit. To do this, we already use crushed stone of the middle fraction, cement and sand.Mix the solution well with a construction mixer.
- We fill the pit with mortar to the height of the soil. Smooth it out well with a shovel and set aside. A few hours later, after the cement mortar has set, we lay the reinforcing mesh on top. We give an hour for a slight shrinkage to pass.
We reinforce the foundation
- Now, on top of the grid, we fill the entire foundation with the remaining solution to the top of the formwork. Smooth well with a shovel. Use the building level to check how evenly you managed to pour and level the foundation. After this, it is necessary to allow the foundation to harden and settle. This process is quite lengthy and will take at least a month. It is not worth rushing in these matters, since the success of the entire enterprise depends on the strength of the foundation.
- After 28-30 days, when the solution has completely hardened, we remove the upper part of the formwork (the one above the floor).
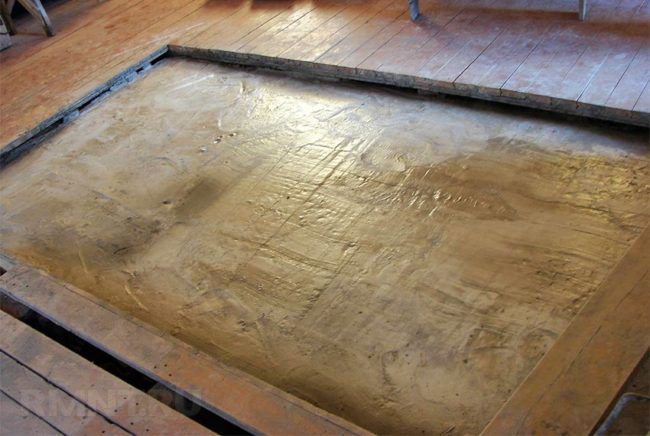

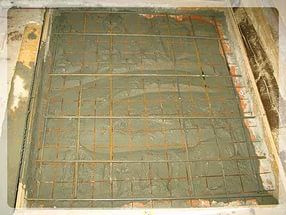
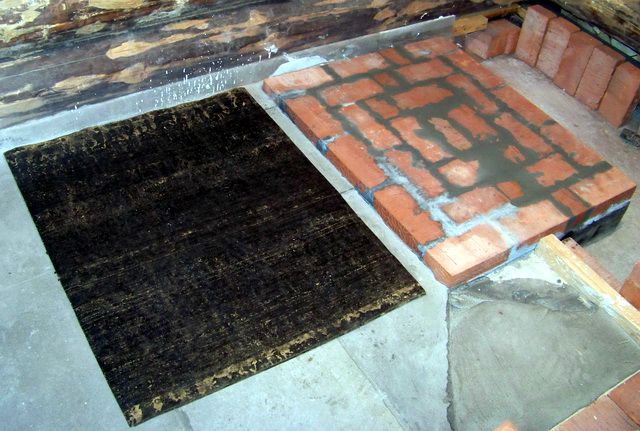
Step 3. Create a waterproofing layer.
- We take several layers of roofing material (the size is exactly the size of the foundation) and glue them together using a construction stapler.
Foundation waterproofing
- We lay this waterproofing layer on a flat surface of the foundation. Now you can already start laying the furnace itself.
- A technical design feature suggests that the Swede delivers most of the heat to the floor. This necessitates reliable thermal insulation of the floor and foundation. For these purposes, it is best to use basalt cardboard - a reliable and inexpensive material. For better insulation, at least three layers of 5 mm cardboard should be laid.
Step 4. Lay out the oven.
- On the roofing material, mark the first row with chalk or a construction marker.This is a crucial step, since the evenness of the entire structure will depend on its evenness.
 On the roofing material, mark the first row with chalk or a construction marker.This is a crucial step, since the evenness of the entire structure will depend on its evenness.
Important! Check each layer of masonry. To check the verticality of the masonry, use a plumb line. For horizontality - building level.
Before proceeding with the laying of the Swede, it is necessary to replace the clay mortar for the installation of a stone oven. Follow the video instructions to properly prepare the clay-sand mixture.
Video. How to prepare a clay-sand mixture for laying a stove
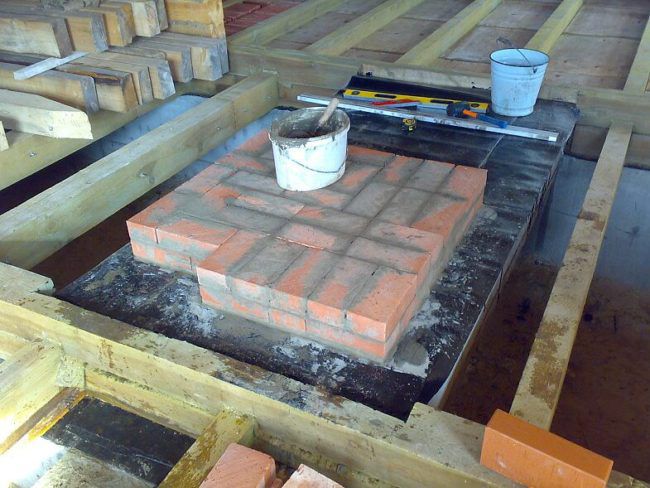
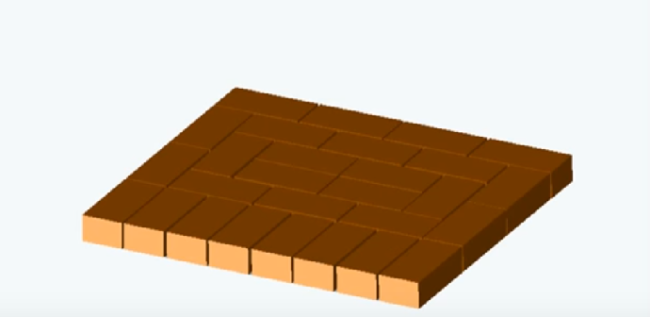
1-2 row solid
The first two rows are solid, according to the markup. This row will serve as a kind of guide for everyone else, so it is very important to make it accurate and observe all angles. To do this, you can use a measuring square.
3rd row
The 3rd and 4th row forms an ash chamber in which all the ashes and ash accumulate. On the same row it is necessary to install 3 doors for cleaning. In order for the doors to be securely fixed on the bricks, they should be strengthened with a metal wire, and the wire itself should be laid in a clay mortar.
- All gaps between brick and metal elements must be filled with asbestos cord.
We lay the ash chamber
Install the doors so that their top is clearly aligned with the horizontal masonry seam. Please note that on the 3rd and 4th row the channels are interconnected.
5th row
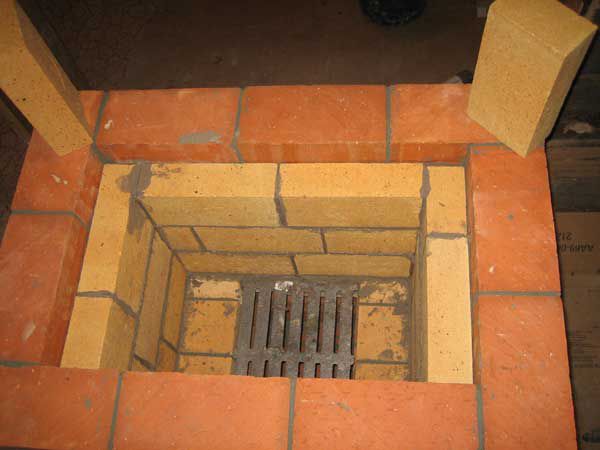
The 5th row begins to form the combustion chamber. Perform laying from right to left. Lined with refractory bricks. We install the grate, make a seam gap of 3-5 mm. This gap must be left taking into account the expansion of the metal at high temperatures. The gap can be filled with sand or ash.The blower door is also closed here, which finally forms the ash chamber. We lay out all the elements with red brick, and the ash pan itself with fireclay.
6
- Installing the oven.
- The 6th row begins to form the chimney. Here we lay the base of the firebox.
7th row
7,8,9th rows form a combustion chamber lined with fireclay bricks. Here we begin to build the firebox door, observing a gap of 3-5 mm, which we lay with an asbestos cord. Between the firebox and the oven we build a wall of fireclay bricks, the rest of the masonry continues in red.
- We make a mustache on a cast furnace door. To do this, we take an annealed steel wire 3-4 mm thick and weld it at the corners of the door directly to the frame in the shape of the letter U. We securely wall them up with clay mortar in brickwork. After that, for reliability and increasing the duration of operation, we reinforce the top with a metal corner.
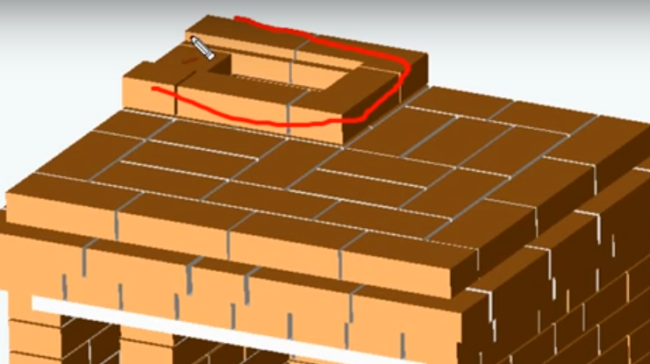
- On the 8th row we close the vertical channel.
Blocking the entrance from the lower chamber
- On the 9th row, it is necessary to cut the bricks at an angle in the lower and upper parts. We do this so that all the smoke from the furnace smoothly goes into the chimney.
9
Attention! Between the firebox and the oven we put fireclay bricks on the edge!
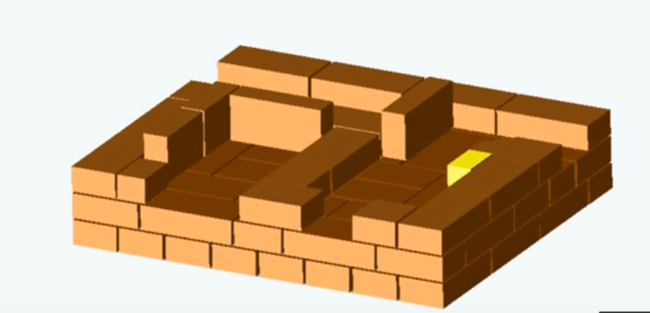
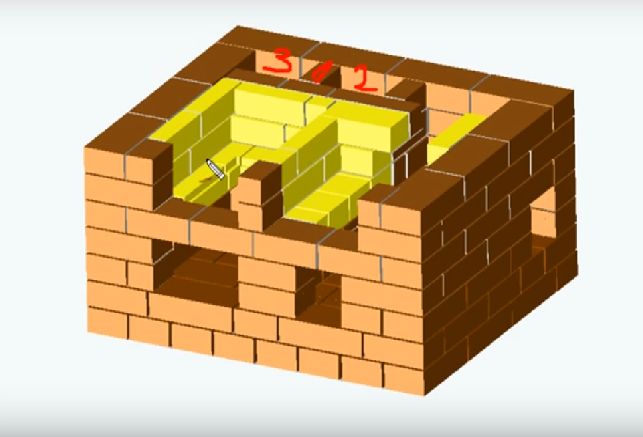
- On the 10th row, we block the oven and the door of the fuel chamber. We create a partition from a brick, raising it by 2 cm. On the oven, to the level of the partition, we apply a clay-sand mortar. Here we lay a metal corner (on the front side under the stove).
10
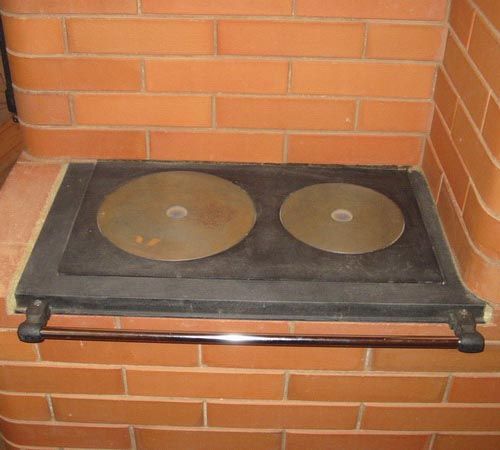
- We form the 11th row according to the order and lay the hob on top.
11th row

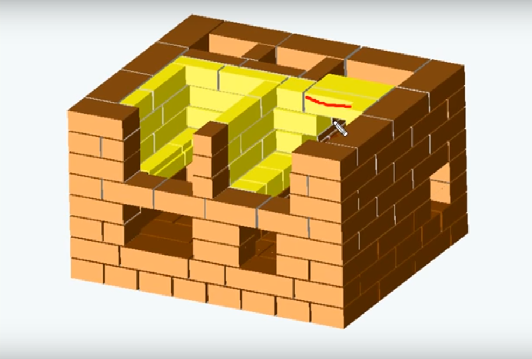
- 12th row - we form smoke channels.
- From the 13th-16th row we lay smoke channels from bricks.
- 17.18th row. We put the brick on the metal corners to block the hob.In the corners, we first make holes (sometimes they already come with corners), through which we pass a metal wire.
We build up the masonry
We twist the wire with a bundle and lay it between the masonry.
Making an overlap
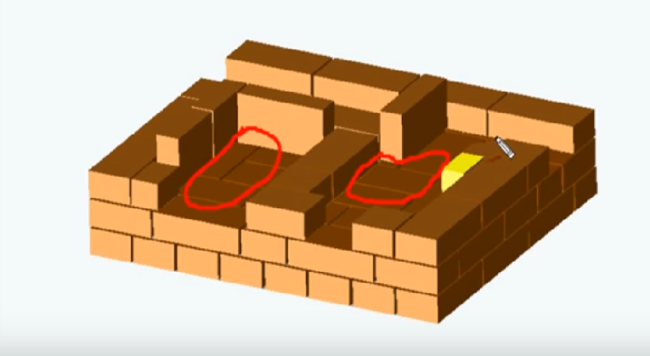
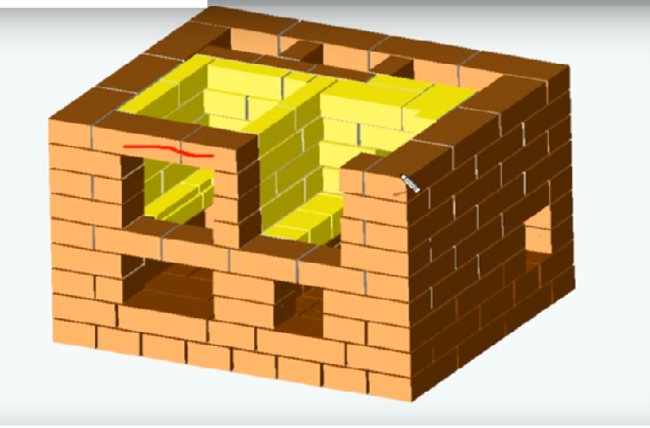
- 19th and 20th row we install cleaning doors. Here we begin to form drying chambers. According to the scheme, we have two of them: large and small. We also continue the formation of the steam-exhaust channel.
We form drying chambers
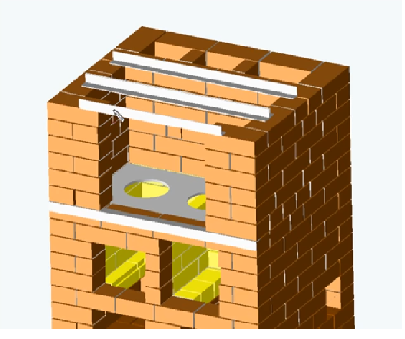
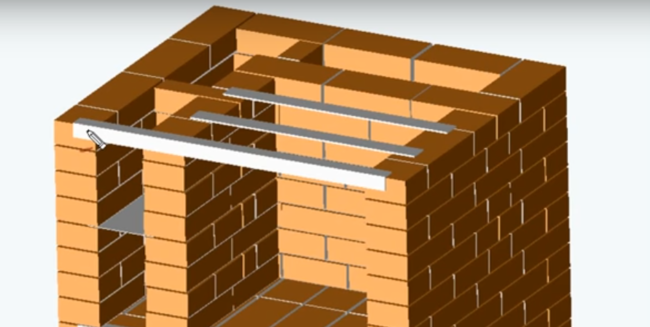
- 21-28th row we continue to build up the drying chamber, blocking a small small shelf made of sheet metal.
Seat for a latch
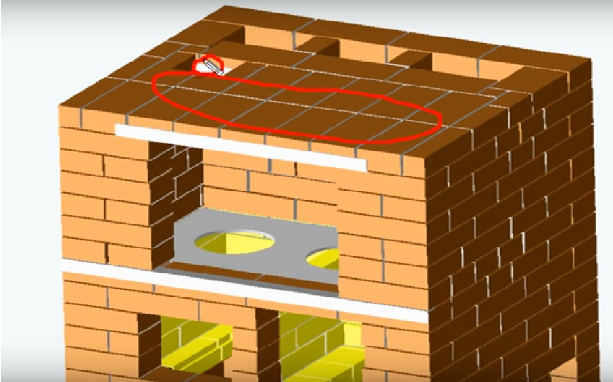
- On the 27th row, we mount the valve, taking into account a gap of 5 mm, between which we lay an asbestos cord.
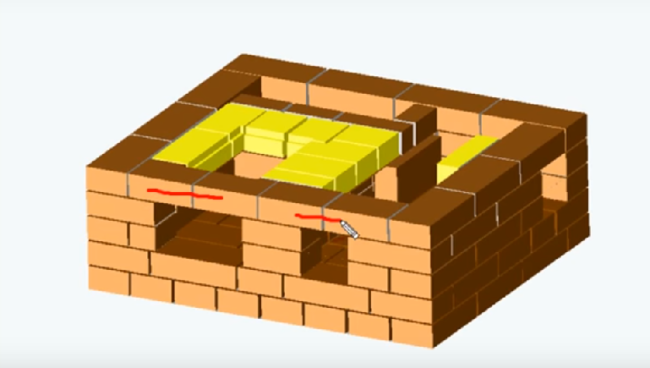
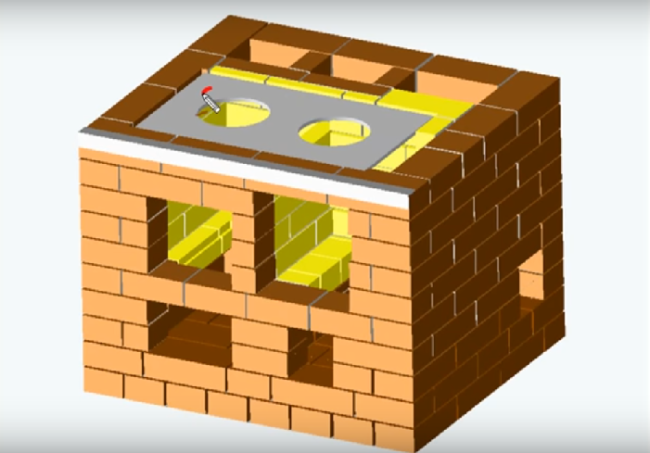
- On the 29th row, the masonry is expanded by ¼ brick to create a cornice. Here we block all channels, leaving only the pipe.
Connecting channels
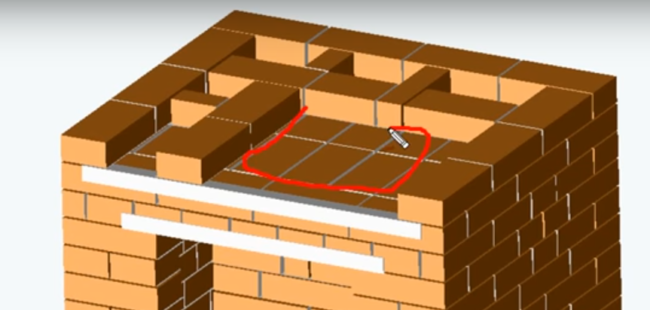

Here, on this row, we need to block the drying chambers. To do this, we install a metal corner, as shown in the figure.
Close dryers
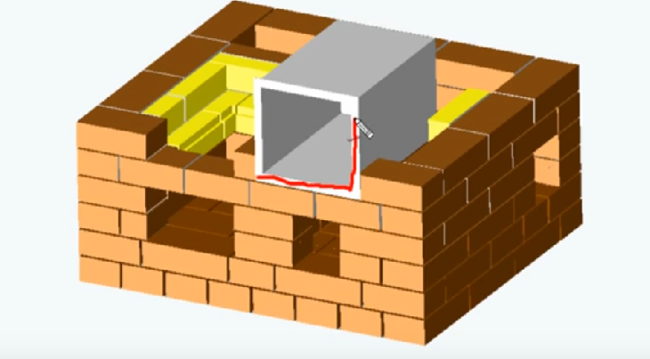
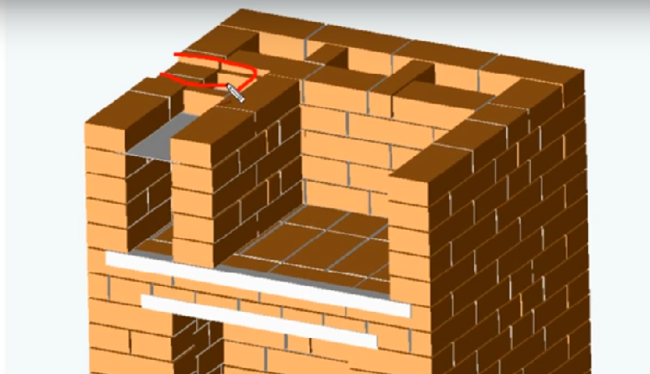
We cover the whole structure with a metal sheet. Please note that in the sheet it is necessary to cut a notch for the third channel with a metal knife.
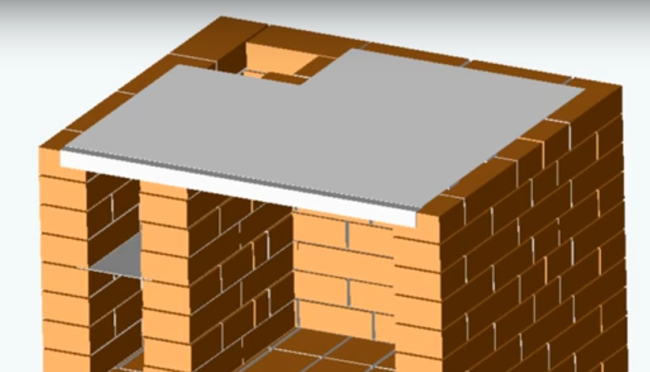
Covered with a metal shield
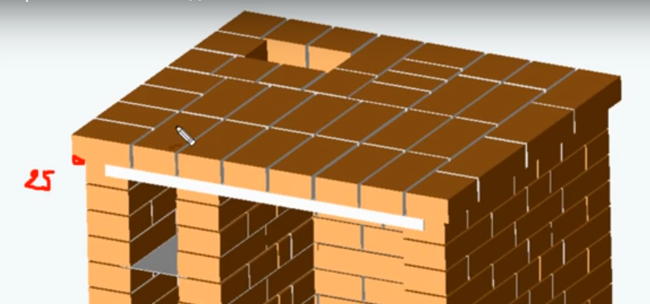
- We overlap all this with a continuous row of bricks, protruding 25 mm beyond the edge.
Protrude 25 mm
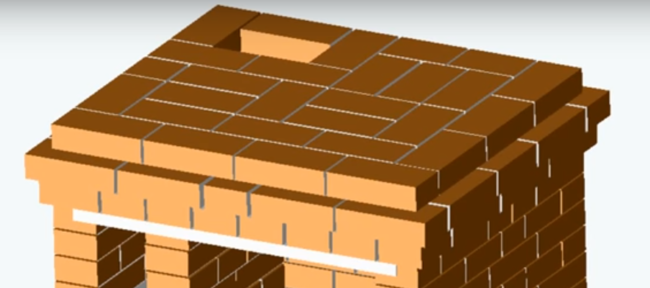
- On the 30th row, we make an additional extension of 5 cm.
- On the 31st row, we reduce the size of the furnace to its original form.
We return to the original form
Step 5. Laying the pipe.
- We build up the pipe by 5 bricks.
We begin to build a chimney
- 3 rows before the ceiling, we make a “fluff” of the pipe to protect the wooden structure, while the thickness of the pipe should be 1.5 bricks.A very important point in the construction of the Swedish oven is the rounding of the corners of the brick. The fact is that the thrust in such a design is quite weak. If you do not cut corners, then the turbulence that forms at sharp corners will further weaken this thrust. Fluff prevents wind from entering the chimney, reducing draft. The pipe itself should go 60 cm above the roof.
- We install a metal cap on top of the pipe.
Step 6. Drying the oven.
It is impossible to start operating the furnace immediately after laying. It is recommended to wait 10-14 days. In this case, the first 2 weeks should be natural drying. If weather conditions do not allow the solution to dry naturally, then this process will have to be ensured with a fan.
Dry the oven well
While drying the oven, line the cleaning doors with crumpled paper or newspaper. It will be a kind of drying indicator. As soon as you see that the paper is no longer damp, then the drying has taken place successfully.
Over the next 2 weeks, you can begin to gradually put the furnace into operation.
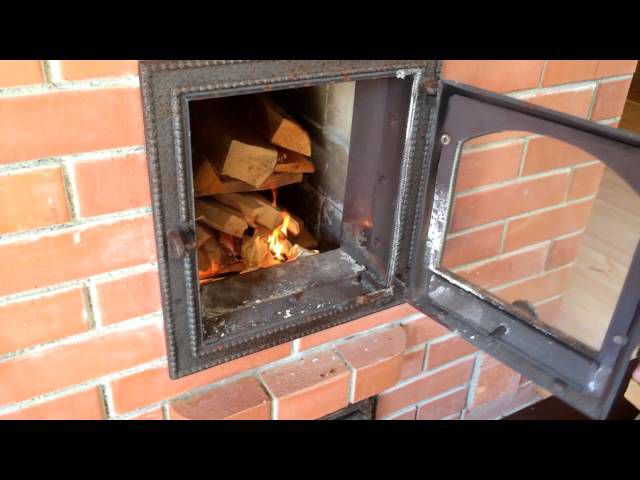
Kindling the furnace
To do this, lay as often as possible small portions of fuel (2-3 kg of firewood each). As soon as the previous batch burns out, add a new portion. Thus, you must ensure that the furnace burns continuously.
Aspen firewood will be ideal for these purposes. They help to effectively dry the furnace before the main commissioning. But birch or any pine firewood is better not to use for these purposes. They give off maximum heat and create a lot of soot, due to the high resin content.
Useful tips for masonry swedes
- During the entire laying process, try to monitor the thickness of the seam. It should be 5 mm.
The seam between the furnace and masonry
- To prevent the brick from absorbing the moisture of the mortar during laying, it is recommended to wet it before construction work. It is enough to dip it in water for more than 1 minute so that it absorbs a sufficient amount of moisture.
- Do not forget to check the vertical and horizontal evenness of the masonry. To do this, use the building level and plumb line. Use corners to check the evenness of the oven corners.
- After laying the stove, wait 2 weeks until it dries well. If you build a stove in the summer, it will dry naturally. In cold weather, use a fan.
- Any furnace master will tell you that the less metal in the furnace, the better.
Leave a gap between the seams
But for hanging masonry, metal corners cannot be dispensed with, because arched vaults are not suitable here (Swede is distinguished by its compactness). The only condition that must be observed is that nothing can be done right next to the iron or put iron on bare brick. In all places where it is planned to join metal parts with bricks, a mortar layer of 5-6 mm should be laid.
- When laying the hob on a brick, it is necessary to lay a layer of clay mortar on it. This will protect the brick from heating.

Swede oven
Following our detailed instructions, you will definitely be able to correctly lay out the order of the furnace. A useful video will help you visually understand the layout of the masonry.
Video. Do-it-yourself instructions for installing a Swedish oven.


Is it that it turns out that the oven is heated only at the very top?
Is there enough fuel? or will you have to burn a whole birch tree to bake pies?