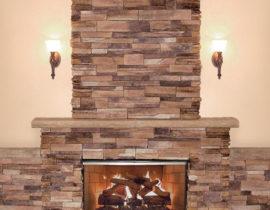
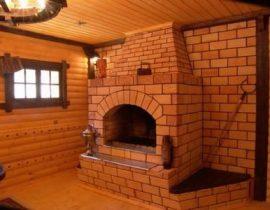
Swede oven — This is a popular heating solution for the home. Due to the variety of their designs, you can choose the most optimal for any home. This oven can be massive or compact, have additional features or simply heat a room. Swede stove with fireplace — one of the most beloved models, as she will create certain a comfortable mood in the house, warm it up, provide an opportunity to cook food, and also not leave hosts without heated water.
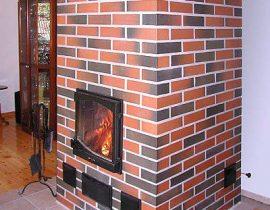
Swede stove with fireplace
The oven heats up quickly and means, the house will have the right microclimate soda much faster than from large structures that heat up for a long time.
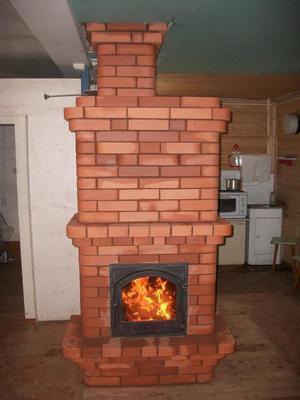
"Swede" is located between the living room and the kitchen — Thus, two rooms are heated at once, as well as goes processss prcooking. In addition to this, the fireplace can be fired separately at a convenient time, for example, when a romantic evening is organized or you just want to sit in silence by the fire.
Content
The history of the "Swede"
A “Swede” appeared, as can be seen from her names, in Sweden in the middle of the 18th century, and it was developed on the basis of the Dutch oven, a hob was added to it for greater functionality, but developments with a fireplace appeared later. According to legend, in Russia, the "Swede" appeared along with captured near Poltava by the Swedes, and took root due to its economy, compactness and functionality.
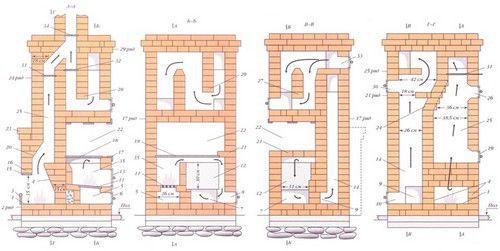
The structure of the "Swedes"
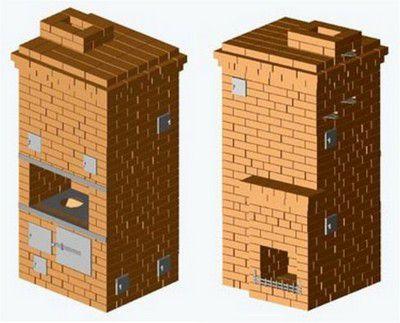
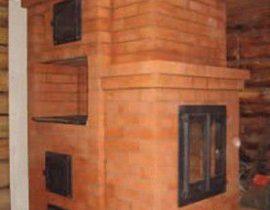
View of the "Swede" from both sides
In this design of the stove, one can say most important and a favorite compartment for many is the fireplace, which is turned towards one of the living rooms — it can be a bedroom or a living room.
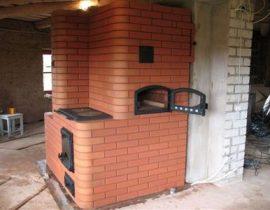
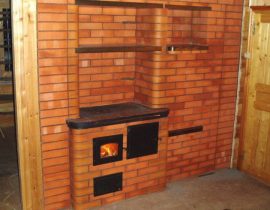
The hob, firebox and oven are located on the side opposite to the fireplace. In this way, the stove divides the house into two zones — kitchen and residential. An ash pan is located under the firebox, and chambers for cleaning are placed in different parts of the structure. The furnace body goes into the chimney.
Perhaps the disadvantage of this design is the lack of a hot-water tank and a drying chamber. But, the compactness of the furnace allows you to place her in a house that has a very small area, and this can be called her significant advantage.
Necessary materials
For a durable building "Swedes" you need to purchase high-quality building materials, and bricks need to be bought with a small margin, so that in case of marriage or damage, in German there was no shortage. So, to build a furnace, you need to have the following materials and metal components:
- Red brick (without accounting pipes) - 717 pcs.
- White, silicate brick - 154 pcs.
- Grate 20 × 30 cm - 1 pc.
- Doors for cleaning chambers 14 × 14 cm - 8 pcs.
- Furnace door 21 × 25 cm - 1 pc.
- Blower door 14 × 14 cm - 1 pc.
- Oven cabinet 45 × 36 × 30 cm - 1 pc.
- Cooktop 41 × 71 cm - 1 pc.
- Latches 13 × 25 cm - 3 pcs.
- Steel strips 50×5×92 — 3 pcs.; 50×5×53 — 2 pcs.; 50×5×48 — 2 pcs.
- Steel angle 50 × 50 × 5 × 102 — 2 pcs.
- Lattice for fireplace (her can be made independently from reinforcement)
- Metal sheet (spreads in front of the furnace and fireplace) 50 × 70 cm - 2 pcs.
- Reinforcement for laying the foundation.
- Cement, crushed stone, sand, clay.
- Boards for the construction of formwork.
- Roofing material sheet, for foundation waterproofing in 2 — 3 layer
- Burnt steel wire for fastening the doors.
- Pieces of asbestos or asbestos rope.
This version of the "Swede" has dimensions of 102 × 89 × 217 cm, the fireplace is extended by 13 cm to the plane of the general structure. The foundation should be slightly larger than the building itself by 10 — 12 cm on each side of the base.
Construction of a Swede stove with a small fireplace
Like any other brick building, the Swede oven begins with the foundation. It is the basis and must be carried out with the utmost conscience.
Foundation
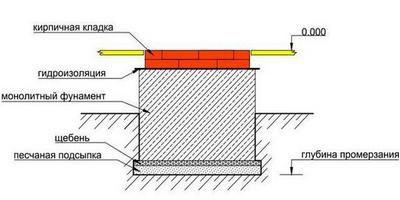
Approximate diagram of the foundation of the furnace
The structure is quite massive, so the foundation must be arranged reliably. The depth of the pit is determined depending on the composition of the soil and her freezing, but it is better that it be deep enough and amount to about from 60 to 80 cm.
- The bottom of the pit is compacted, and a pillow of sand is laid on it, height 10—12 cm
- next step goes crushed stone backfill, its layer should be at least 15—17 cm thick.
- After that, a monolithic foundation is arranged. Before its device, a formwork of boards is installed, on that part of it that will rise above the ground.
- A reinforcing mesh (reinforcement) is installed over the entire thickness of the monolithic base, which will give the foundation rigidity and reliability.
- Further concrete mortar is poured into the pit. This can be done in several stages, in layers, giving each of layers grab onto. And the lower layers may consist of cement and gravel, and the upper is a 3: 1 sand-cement mixture.
- The foundation should rise above the floor by 5—7 cm
- When the foundation is ready, a roofing material sheet is laid on top of it - it will play the role of waterproofing.
Masonry "Swedes"
Detailed diagram with dimensions and vertical sections
The detailed diagrams-plans clearly show where and how the elements of the fireplace stove are located, and the description of the process will help not commit errors during operation. A very important piece of advice that an experienced stove-maker will give to a beginner is that you first need to lay the entire structure without mortar. This business labor intensive, but such an event will help to understand the internal structure in detail. Another trick of all masters who own the stove art — this is the laying and fitting of each row from the order, also without mortar. When it is done, the bricks are picked up and, if necessary, hewn in the right size, they are immediately laid white. The procedure will slow down the work a little, but not have to to redo the entire structure completely due to one incorrectly laid row.
By carefully following the developed scheme, you can easily put your own at home it amazingly useful building.
Beginning of laying. Rows 1 - 6
- The first row is mounted on roofing material. In order for it to be laid evenly, since the entire harmony of the structure will depend on this factor, it is best to first do it on a sheet waterproofing markup — for this, chalk, a corner and a long ruler are used. Having an accurate outline of the brick laying, and strictly following it, it will be easy to get the job done.The first row is fully laid out with bricks, according to the configuration and dimensions indicated on the diagram.
- The second row also goes according to the scheme, but metal parts are already being installed here, on which the fireplace will later be welded lattice, or mounted and fixed ready-made decorative lattice.
- The third row is laid out according to the scheme, and on German the doors of the blower and cleaning chambers are installed. And wrap it with pieces of asbestos or wrap it with asbestos rope. To fix the metal elements in the right place, prepared pieces of wire are threaded into the ears of the doors, and it is fixed with mortar and temporarily substituted bricks from all sides.
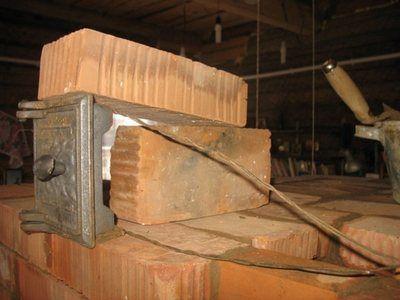
Installation of blower doors
- Fourth the row is laid out according to the scheme, and it is notable only for the fact that the bricks coming from both sides of the doors must be installed perfectly evenly, despite the interference from metal elements.
- On the fifth row, which is best laid out of fire-resistant silicate brick, like the entire furnace chamber, the grate bracket is laid on the mortar and the oven box is installed. It is also wrapped in some places with asbestos rope. This is clearly seen in the photo shown.
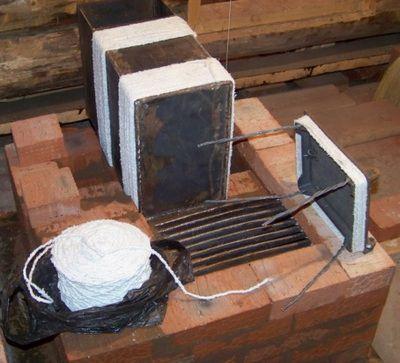
Metal parts must be tied with asbestos
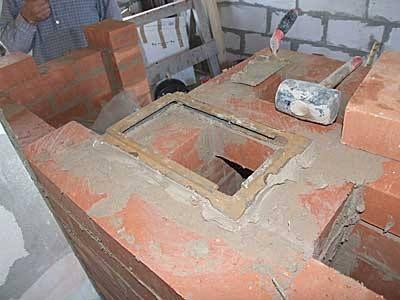
- The firebox door is installed on the sixth row — because the same principle as the doors of the blower and cleaning chambers. Her be sure to wrap with asbestos and secure with wire.
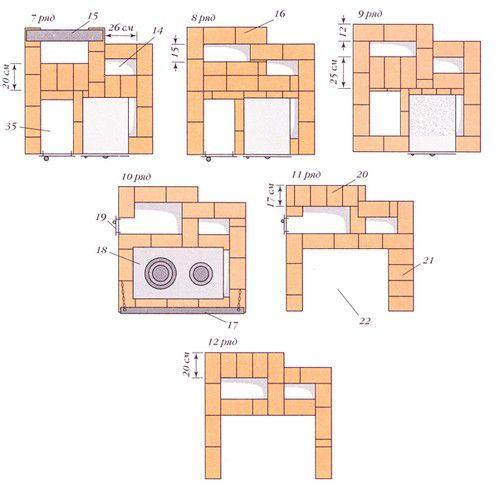
Continuation of masonry - rows 7 - 12
- On the seventh row, you should work according to the scheme, but a metal strip is laid over the fireplace insert, on which, in the next row, brick will be laid. And, it can lie flat or be arched like a semi-arch.
- The eighth and ninth rows are stacked according to the scheme without deviations.
- The tenth row is reinforced with a prepared metal corner in the part where the hob is then mounted. Under her the edges are also stacked with pieces of asbestos. On the same row put more one cleaning chamber door.
- The eleventh and twelfth rows are placed according to the scheme without additional elements.
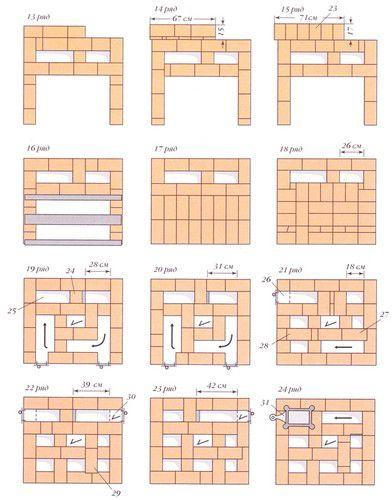
Complex internal channels - from 13 to 24 rows
- From the thirteenth to the fifteenth row masonry goes according to plan.
- On the sixteenth row, metal strips are installed above the cooking chamber — they will become the basis for the next continuous row of bricks.
- The seventeenth and eighteenth rows are laid following the scheme.
- On the nineteenth row they put two twocleaning chambers, fixing them in the same way as the previous ones.
- the twentieth and twenty-first have additions and are placed according to the scheme.
- On the twenty-second row are installed more two twocleaning chambers.
- twenty third row goes according to plan.
How valves are mounted
- For twenty fourth a metal valve is placed on the solution in a row.
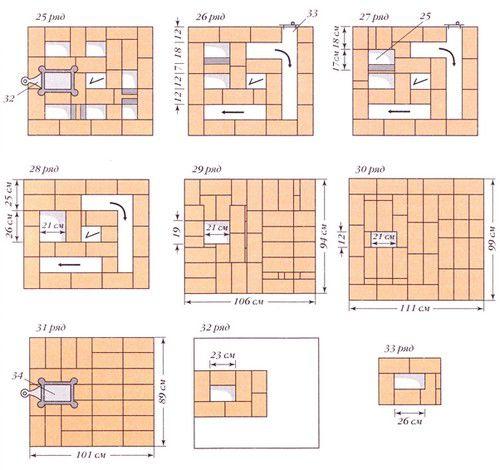
Rows 25 to 33 - valve system and transition to a chimney
- On the twenty fifth goes installation more one valve, adjacent to the first.
- The last door of the cleaning chamber is located on the twenty-seventh row.
- From the twenty-eighth to the thirtieth row, laying is carried out according to the scheme.
- On the thirty-first row, the last, third valve is installed on chimney hole.
- Thirty-second and thirty-third row — this is the exit to the pipe laying. The pipe is laid out because the same principle as the last row in the diagram. She settles up to the ceiling.
- In the attic floor, the chimney must be isolated by pouring expanded clay around it for fire safety purposes.
- Further, the head of the pipe is displayed on the roof, rises above the roof by at least half a meter.
- Pipe penetration through the roof sealed to prevent moisture and dust from getting into the cracks.
- A special metal umbrella is put on top of the pipe.
- Metal sheets are laid in front of the fireboxes, or this place can be decorated with fire-resistant ceramic tiles.
It is worth noting more one moment. If a bake will be plastered or finished with ceramic tiles after construction, then the masonry seams not necessary decorate aesthetically. But, if it is planned to leave the brickwork as a decorative design, the jointing should be done immediately on a fresh, not seized more solution.
For complete clarity: a Swede oven with a fireplace on video
It must be said that the construction of a furnace is comparable to art, so if there is no experience in this delicate work, then it is better to invite a master who knows perfectly his a business.
We also add that it makes no sense to make a Swede stove without a fireplace, since these two types do not differ in any way in terms of the space they occupy, so why steal such a useful additional option from yourself?