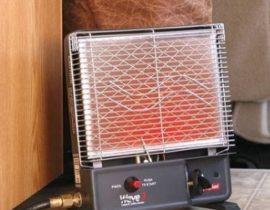
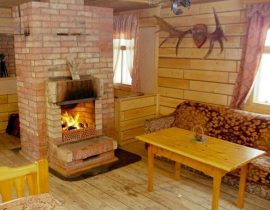
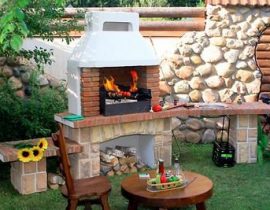
The dacha has become for many a favorite place where you can relax in nature from the bustle of the city. To be able to be on it at any time of the year, the house must be heated. Unfortunately, not everywhere there is access to a gas connection, so one of the most pleasant options remains bake. In autumn, when it is overcast, cool and drizzling outside, it will be a pleasure to sit at kindled fireplace with a cup of tea, and watch the picturesque flames. The stove is necessary for heating and cooking, and you want to have a fireplace to create the desired comfort in the house. Therefore, you can combine these functions - this task will be performed by fireplace stove for a summer residence.
Finished stove fireplace for a summer residence
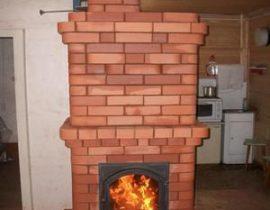
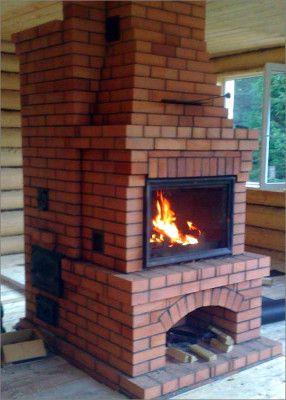
There are two types of fireplaces: mounted against the wall and arranged in the middle of the room. Which one to choose depends on your taste and on the area of \u200b\u200bthe room in which it will be located.
Content
What is required for construction?
Preparation for such serious the process, like a fireplace stove, must begin with the selection of tools and materials.
Tools
You simply cannot do without some tools, so you will definitely need:

Required Tools
- Pick for breaking bricks.
- Variety of trowels (trowel) for working with mortar.
- Rubber hammer for compacting the mortar under the brick.
- Stitching for working with seams. By using her the seams are given a square, round or triangular shape and make them neat.
- Plumb - to confirm the ideal vertical masonry.
- The level will become your faithful assistant when checking the vertical and horizontal seams.
- The corner will help to maintain the evenness of the outer and inner corners.
materials
- Red brick (refractory) - its quantity will depend on the chosen model of the fireplace stove.
- Silicate white brick for furnaces.
- crushed stone, sand, cement, clay or a special compound for laying fireplaces.
- Metal corner and steel wire (needed to fix cast iron parts).
- Pig-iron doors for a fire chamber, blew and a window for cleaning.
- Tank for warming water (if provided by the design).
- Cast iron hob.
- grate gratings for furnace and fireplace inserts, blower holes.
- A metal box and doors can be installed in the fireplace window.
- Heat-resistant materials, sheets of asbestos, specialized drywall, basalt, etc., to fix them on wooden walls and ceiling near the stove.
- Waterproofing and foundation boards.
How to choose the right place for a fireplace stove?
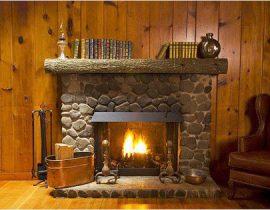
If it is decided to install a fireplace stove against the wall of an already built house, the wall have to isolate from high temperatures using a fireproof material — it can be fiberglass, special drywall, masonry, asbestos, etc.
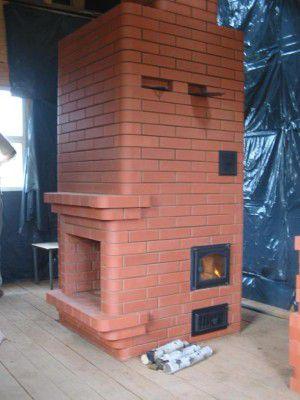
Furnace - fireplace against the wall
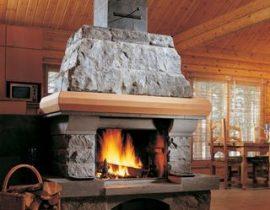
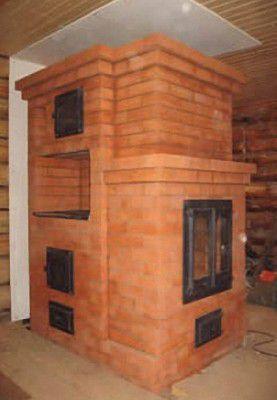
A fireplace stove installed in the middle of the room has its advantages - it will divide the room into two zones: kitchen and living room. Accordingly, the furnace and stove can be turned towards the kitchen, and the fireplace will create comfort in the living room.
Stove - fireplace in the center of the room
Choosing a fireplace model, which the you would like to have in his home, work by byThe preparation of the site must begin with the drawing up of a drawing and a thorough understanding of the specific masonry scheme for each row.
Site preparation
Site preparation takes place in accordance with the geometry and dimensions of the base of the fireplace stove.
The best option would be to cook a place for the construction of a fireplace even during the construction of the foundation. But if it happens that it has to be built into a finished house, have to put in some effort. in wooden semi need remove part of the boards from the place where the base of the furnace is located. Remember that it must have a size of 12—15 cm more in each direction.
- The foundation must be deepened into the ground at 40—60 cm, the depth will depend on the composition of the soil in a particular area. The foundation for the foundation needs to be strengthened, since the furnace structure itself will give it a large load. To do this, use crushed stone, which is tamped into the ground - this layer should be at least 10—15 cm.
- Further wooden formwork is installed.
- Then a sand cushion with a thickness of 10—12 cm
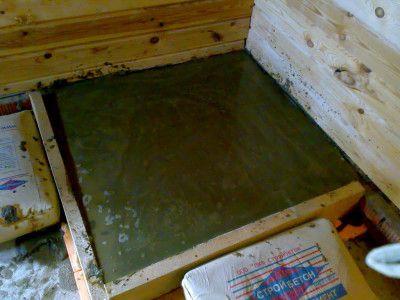
The foundation for the stove - fireplace
- If the foundation is deep, you can fill it in several stages. The first layer can consist from concrete and broken stone, the next - from concrete, mixed with large pebbles, and the top - from concrete solution, consisting of sand and cement, in proportions 3:1.
Preparation for masonry
If you do not have experience in bricklaying, do not rush to knead the mortar. Do not be lazy and fold the entire structure of the fireplace stove dry. Being engaged in this process, you will be able to understand the masonry scheme, since each of the rows has its own configuration.
After you enter up to date, you can knead the solution and start working. Traditionally, special grades of clay are used for laying stoves and fireplaces, but now there are special fire-resistant mixtures designed for this process.
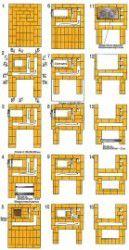
Schemes and orders for masonry
The presented diagrams clearly show not only the laying of each row, but also the movement of heated air inside the structure through the air ducts to the chimney. These diagrams are presented as an example and not necessary must match the drawings of the model you have chosen. However, they should help to understand the essence of the whole structure.
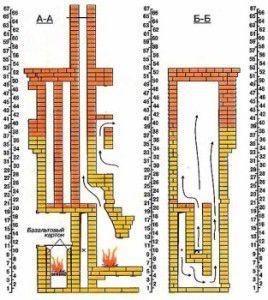
Vertical section, 1
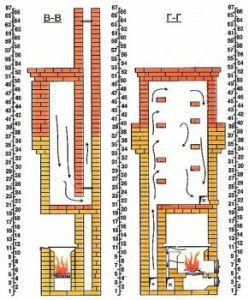
Vertical section, 2
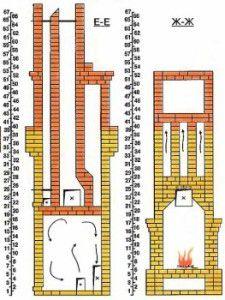
Vertical section, 3
These figures show the fireplace stove in vertical sections, which clearly show which row the cast-iron parts of doors, panels and valves should be located on.
Masonry scheme 1

Masonry scheme 2
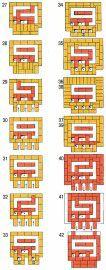
Masonry scheme 3

Masonry scheme 4
This is the scheme ordinal the location of the bricks, which should be relied upon when arranging each row. This guide needs clearly follow throughout the work, as a small mistake can ruin the whole system.
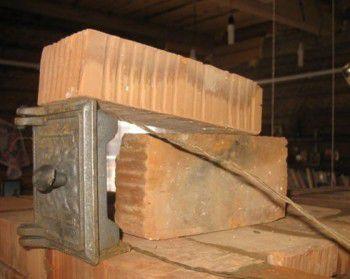
Proper brick laying
- Before laying out the rows on the solution, it is necessary to lay out each of them dry. This is necessary not only to understand the design specific row, but also for fitting and fitting bricks to size. Sometimes you need to use only a part of it, then, taking a pick, they carefully split it.
- When all will be selected and adjusted, laying is done on the mortar. The composition should not be applied in a very thick layer, but if it after all protrudes beyond the brick, the excess is picked up by a trowel.
 blower door installation
 - Having reached the row indicated on the diagram (second or third), they arrange the grate of the blower and the door, strengthening her with the help of a wire.
- After installing these parts, masonry is made decently according to the scheme. Having reached the row of the furnace device, a grate and a door are installed, around which asbestos strips are placed. The firebox is laid out with white fire-resistant silicate bricks.
- Do not forget that on the other hand you will have a fireplace insert, which can also be made of white brick.
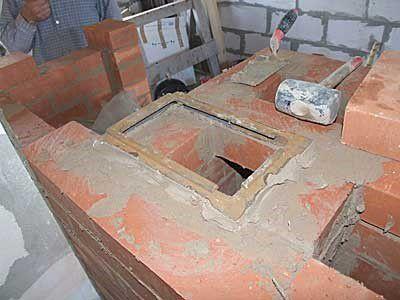
- After laying out row 11, a cast-iron hob is installed. Under her it is best to make a metal frame from a corner, and also lay strips of asbestos. Further Work continues according to the scheme.
- To lay out the vault, you will again need a frame welded to the desired size from a metal corner, which has lattice from strips of metal located at the length of the brick. On the her and the next row will fit.
valve frame installation
- Further the brick is laid, adhering to the drawing, up to the 65th row, where the valve is installed. Her the frame lies on the chimney openings, and in her the moving part is inserted.
- A hole is made in the ceiling, and in the interfloor space, fireproof material is arranged around the pipe.
- In the attic, the pipe is laid out according to the scheme of the last row, and is displayed on the roof. There around her make waterproofing, and fix an umbrella on top.
Drying the fireplace stove and the first ignition
After laying out the entire fireplace stove, you can not immediately start her intensively drown - it requires a long proper drying. 8 to 10 days goes natural drying process - at this time, you need to leave all doors and valves open. Allowed placement in the furnace of a thermal fan or a conventional light bulb 200—250 W. Such a procedure will stimulate the evaporation of excess moisture and prepare the materials for more active heating.
After this stage, you can start burning a small amount of dry firewood twice a day. It needs to be done 8—12 days, depending on the result. If after 3—4 hours after heating, no perspiration forms on the doors, the oven can be considered dried and operated her at full power.
It may happen that at the first firebox cracks will appear on the bricks - this indicates that the masonry technology has been violated. But do not lose heart and immediately rush to close up the marriage that has appeared. Let the oven run 2—3 months, and you will observe how the materials behave, and then you can carefully repair all the cracks that have appeared.
A good help for a novice master can be the video tutorial presented in the story below:
The fireplace stove is universal, and this is her advantage over other designs. That's why she is fit not only for a country house, but also for a country cottage, in which residents stay all year round. If you are faced with the question of which model to choose, without a doubt stop at the fireplace stove.