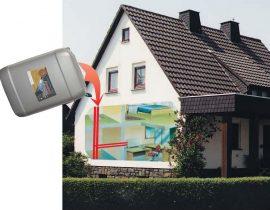
Wooden two-story house and heating furnace on two floors — this is quite a dream come true, if you make the effort and have the necessary finances.
Heating stove on two floors
Double storey ovens may be different in design, but according to the scheme it is not much more complicated than conventional, one-story heating buildings. Of course, on her construction will require more building materials and time, but on the other hand, having made an effort once, you will completely equip the house with stove heating, which will help you out more than once.
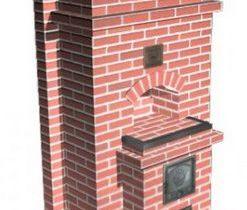
The presented stove on two floors is compact and neat, it does not will take large area, but her functionality will help not only to heat the house, but also to cook food. Therefore, we can assume that the stove will help in any circumstances, even if other sources of energy supply are suddenly turned off to the house.
Whole processss stswarms goes according to the scheme, according to the model chosen by the homeowner.
A very good option for a two-story oven
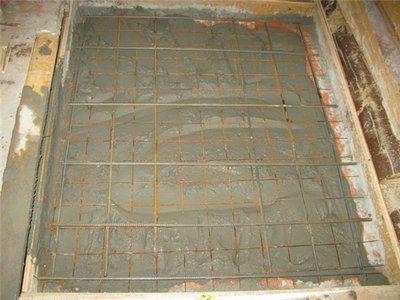
A brick building must stand on a well-prepared foundation. — foundation. A furnace built on two floors will be much more massive than a one-story one, and the foundation must be well calculated.
Foundation
The size of the base of this oven is 90 × 90 cm, the height from floor to ceiling is 2m 10 cm. The foundation should be slightly larger than the base, and can compose about, 100×100 cm.
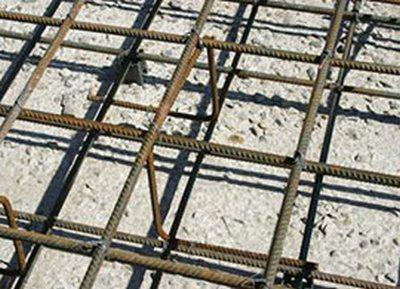
The furnace is heavy, and serious reinforcement will be required
For the construction of the foundation you will need the following materials:
- boards for the construction of formwork;
- cement;
- sand;
- crushed stone;
- fittings;
- roofing sheet, which will serve as waterproofing.
The foundation, arranged in an already built house, is more difficult to make than when building a house, but it is also possible. For this have to do some preparatory work.
- If the floors in the house — wooden, then marking the place where the stove will be located, have to cut out part of the boards. It is very important to provide for the location of the building in such a way that it passes through the ceiling between the supporting beams, and does not rest against one of them, otherwise have to rebuild more and ceiling.
- When the boards are cut, you can start digging a foundation pit. The depth of the pit is selected based on the characteristics of the composition and freezing of the soil. It can vary from fifty to eighty centimeters.
- Further the bottom of the pit is well compacted, and sand is poured onto it. This pillow must be at least 10—15 cm.
- next step goes installation of formwork from boards. The gaps between them should not be wide so that the concrete solution does not flow out of the mold. If necessary have to them caulk.
- Is becoming fittings. It can be welded together in the form of a large mesh or fixed (tied) with steel wire.
- The most crucial moment in the construction of the foundation is the pouring of the mortar into the formwork. The first layer may be a coarser mortar made from gravel and cement. After it seizes, the upper control layer of cement and sand is poured in a ratio of 1: 3.
Filling haste does not like - about three weeks
The foundation can be arranged on a par with the floor, or it can rise above the coating by 5—7 cm Its surface must be perfectly level. This is necessary so that the entire structure is laid out in perfect horizontality. Do not rush to start laying — it is necessary to wait for the hardening and shrinkage of the foundation, and this will take at least 3 weeks.
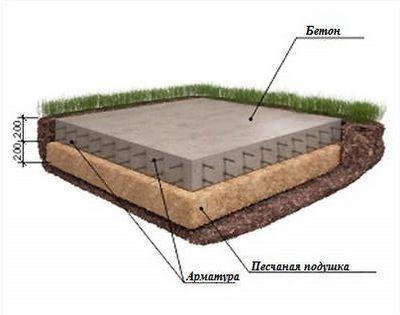
General view of the "pie" of the foundation
When the foundation will be ready, top her, on a leveled surface, fit into one or more layers roofing material, which will play the role of waterproofing.
Furnace construction
For construction, it is necessary to purchase high-quality materials if you want the stove to have a respectable appearance and serve its intended purpose for a long time. For laying you will need:
- Red brick - 1085—1090 pcs. It is better to buy it with a margin, in case of marriage or unsuccessful splitting;
- silicate brick or fireclay - it is fire resistant and is needed for laying out the firebox, in total 150—155 pcs.;
- for making a solution needs clay - about 200 kg and sand, about 75-80 buckets;
- steel 2 mm wire for fixing cast iron doors;
- corner metal 7 × 7 cm - 2 pcs.;
- corner metal, length 80 cm, 40 × 40 mm - 6 pcs.;
- corner metal, length 40 cm 40 × 40 mm - 2 pcs.;
- sheet metal 1 × 1m for flooring in front of the firebox;
- asbestos sheet or cord 10—12 m.
You can’t do without cast-iron elements when installing a furnace:
- chimney valves - 3 pcs.;
- lattice grate -1 PC.
- furnace door 1 PC.;
- blew door 1 pc.;
- doors for the cleaning chamber 5 pcs.;
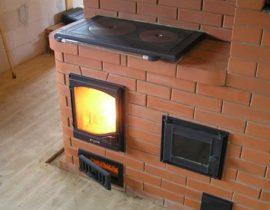
- hob with two burners 1 pc.
If everything is ready, you can move on:
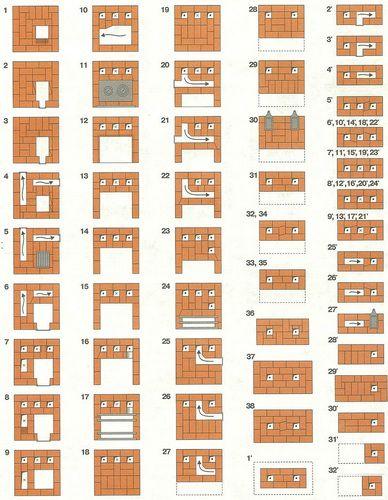
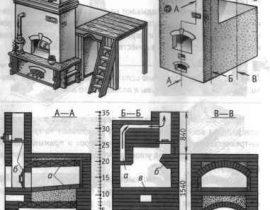
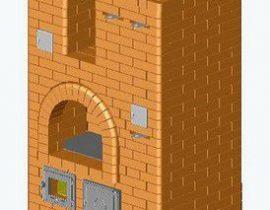
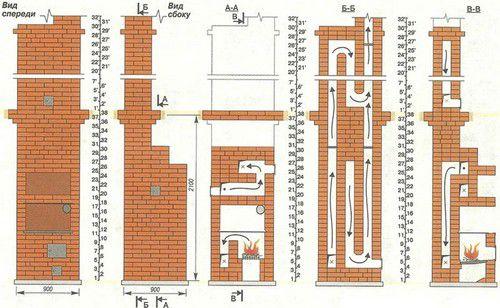
Main scheme - masonry ordering
- On the waterproofing material laid on the foundation, mark the location of the first row.
- A solution consisting of clay and sand is kneaded. Its proportions will depend on the fat content of the clay. Therefore, it is better to experiment, and draw it up in advance. To do this, you need to mix the ingredients in different proportions and mold balls from a fairly thick solution. That solution, which, drying up, is not yesst tryeschin, will the most optimal masonry option. In such proportions, you need to make the entire solution for the furnace.
- According to the markings laid out dry, those. without mortar, first row of brickwork. In the process of visually figuring out how the bricks will be laid, perhaps several of them have to adjust (reduce). The first row is freely attached to the waterproofing.
- On the second row, a blower door is installed, securing her wire and temporarily propped up with bricks.

This is how doors are installed
- FROM fourth row goes installation of the combustion chamber. Her start laying out fireclay bricks. On the same row, cleaning chambers are placed two twortsy.
- Fifth row - asbestos strips are laid on the sides of the bottom of the combustion chamber. On them in the future on brackets lay the grate (lattice).
- Sixth - a furnace door is placed, because the same principle as the blower.
- rows eight - ten - work goes strictly according to the plan.
- On the 11th row, a steel corner is fixed to the front edge, and the combustion chamber is covered with a cast-iron hob. Her installed on strips of asbestos.

One of the main elements is the hob
- From the 12th to the 16th row, the walls of the cooking chamber are laid out according to the scheme.
- On the 17th row, metal corners are embedded, on which from above goes solid brickwork.
- The eighteenth and nineteenth rows are laid out solid, except three openings for the removal of smoke into the chimney.
- On the twentieth row - the door more one cleaning chamber, and, beginning with of this row along the 23rd, the walls of the drying chamber rise.
- At 24 - again the corners, which will become the basis for masonry, which forms the ceiling of the chamber.
- On the twenty-fifth, a door is fixed to the cleaning chamber, and on the twenty-ninth row, work goes according to the scheme without deviations.
- On the thirtieth row, two valves are embedded.

Installation of chimney dampers
- From the thirty-first to the thirty-fifth row, the narrow part of the furnace is laid out, in which the chimney channels pass.
- From the thirty-sixth to the thirty-eighth, the masonry expands, approaching the ceiling, which is very clearly visible in the diagram.
- The next rows already belong to the second floor, and they are numbered again from the first row.
- From the first to the twenty-sixth row, the stove-chimney is laid out according to the scheme. At the same time, let's not forget carefully clean the flue ducts. On the second row, install the door on the cleaning chamber.
- On the twenty-seventh, the last valve is embedded.
- From the twenty-seventh to the thirtieth row, all goes according to the scheme.
- thirty one and thirty second second ranks — this is the beginning chimney pipe, which rests against the ceiling of the second floor. If the ceiling is higher, then the pipe is laid out in the same way before it.
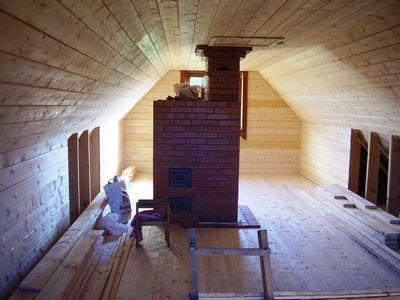
Through the ceiling and roof
- The next part of the furnace, passing through the ceiling of the second floor, goes to the attic and is displayed on the roof. The entire pipe is laid out according to the scheme of the last rows.
Other options for double-deck ovens
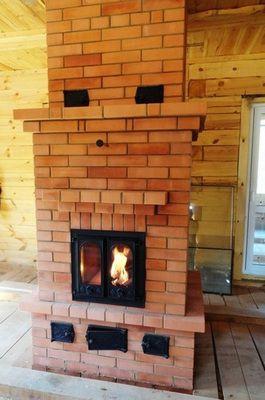
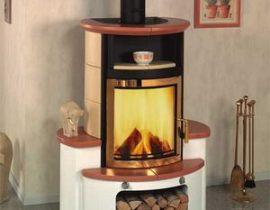
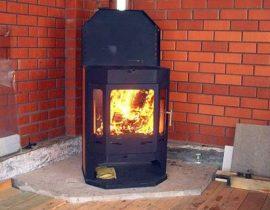
Both the stove and the fireplace at the same time
This fairly compact version of the stove on two floors of the house resolved a little differently and by external design, and by designs. Firebox in this case, it has fire-resistant glass doors, and when they are opened, it turns into a fireplace. But this option has its downside. — the absence of a hob, which never puts in the stove of a private house. Therefore, such a structure, although it will work on two floors, has only one function. — heating. Of course, it is an interior decoration, creates coziness and comfort, but after all bake should be multifunctional, and come to the rescue at the right time for the family.

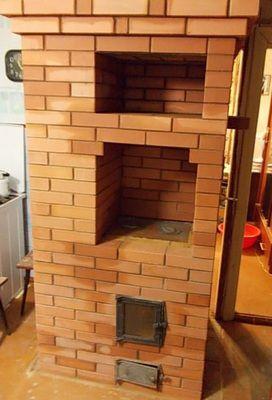
A big plus of the oven is the oven
Such an oven, working on two floors, has much more functions. An oven is provided above the firebox, and a bracket is mounted on the side wall, on which you can hang clothes to dry when you return home after rain.
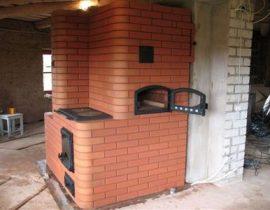
I would like to note the compactness of the structure and perfectly neat masonry, which was made by a highly qualified professional stove-setter. Despite its modest size, the stove looks reliable and capital building. Due to its appearance, the building has become a decorative decoration of the room.
Illustrative video example - oven on two floors
If you are building a two-story house, think about the stove right away, because then her embedding will be much more difficult. Have to make a hole not only in the interfloor overlap, but also in the attic, as well as in the roof. That is why it is better to build a stove together with the house — she will help you out more than once under unforeseen circumstances, as well as will bring warm to your houseoh and uut.