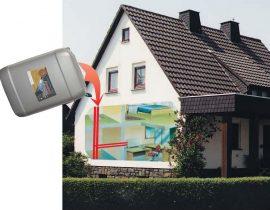
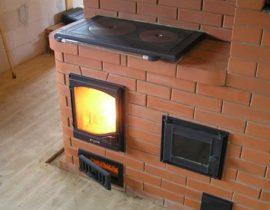
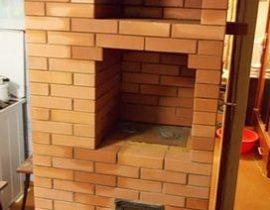
One of the most popular models is a two-bell heating and cooking stove, as it has the most necessary functions. — This is home heating and cooking.
Double-bell heating and cooking stove
The design has both a hob and an oven, so it is possible to diversify the diet of cooked dishes daily. If the oven is lit, the oven is always ready for use, so you can cook several dishes at the same time. Above the niche where the stove is installed, there is a shelf for drying, for example, shoes. It is especially useful in autumn or spring days, when outdoor humidity is high or goes rain.
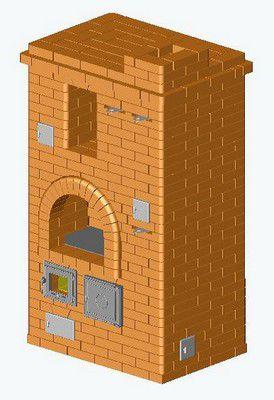
Bake It has double-bell construction. Cap — this is a chamber having an outlet and an inlet of the gases formed, which are formed in her lower part. The advantage of such structures is that the valve not closed in time will not affect the rapid cooling of the furnace, and it will remain hot for a long time. At the same time, combustion wastes freely leave the system without encountering obstacles. This design is great in cases where it is not possible to arrange a pipe of the required height, which reduces the traction force.
Content
General characteristics of the presented model
A furnace of this design is effective for heating a room with an area of 40—45 sq.meters, despite its compactness. At the base her the size is 128 × 89 centimeters or 5 × 3.5 bricks. The height of the oven rises by 225 centimeters.
Power her heat transfer — at least 4000—4200 kcal in hour. The firebox, lined with fireclay bricks, placed on edge, has a depth dimension of 55 — 60 centimeters.
Above the firebox is a hob with or without two burners — this chamber ends with an arched ceiling, which attaches the design of the furnace is a special decorative effect.
Above her there is a drying chamber, which, if desired and with minor changes, may well be replaced by a hot water tank.
Principle of operation
Bake can work in two modes, which is extremely convenient for different times of the year. When it’s hot outside, you don’t want to get additional heat from a blazing stove at all. That is why the internal structure of the furnace provides for heating one part that is needed at the moment.
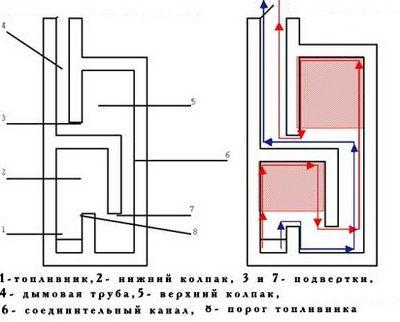
Scheme of operation of a two-bell furnace
- The "summer" course of the design allows the use of the furnace in warm time of year just for cooking. At the same time, the valve blocks the flow of hot air to other sections of the structure, and they remain cold.
- In winter, when the stove is fired, all valves open, and the heated air smoothly goes across all channels. He for a long time delayed in inside and evenly heats the walls, and only after that it enters the chimney.
In complex mode, the furnace works as follows:
- heat from the furnace goes to the side and rear walls of the furnace, rises along the channel of the lower tier (the first cap);
- further, after cooling, the gases descend into refurbishing channel;
- then going up refurbishing channel, air enters the upper tier (second hood) and only then coming out into the chimney.
When the forward travel valve is open, warm the air does not follow the path described above, but immediately enters the upper section and passes into the chimney.
The heated air in the chimney structure moves according to the laws of convection, while it is not hindered by valves and channel walls.
For better heat transfer from the furnace, a cast iron slab is laid on top of the firebox and the thicker it is, the longer it takes. her heat will come out.
Tools and materials
When you decide on the choice of a model for this structure, you need to think about acquiring materials and preparing tools.
Tool
Tools not too much will be needed, but each of them must be present when laying the furnace. For work you will need:
- Trowels of different sizes (trowels).
- Wooden hammer.
- Rule.
- Kirochka-hammer.
- Construction level.
- Roulette.
- Toolnt dlI am stitching.
- shovel and capacity for solution.
- mop.
materials
You need to purchase the necessary materials in advance, and in order for the stove to have a respectable appearance, they need to be selected only high quality and buy with a margin. For laying the furnace, excluding pipes, you will need:
- Chamotte brick - 63 — 65 pcs. (required for laying the firebox).
- Red brick - 755 — 765 pcs.
- Whether waterproofingst dlI am the foundation.
- Metal corner 4×4×0.4 — 80 cm - 2 pcs.
- Cement, clay, sand for mortar.
- Furnace door 21×25 cm -1 PC.
- Cleaning doors 14 × 14 cm - 5 pcs.
- Blower door 14×25 cm -1 pc.
- Grate 25×25 — 2 cm - 1 pc.
- Cast iron hob -41×71 cm -1 pc.
- Oven cabinet 31 × 26.2 × 50 cm -1 pc.
- Chimney damper 13×25 cm - 2 pcs.
- Chimney damper 13×13 cm - 1 pc.
- Reinforcement with a section of 12 mm.
When everything you need has been prepared, you can proceed to the construction of the foundation, which should be around the perimeter by 7—10 cm larger than the oven itself at the base.
Foundation
The foundation device must be approached very Seriously, because from it reliability will depend on reliability the entire building.

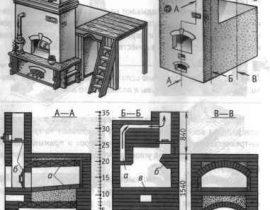
Scheme of the foundation device for the furnace
- The first thing to do when building a foundation — it's digging a pit, depth 50—60 centimeters.
- The bottom of the pit is compacted and a pillow of sand, up to 20 centimeters thick, is laid on it.
- Further sand is poured with water and compacted again.
- A formwork is installed for pouring the solution.
- Next stage — this is the installation of a reinforcing cage.
- The first layer of the solution is kneaded on the basis of sand, crushed stone or large pebbles and cement.
- The upper final layer of the foundation is poured with a solution of sand and cement, the foundation is leveled from above by the rule.
- Each layer of poured concrete must dry well. The laying of the furnace can be started after 3—4 weeks after foundation installation.
- The final stage goes flooring on the finished foundation of waterproofing material (roofing material).
Mortar for oven masonry
Clay oven mortar — This is a classic kiln art. And each master has his own secrets of its preparation and work with it.
It is very important to calculate the seam of clay between the bricks, it should not be thicker than 4—5 mm. A thick layer will "misbehave" under the influence of thermal shocks. — it will begin to crack, and carbon monoxide can enter the room, which is extremely dangerous for the health of residents.
The solution is prepared from clay of good quality, sufficient, but not excessive fat content.Only then will it be elastic, it will be easy to work with it, and also it will will lead stable under any temperature conditions.
In addition to clay, fine-grained sand goes into the composition of the solution, which is added to the clay, making a homogeneous mass, the consistency of thick sour cream.
To make the right solution, experienced stove-makers are advised to experiment. To do this, you need to make several solution options that will have different proportions of sand and clay.
The solution is made in small quantities — by matchbox. It is enough to prepare four options by adding 10, 25,50.75 percent sand.
- The solution is mixed until smooth and from each of them a ball or sausage rolls. Then the figurines are dried at room temperature for several days.
Those figures are rejected, and accordingly — and mortar, on which cracks appeared. This composition is not fit.
- Another variant — 4-thick mortar—5 mm is placed between two bricks or planed boards and also allowed to dry indoors. AT given case, the true quality of the solution will be very clearly visible.
It is also necessary to knead the solution correctly, and kneading will require appropriate preparation. It consists in sifting sand and soaking clay. Soaked clay is also rubbed through a sieve. When the ingredients are prepared, they are mixed and left. Such a solution can be stored at any time, if it dries up, it needs to be slightly diluted to the desired consistency.
Some stove-makers practice soaking bricks in water 20—24 hours before laying. Masters guarantee that such a structure can stand for centuries.
If the laying is carried out entirely from fireclay bricks, then the solution for it is made from fireclay and refractory clay, in a ratio of one to one — it will give good grip and reliably will keep the masonry in excellent condition for a long time.
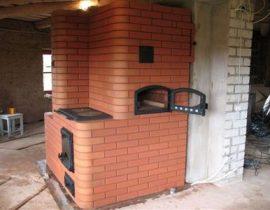
Masonry of the Kuznetsov furnace
The diagrams clearly show the design of the furnaces and the installation of all metal elements.
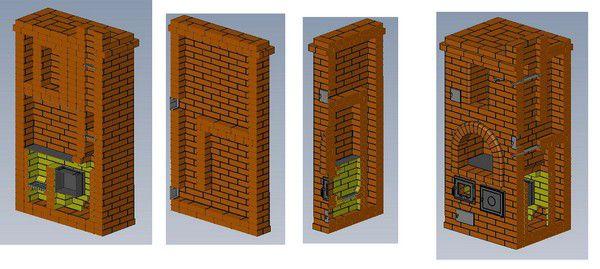
For clarity - several vertical sections of the furnace
All rows are first laid dry, without mortar, in order to fit the bricks to size and understand the laying system.

Ordering - from 1 to 6 row
- The first row is laid in a continuous plane on the waterproofing, it does not have a complex pattern and 35 bricks will be needed for it.
- The second row is also solid, it is laid according to the scheme, but it differs from the first rounded corners. Grinding corners on bricks — an optional process and is optional. For the second row, you also need 35 bricks.
- On the third row, the blower chamber, a place for the oven, and the configuration of the lower hood are already beginning to emerge. A channel of 20 cm is left between the lower hood and the oven. The lining around the heated parts of the oven with fireclay bricks begins to be made. When heated, fireclay tends to expand, so a distance of half a millimeter must be left between white and ordinary bricks. AT free distance corrugated cardboard is often placed between the bricks — over time, it gradually fades, leaving the desired desired clearance.
- On this row are installed: a blower door and two cleaning doors. Used for laying 7 fireclay and 15.5 red bricks.
- On the fourth row, the distance between the lower compartment and the oven is reduced from 20 to 18 centimeters.In the left rear of the area where the oven will be installed, the brick is installed in such a way that it protrudes inside — this will become a stand for the oven box. In this row, 6.5 white fireclay bricks and 15 red ones were used.
- On the fifth row, the distance formed by the oven and the hood wall decreases from 18 to 12 centimeters, and the formation of the firebox begins, which will be located above the blower. To do this, a part of the blower chamber is covered with masonry, and cuts are made for laying the grate. Grid-iron lattice fit in such a way that between it and the brick remains a distance of half a centimeter, since when heated, the metal tends to expand. In a row, 16.5 red bricks and 10 white ones were used.
- On the sixth row, the walls of the furnace from fireclay bricks begin to form above the grate. A vertical channel is also arranged, which will connect the lower and upper caps. Making a place to install the oven.
The oven box is also installed on the same row. There should also be a distance of half a centimeter between it and the bricks. For this, the metal box is wrapped with asbestos rope in places of contact with bricks. On the back of the box, you need to leave a small space of two centimeters.
In a row, 8 white bricks and 18 red ones were used.
- On the seventh row, the firebox door is installed. Ideally, it should be glass with adjustable airflow, but quite fit and just cast iron. Used 6 white bricks and 15 red ones.

Continuation of masonry - rows 7 to 12
- The eighth is laid in the same way as the seventh row, used 5.5 fireclay and 16 red bricks.
- 9 row — 6 fireclay and 15.5 red bricks were used.
- On the 10th row, the firebox door and the oven box overlap with a brick. Used: 5 fireclay and 17 red bricks.
- 11 row — a place is arranged for laying the hob. At the front of the kiln, the bricks are pushed outward. Used 18.5 red and 6 white bricks. This is where the stovetop is located.
- 12 row — masonry ongoing according to the 11th row, but only red brick is used for it - 20 pcs..
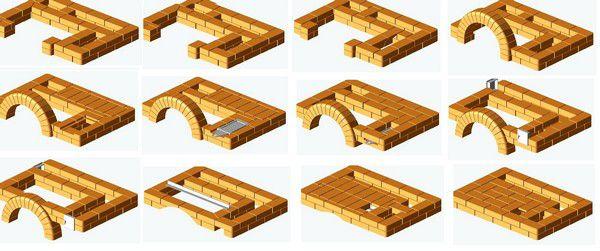
Ordering from 13 to 22 row
- On the 13th row, a “summer” course of “half a brick” is formed, and a total of 20.5 red bricks are used.
- 14 row put similar to the previous one with the same amount of material.
- masonry on the 15th row will require 19 red bricks. Here begins the laying out of the arch, the height which is 26 cm and for required 17 bricks are needed. For an arch, bricks are ground into a cone, the wide part of which is 14, and the narrow part is 4.5 centimeters.
- 16 row — the lower cap is covered with bricks. On the right side, in the "summer" course, a valve is installed in the arranged recesses. Bricks adjacent to the arch are cut at the right angle. Used in a row of 22.5 bricks.
- 17 row — put likewise previous, 23 bricks are used.
- At 18, the upper cap begins to form, two cleaning doors, 17 bricks are used.
- 19 row put same way, used 19 bricks.
- Further, on the 20th row, an upper cap is formed and a metal corner is arranged for laying bricks next row, to cover opening above the hob. It will take 20.5 bricks.
- On the 21st row, the distance above the hob is completely covered, remains open only the top cap and chimney holes. 30.5 bricks are used.
- The laying pattern of 22 rows is the same as on the previous row. You need to use 30 bricks.

Completion of masonry - before entering the chimney
- 23 row — the upper hood rises and the drying chamber begins to be erected, the cleaning door. 22 bricks are used.
- 24 row — to the right of the drying chamber is formed more one, connected with it a channel that will help air circulation. For a row, you need to use 22 bricks.
- As well as and 24 row put 25.26 and 27 rows, using 23 bricks.
- On the 28th row two latches fit into the arranged cutouts. It requires 23 bricks.
- On the 29th row combine hoods of the smoke channel, cooking and drying chambers. It will take 22.5 bricks.
- On the 30th row the drying chamber is completely blocked, for this you need 26.5 bricks.
- On the 31st row the plane is completely covered, remains only the opening of the smoke channel. Since the area of this row is increased, the outer bricks protrude 4 centimeters outward. Total will leave 41 bricks.
- On the 32nd row, the size of the area returns to the previous one, the extreme bricks are shifted from the edge inside by 4 centimeters. For this series you need 35 bricks.
- Rows 33 and 34 are the beginning of the laying of the pipe, they will require five bricks each.
Further goes pipe laying with outlet her through the attic and roof. These issues are discussed in separate publications.
For greater clarity - a video about Kuznetsov's two-bell heating and cooking stove