Many people who have a private house, simply do not imagine it without a stove. From time immemorial, this attribute of human habitation has been loved and respected. The stove will warm, feed and cure — exactly that's why, even in the presence of conducted in the gas house, hosts don't rush away her refuse, but building new houses, first of all thinking about this building.
«Roughcalled cozy Little Russian ovenswho had beds, and today they are becoming popular again. You can easily build afelling on wood with their own hands, and it doesn’t matter at all whether it will be erected during the construction of the house or built into an already finished room!
When making rough wood, take care of the aesthetic beauty of your stove!
When Dutch stoves appeared in Russia, they entered fashion, as they had a compact, slender appearance. But apparently, they seemed to the locals low-functional, and therefore they were modernized by adding to the construction scheme more and a bed. Got an option Russian-Dutch ovens, her and began to callrough". It has cooking and heating functions, sometimes combined with a fireplace, and heated with wood.
Various models of such stoves have been developed: with a stove bench on the side or behind, high, nearly under the ceiling or at table level.
Like all brick heating buildings, coarse oven has its ordinal masonry scheme — she becomes a guide during work. Having considered the proposed plan, one can understand how this process should go.The presented stove is able to heat a room with an area of 25—30 sq.m.
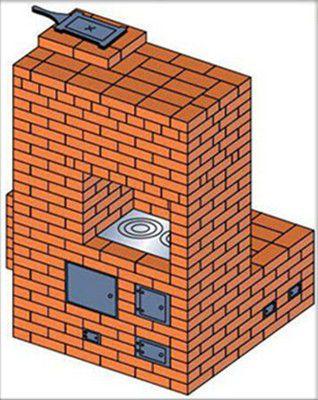
A simple but effective coarse oven
But, before proceeding with the construction, you need to stock up on all the necessary materials for arranging this kind of work of art.
Content
What materials do you need to have:
For the device of the furnace, you must have the following materials:
red brick in the amount of 800 pieces;
- silicate brick for the firebox 150 pcs.;
- cast-iron doors for the firebox 25×21 cm, blower 25×13 cm, 1 pc. and 18×10 —5 pieces.;
- cast-iron damper for a chimney 25 × 13 cm -2 pcs.;
- hob with two burners size 71×41 —1 PC.;
- grate for firebox 25×25 cm -1 pc.;
- oven size 31×37×28 cm;
- metal corner 5 × 5 or 4.5 × 4.5 cm;
- crushed stone and reinforcement for the foundation;
- steel wire for fastening doors;
- cement, sand, gravel, clay or a special dry mix for laying fireplaces.
It is best to take all the materials with a small margin, so that in the process of work it does not turn out that something is missing.
Masonry mortar
Mortar for laying the oven can now be purchased at hardware stores, but you can prepare it yourself. Homemade mortar cost you are much cheaper, and also it has its own advantages.
Previously, laying was carried out on a solution made of clay and sand, but it dries for a long time, and often when firing on German cracks appear, so I want to share a recipe for another, more plastic solution that has good adhesion.
To make a solution, you will need sand, cement and ordinary clay, which is extracted when digging pits or wells. Her you need to dilute to the consistency of thick sour cream, and then rub through the mesh. This is done in order to get rid of debris and small stones.
The solution is prepared in different proportions — they depend on the fat content of the clay. To determine the best of them, you need to prepare ten different options, 20 each.—50 grams. All mortar options consist of one part of cement and:
- 10 parts clay and 1 part sand;
- 9 parts clay and 2 parts sand;
- 8 parts clay and 3 parts of sand, and so on, gradually decreasing by 1 unit the amount clay and, accordingly, increasing the proportion of sand.
Further samples are laid out in separate boxes, and you need to wait until they are completely dry. The best one will be the one that has in his the composition is more clay and, having dried, does not crack. On the boxes you need to make inscriptions, how much and what ingredients are involved in this particular composition.
The composition of the solution has the following advantages:
- it is made from affordable materials;
- it is durable even without firing;
- when heated, the dry solution is burned;
- dries very quickly due to the presence of German cement;
- after drying, it becomes much more resistant to moisture than a traditional mortar.
Coarse foundation device
The laying of the foundation begins with the preparation of the excavation pit, it must have a depth, least 50 cm and sometimes — and deeper. A very deep foundation is made in unstable puffy soils where any building requires more serious fortifications.
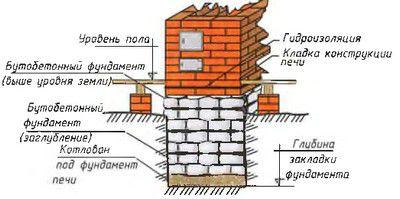
The basis of the stove is a reliable foundation
- If the foundation is arranged in the finished building, it is necessary to mark the floor and remove part of it, in the place where the furnace will be installed. The size of the platform for the foundation should be 15—20 cm more in each direction than the first row of masonry coarse.
- The bottom of the pit is well compacted and laid out with clay, her layer is from 10 to 15 cm.
- Then goes rubble layer in 10—12 cm
- The next gasket will be a layer of gravel.
- Wooden formwork is installed, reinforcing meshes are laid.
- Filling with rubble concrete mixture, her thickness should be 20—25 cm at least. The concrete foundation must be in-depth into the ground and above ground, also component 20—25 cm.
- After hardening of the cement screed for the entire her area spread waterproofing material, for example ruberoid. The first row of masonry will be laid on it.
Step-by-step scheme for laying rough on wood
Every baker has his secrets, acquired for years of work. But even some experienced craftsmen, starting laying, before kneading the mortar, lay the entire structure dry. This is done in order to understand the configuration of each row. In addition, before laying on the mortar, each row is also laid dry so that it is possible to adjust the bricks to size. And only after that produce laying a row with mortar. It is best to stick to these tricks and take your time so as not to make fatal mistakes in which there will be no good traction or vice versa all the heat will go up the chimney.
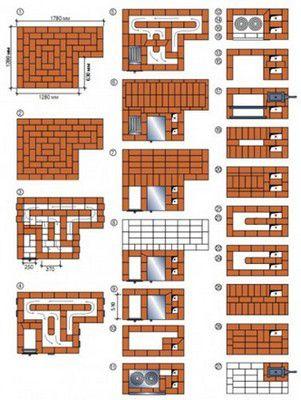
The general ordinal scheme for laying out one of the coarse options
The presented scheme shows the laying of the most important rows, on which cast-iron and metal elements are laid. To properly complete the rest of the rows, it is very important to stick to the action plan.

Laying out the initial rows
- The first row should be posted precisely and accurately on the marked surface, as it will give direction to the entire structure. To do this, you need to control the evenness of the masonry with the help of a level and a corner. This row is solid and does not have complex configurations, just like the second one.
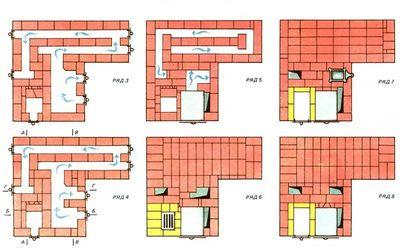
We lay out the rows from the third to the eighth
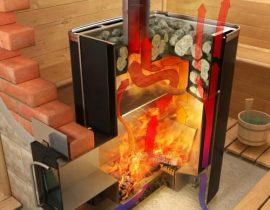
- From the third row, work begins that requires special care and skill, since the operation of the furnace will depend on the correctness of their laying. On the third row, all the lower doors of the blower holes are exposed. They are fixed with steel wire. The diagram clearly shows movement. warm air, which warms the entire structure, including the stove bench.
- On the fifth row, an oven is installed. We must not forget that an empty space is left around him. opening, in which heated air will be stored longer.
- From the sixth row, they begin to lay out the firebox with silicate bricks, and the grate is laid here.
- In the seventh row, in the place where the chimney begins, the first valve is laid, and the firebox door is also installed.
- Eighth row — this is the completion of laying the surface of the couch, it must be perfectly flat, otherwise you will feel all the bumps with your back.
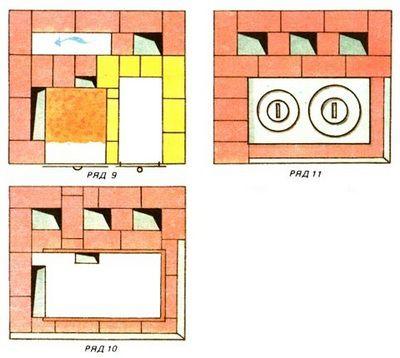
Rows 9 to 11, with hob installation
- The ninth row is laid according to the scheme, as well as the tenth. After its completion, a reinforcing frame welded from a metal corner is installed. The hob is mounted on the eleventh row.
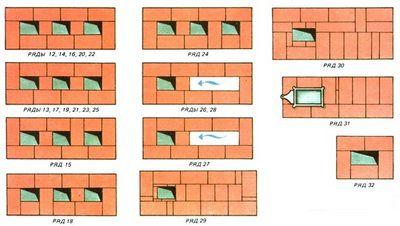
Laying out the vertical part of the coarse oven
- The next rows follow the pattern. At the thirty-first, a valve is installed, around which the chimney is laid.
- In the attic chimney pipe must be insulated isover from flammable parts of the building structure. The head of the pipe is brought to the roof, waterproofing is arranged around it, and a special umbrella is put on top.
Models coarse with a bed
As stated above, coarse can have various designs, with different the location of the stove bench, firebox and hob. It is worth considering a few of them in order to know which option to choose.
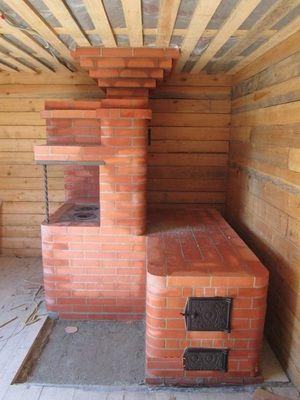
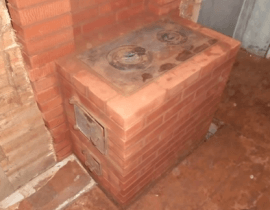
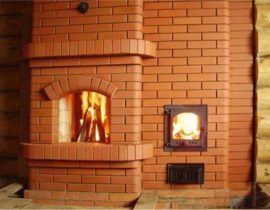
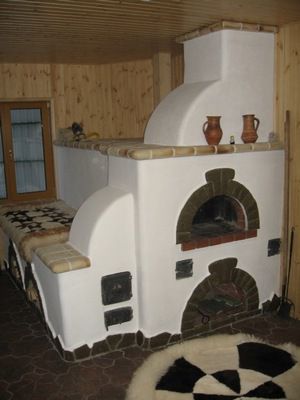
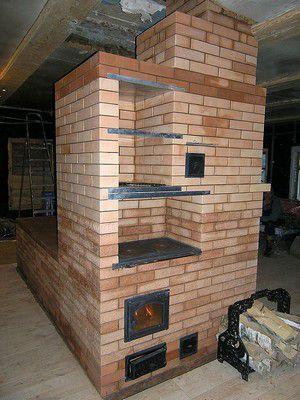
Freshly laid stove-coarse - a cozy corner
This photo shows a recently built stove installed in a house under construction. A well-placed couch will allow you to arrange an excellent solitary place to rest. Separate fireboxes are arranged for the lounger and hob, which will help save heat.
In the summer, no one wants to bask on a hot sunbed, but a stove can be useful for cooking, and her can be heated to the desired temperature very quickly — the heat won't go away on onbed heating.
Above the stove there is a place for drying, or it can be used to store bulk products. In any case, an extra shelf in the kitchen never fits.
When a domestic cat discovers this place, it will become his favorite refuge, especially in winter.
Such coarseness will easily warm 2-3 rooms
This bake It has too good location as around her you can create three rooms at once, which can be heated. Into one of them rude coming out couch. Warm another room warm furnace wall.In the kitchen room there will be a side with a hob and furnace, as well as shelves for drying.
With such an oven, almost the entire house will be heated in cold weather, wet shoes and clothes will be dried, and a hot dinner will be prepared. She will become reliable helper in every situation. It is only worth putting in her wood and light a fire — and in your house there will be a cosiness and comfort.

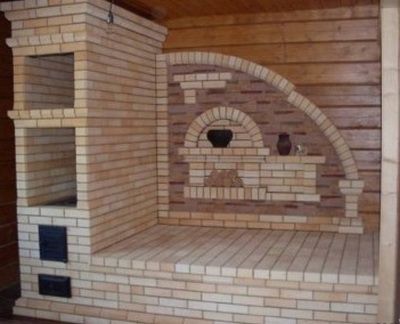
Works great even with ultra-modern room design
This rude good for a large room where you can place both the kitchen and the dining room. Coming from the frost, it will be great to climb on warm couch and how to warm up. For convenience, steps are arranged on the other side of the furnace. For firewood, a niche is provided in which they will always be dry. Bake in this room is central attribute of the interior creates pleasant cozy atmosphere and performs the functions necessary for the home.
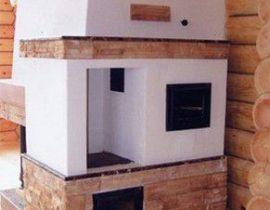
Rough light brick - why not a ready-made bed?
The model of this coarse It has double couch that looks like a bed — just need to put it on her mattress and linen. In winter, a stove heated in the evening will warm the sleeping ones until the morning. The stove has one burner, but to warm the kettle or cook food — quite possible. Above the hob there is a drying chamber, which can be useful for various needs. It is impossible not to notice the panel on the wall, which has small shelves on which you can conveniently arrange your favorite books.
The whole structure is made of silicate brick, light in color, which makes her exclusive, since basically such material is used only for laying the firebox.
Be careful familiarize with the secrets of the stove-maker's work on laying out, for example, coarse on wood, you can on the attached video:
Video - do-it-yourself wood-burning
Putting a stove in the house is a very responsible and rather complicated matter. If you never didn't deal with a job like this, it might be better to trust her a qualified stove-maker who has already laid down more than a dozen such structures. But, if you want to take a chance and try your hand, follow all the recommendations that will help you complete the job successfully.