Muffle furnaces are a design, the heating elements of which allow you to achieve the temperature required for firing ceramics, melting metals, hardening steel in a personal workshop. Jewelers and other craftsmen whose workshop is at home understand the value of such a design. And given the high cost of factory-produced muffle furnaces, such a furnace, made independently, is of particular importance.
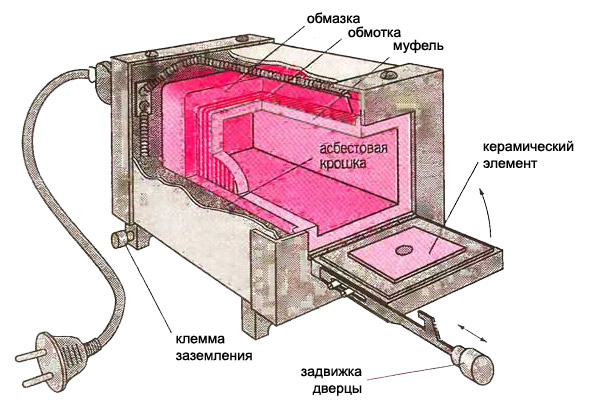
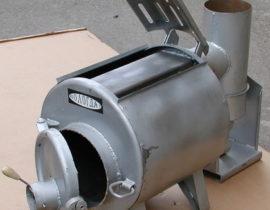
The device of the muffle electric furnace
Content
Classification of muffle furnaces
According to the type of heating elements, muffle furnaces are divided into:
- electrical;
- gas.
By purpose, they are divided into:
- for melting metal;
- for firing ceramics;
- for melting glass;
- for hardening metal;
There are also industrial and home-made muffle furnaces.
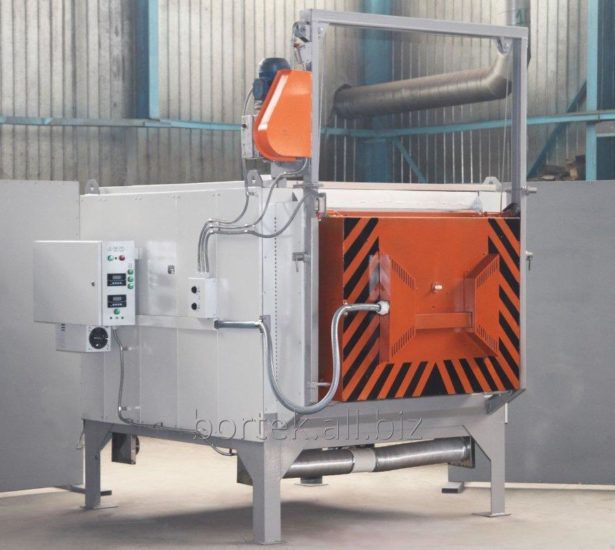
Industrial muffle furnace with automation
But it is impossible to make gas-fired stoves at home, although gas is cheaper than electricity, since such experiments are prohibited by law. The electrical control of the furnace provides the convenience of temperature control.
By constructive type, muffle furnaces are divided into:
- horizontal (the most simple);
- vertical or pot type;
- bell-shaped;
- tubular.
Heating can be carried out in air, in a vacuum or in a gaseous medium.At home, it is only possible to design a furnace with heat treatment of products in an air environment.
With the independent implementation of the muffle furnace, it can be given the desired shape and volume, decorated in a style suitable for the interior.
The main parts of the structure
- The outer part of the furnace, the shell (housing). As a housing for the future muffle furnace, it is convenient to use a disused gas stove, or rather an oven from it or an electric stove. To use them, all plastic parts are dismantled. In the case when it is not possible to use such housing options, it is welded from sheet metal (at least two millimeters thick).
- Thermal insulation layer. This part of the design is extremely important. The efficiency of the furnace and the heat loss that it will incur depends on its quality. The inner layer of thermal insulation is a refractory (fireclay) brick that can withstand temperatures up to one thousand degrees.

Refractory fireclay bricks for interior decoration of muffle furnace
- The outer layer, which reduces heat loss to the surrounding space, is made of perlite or basalt wool. Asbestos is not safe to use; when it is heated, carcinogenic substances are released into the atmosphere.
- Elements that directly heat the workspace. The heating elements inside the muffle furnace are spirals twisted from nichrome or fechral wire. Thickness 1 mm. Nichrome (nickel-chromium) wire is very ductile and resistant to corrosion.
Spirals twisted from nichrome or fechral wire
- Fechral (aluminum, chromium, iron) wire is somewhat cheaper due to the absence of aluminum in the composition and also has the necessary properties for its use in a muffle furnace.


List of materials and tools for assembling the structure
- grinder (machine for grinding and cutting materials) with cutting wheels for metal;
- welding machine;
- sheet steel >2mm thick;
- metal corners;
- fireclay fire-resistant brick;
- refractory mixture;
- heat-resistant silicone;
- basalt thermal insulator (wool, density 200 kg/m3) or perlite;
- goggles and respirator;
- nichrome (fechral) wire with a cross section of 1 mm;
- wire cutters or scissors for metal.
Muffle Furnace Construction Technology
The procedure for performing the work of a horizontal or vertical muffle furnace is similar, the difference lies in the arrangement of the elements of the furnace.
- The body of the muffle furnace is made of sheet iron. We cut out a rectangular strip of the required size with a grinder, bend it into a radius and seal the seam with the help of welding. To prevent the formation of corrosion, you can cover the metal with several layers of refractory paint. We weld the bottom to the resulting cylinder. To do this, we cut out a circle of the required diameter from a sheet of steel, equal to the diameter of the cylinder. We strengthen the walls and bottom with metal fittings. The body is made of such a volume that it is possible to place a heat-protective layer and refractory bricks inside.
- If an old refrigerator is used for the case, we similarly strengthen its bottom and walls with metal corners or tubes.
- We lay out the inner part of the body with a thick layer of basalt wool.
Basalt wool interior
- For the manufacture of the internal thermal layer (heat accumulator) we use fireclay bricks (refractory). The task is to join the bricks in the amount of seven pieces in the form of a pipe, which will later serve as the working chamber of the furnace.
Muffle furnace body made of fireclay bricks
- To do this, we lay out the brick in a row and make markings on each brick, along which we will cut. The shape of the bricks after cutting should allow all the bricks to be assembled in the form of a hollow tube. Pruning is done by a grinder. For convenience, the bricks are numbered. After trimming, we collect them together and fix them with wire, checking the correctness of the cut. If necessary, we correct the form, achieving accuracy.


Important! When cutting bricks, be sure to protect your eyes and respiratory organs from dust with goggles and a respirator. Work must be carried out outdoors or in a well-ventilated area.
We place the formed brick pipe in the body with a layer of thermal insulation.
Next, on the inner surface of the bricks, it is necessary to cut grooves for the wire.

Grooves for wire
But first, from a coil of nichrome or fechral wire, it is necessary to make a spiral with a diameter of about 6 mm. To do this, we wind the wire on the base (pencil, welding electrode or thin metal rod). We take out the bricks and again lay them out on a flat surface in a row.
We apply a spiral, make markings for future grooves, which we will cut out in bricks with a grinder. We check the correctness of the lines with a building level. Ultimately, inside the workspace, the wire will be laid in a spiral from the bottom to the top of the workspace. It is important that the turns do not touch each other, otherwise there will be a short circuit.

Spiral in a muffle furnace
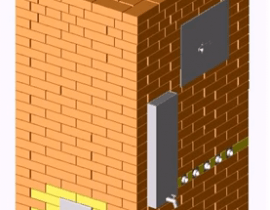
To bring the ends of the wire outside the working chamber and connect them to the machine, between two adjacent bricks we insert three thin long pieces of ceramic tiles with thin channels sawn into them for the wire.

Channels for wire from a muffle furnace
The use of such ceramic leads in the future will make it easy to repair the muffle furnace.
Electrical switching with three power levels
- for the first stage of power, it is necessary to connect two coil circuits in series;
- the second stage implies a separate connection of the lower spiral;
- the third stage of power is the parallel connection of two circuits.
When turning on the spirals, grounding is mandatory!
We place the finished structure of the working chamber in a housing with a layer of heat-insulating material and one brick laid on the bottom, coating it with refractory (furnace) clay or refractory glue.
To bring the ceramic channels outside the case, we drill holes in it.

We make the body and coat it with fireclay clay
We make the cover from sheet steel, cutting it to the size of the furnace and fixing refractory bricks on it with furnace clay. From above we weld the heck, handles and canopies. For tightness, we apply a layer of heat-resistant silicone along the edges of the lid and on the adjacent walls of the muffle furnace, having previously thoroughly degreased the surfaces.

Muffle furnace in operation
After the oven has completely dried, we connect the wire to an electric machine with a stabilizer and carry out a series of tests, adjusting the heating power of the spirals and the temperature in the working space, increasing or decreasing the mains voltage.
Important! To make sure that the stove is completely dry, turn it on at maximum power and check that there is no steam escaping from the stove surfaces.
The door must be tightly closed while the oven is in operation.
Video - homemade muffle furnace