Dishes of Caucasian and Oriental cuisine cooked on an open fire are especially tasty, healthy and appetizing. The aroma emanating from the dishes prepared in the cauldron is very good and pleasant.

Cauldron oven
Dishes acquire special taste qualities due to the uniform heating of the bottom and walls of the cauldron with an open fire. It is no wonder that the owners of their own dachas, country houses or just going to relax in nature strive to assemble with their own hands a structure adapted for preparing culinary delights in a special semicircular cauldron.
Such furnaces are stationary or mobile. The former are a permanent structure that is easy to use year-round, while the latter are usually foldable, they are taken with them on a trip or collected for seasonal recreation outside the city. Furnaces under the cauldron are assembled from metal or brick.
Content
Mobile ovens under the cauldron
They are made exclusively from metal, best of all from stainless steel, in extreme cases from ordinary steel, painted with heat-resistant paint!
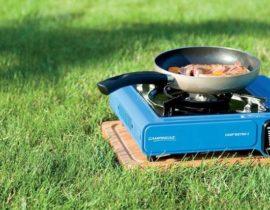
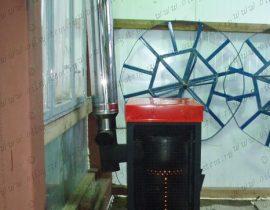
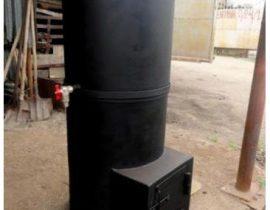
The simplest mobile version of the furnace for a cauldron is a cylindrical furnace made of sheet metal with a hole for laying fuel and slots for smoke to escape.The cauldron is placed on top of the stove, while two thirds of the bottom are directly above the fire.
But the lightest design is the tripod. It is made of a metal tube bent in the shape of a circle and the legs are attached to it (by welding or bolts). Such a “stove” is very convenient for hiking, but does not allow the walls of the cauldron to warm up evenly.

Oven for cauldron tripod
The size of each oven is individual and depends on the cauldron in which the cook will cook the dish.
In order to make the simplest oven for a cauldron with your own hands, you will need:
- directly cauldron (for measuring the diameter of the firebox);
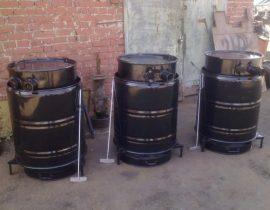
- sheet steel (the thicker the metal, the more reliable and durable the structure) or a piece of thick-walled pipe (a used gas cylinder or even a body from an old cylindrical washing machine);
- metal corners or tubes (of which we will make the legs of the furnace and handles for its transportation);
- a machine for cutting metal - a grinder (or its replacement - a hacksaw for metal, a file);
- drill;
- a hammer;
- welding machine with a set of electrodes.
Work will be carried out outdoors in close proximity to electricity and with the obligatory observance of safety rules (protective suit, leggings and a mask for working with a welding machine).
- We measure the circumference of the cauldron, according to this value we will build.
- From sheet steel with a grinder (we use a cutting wheel for cutting metal), we cut out a rectangle. The long side of the rectangle should be equal to the circumference of the cauldron. Next, cut out a circle - the bottom of the furnace.
- On one side, which will be the top of the stove, we make markings and make several cuts for the free exit of smoke.At the bottom of the furnace we cut out a rectangular window for loading fuel.
- We roll the steel into a cylinder. We use either a suitable form, winding the metal around it and achieving accuracy with hammer blows, or using a special bending machine.
- Along the way, we cut out handles and supports for the future furnace from the corners (tubes, etc.).
Using a welding machine, we connect the steel into a cylinder, weld the bottom to the finished structure, then the supports and handles. However, the last parts of the structure can be bolted, having previously drilled holes in the metal.

Reamer for cauldron oven
The simplest oven for a cauldron is ready. To protect it from corrosion, we apply several layers of heat-resistant paint. It remains only to put a cauldron on top, light a fire in the furnace and prepare food, everything is simple, just one, two, three!
An improved version of the oven for a cauldron
We supplement the design with a pipe for removing smoke, doors, a blower, a grate.
The manufacturing process is similar to the first option, but a few points will be added.
- You will have to cut not only the furnace hole, but also the blower hole located under it and the hole for mounting the chimney.
- On the top of the furnace, instead of slots for chimneys, it is advisable to attach a metal bar to strengthen the structure.
- Between the furnace hole and the blower, it is necessary to fix the grate. To do this, we weld small pieces of metal corners inside the furnace - supports. The simplest grate is made of thick metal wire (laying out its segments in the form of a grid and connecting them by welding). There is no need to attach the grid to the supports.
- We weld the chimney pipe from the back of the furnace.The height of the pipe must be higher than human height (to prevent smoke from entering the eyes).
- We supply the chimney with a spark catcher - a tin can with many holes drilled in it.
- The doors are made from those metal pieces that remained after cutting holes for the blower and firebox, or we cut out new ones from steel.
Ready-made doors for the oven are also suitable. We fasten them to the canopies by welding or bolts, supply them with metal hecks.
Thus, a model of a furnace for a cauldron is obtained, in which it is convenient to put fuel and clean out the products of combustion, the smoke is discharged into the chimney, and it is easy to adjust the draft with the blower door. But for transportation, this oven is less comfortable, as it takes up more space.

Cauldron oven example
Do-it-yourself brick oven for a cauldron: step by step instructions
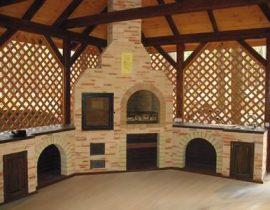
Stationary ovens for a cauldron are not only a place where food is cooked, but also an element of decorating the interior of a house. Therefore, you should prepare a place for the stove in advance and carefully consider its shape and finish options, purchase beautiful accessories for cleaning the stove (scoop, poker), doors (furnace, blower) and a decorative plate with rings of various sizes, on which you can install various the volume of the cauldron.

Stationary oven for a cauldron
For construction it is necessary to prepare:
- refractory brick;
- angle grinder (grinder);
- sand, fireclay powder;
- containers for the solution (for example, buckets);
- shovel;
- grates and doors;
- steel corners;
- steel plate to cover the top (thickness about two centimeters).
The configuration of the oven from the outside can be any, and from the inside the oven should resemble a stand for eggs.For ease of use, the height is made at the level of 80 centimeters.

The device of the firebox for the installation of an Asian cauldron
There is no need for a foundation for the furnace due to the low mass of the structure. But to prevent the masonry from skewing, concrete will have to be poured into the formwork and reinforced with reinforcement. For this you need:
- We select the space for the furnace, clean it and moisten it with plenty of water. We level and compact the soil.
- From the boards we build formwork.
- We mix sand and fireclay powder in the ratio of one part of powder to three parts of sand. The solution is kneaded to a plastic state.
- Pour the solution into the formwork. Layer 5-10 cm. Be sure to level the solution and check the level.
- On top of the solution we lay longitudinal and transverse metal rods in increments of about ten centimeters.
- Without waiting for the solution to dry, we proceed to laying.
Recommendations
To make the seams as even as possible, we lay thin wooden slats between the bricks. As soon as the solution grabs a little, we pull out the slats. This technique will allow you to quickly and accurately make subsequent jointing.
We start each first row with half a brick, every second row with a whole. This technique is called ligation of sutures.
All metal elements (doors, etc.) are installed along the masonry.
If the metal plate under the cauldron is not factory-made, we cut out a circle in it, with a diameter slightly smaller than the cauldron and carefully clean the circle from bumps and burrs with a file to prevent smoke from seeping and ash getting into food.
When installing pipes, to ensure good traction, they make a docking at an angle of more than 90 degrees.
After the masonry is completed, the oven can be tiled or grouted.After that, the oven is dried under the cauldron, lighting a small fire in the furnace.
When cutting bricks with a grinder, a large amount of dust is generated. It is advisable to use eye and respiratory protection during work.
Do-it-yourself step-by-step laying of the furnace under the cauldron

Scheme for the construction of a furnace under a cauldron
The first two rows are the bottom of the future furnace. When laying, leave space for cleaning the stove and ash pan, which will be closed with a door. We fasten the door with a wire, clamping it with neighboring bricks and fixing it with mortar.

Fixing the oven door
The third row - we make the overlap of the ash pan door, we continue to lay out the walls of the furnace. We lay the grate.
In the fourth row, it is necessary to provide an opening through which flue gases will exit.
In the fifth row, continuing to lay out the walls of the furnace, we install the door for the furnace. Its size is envisaged depending on the intended fuel. For firewood, the optimal door width is about forty centimeters, for coal - less.

Laying 5 - 12 rows for the oven
In the sixth-eighth rows, we block the firebox, continuing the construction of the walls.
In the ninth and eleventh rows we leave a hole for the circulation of flue gases.
In the twelfth - we block the top of the outer walls of the firebox with the help of metal corners and a steel (cast iron) plate with a hole for installing a cauldron. The hole in the stove should be exactly above the firebox, laid out in the form of a cylinder.
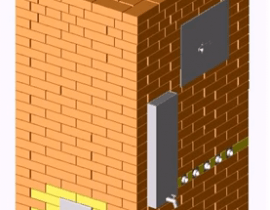
We mount the chimney of the furnace for the cauldron
The chimney is an important part of the design. For its installation you will need: a grinder (angle grinder) and cutting discs, a welding machine and electrodes, hammers, a steel pipe with a diameter of 10 to 12 cm, elbows or fittings with the required angle of rotation.
We connect the fittings and the pipe by welding, having previously laid them out on a flat surface. Be sure to use protective equipment - a mask, overalls and gloves.
Scale and other irregularities are removed with an angle grinder (grinder) or a file.
We install a prefabricated metal chimney in the right place (in a hole specially left for this in the masonry of the furnace), coat the cracks with furnace clay or refractory mortar.
Check the chimney for cracks. To do this, we make a small fire in the furnace furnace and monitor the movement of smoke.
A properly built oven ensures uniform heating of the cauldron. You can check this by pouring water into it. If the cauldron is heated evenly, the bubbles of boiling water will completely cover the dishes from the inside.
The stove can be finished by grouting, plastering or painting the bricks with special heat-resistant paints.
The oven under the cauldron is multifunctional. It is easy to warm a kettle of water on it or even fry a barbecue. To do this, skewers are hung on a metal rod laid across the stove, and hot coals evenly bake juicy fragrant pieces of marinated meat.
Video - a simple homemade oven for a cauldron