At the word Burzhuyka, a rickety smoking stove from the distant past appears, but modern designs are not at all similar to these stoves of pre-war times.

Content
What kind of potbelly stoves are there?
Fuel for different types of bourgeois can serve:
- waste oil;
- solid fuel.
Main materials for the furnace:
- steel;
- cast iron (or a combination thereof);
- refractory brick.
Bourgeois modifications:
- with a stove for cooking;
- stove with oven and hob;
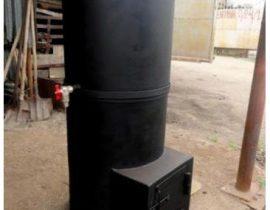
- heater with a special outer casing;
- gas-generating two-chamber potbelly stove.
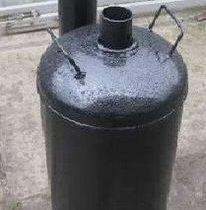
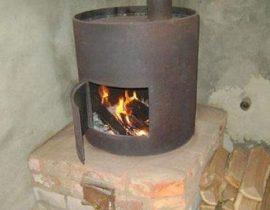
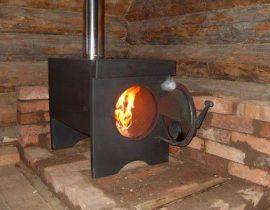
The appearance of the heater depends on your ability to handle the tool. Furnaces are constructed as rectangular, cylindrical from barrels and cylinders (the most simple), and other geometric shapes. To decorate the stove, they use decorative forged elements (doors, grates and other decorations) and heat-resistant glass in the door, through which it is pleasant to watch the flame, especially after all the work done in the garage.
What type to choose for the garage?
garage oven will be made of metal. This design heats up as quickly as possible, does not take up much space in the garage and is quite simple and economical.When designing, it should be taken into account that for the most efficient use of the thermal energy of heated gases, the chimney should be made as long as possible and be sure to equip it with a slide gate valve.
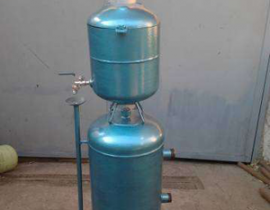
Potbelly stove with convection system
Prepare sheets of steel (at least 2 mm thick), a grinder or a gas cutter, a drill, a welding machine, chimney pipes, a channel, fittings for oven doors (hinges, latches, asbestos sealant), 5-6 fireclay bricks. Also useful: sandpaper, heat-resistant paint, tape measure.
Video: wood burning stove design
For potbelly stoves a rectangular shape is perfect for a garage.
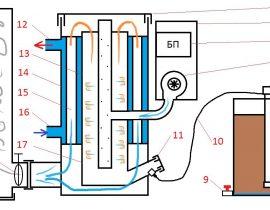
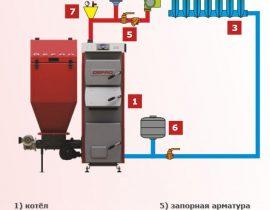
The design includes:
- ash collection unit with drawer;
- the zone where the fuel burns (we will put the fuel on the grate);
- chimney;
- convection system;
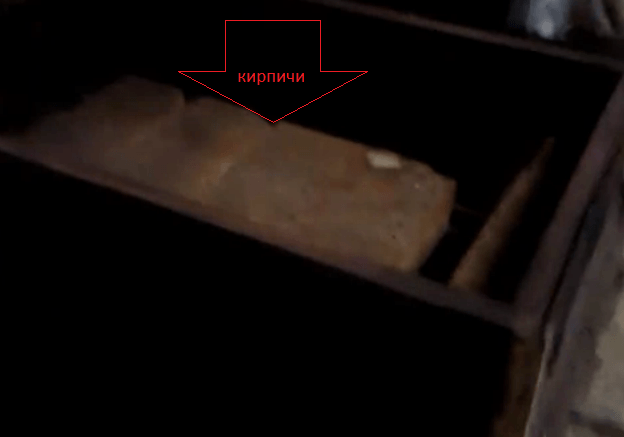
- upper compartment with fireclay bricks and hob.
How will a potbelly stove heat your garage?
During combustion, heat is released, which heats the bricks and the walls of the furnace. Convection ducts (or simply vertical pipes) are located on the walls of the furnace. Cold air enters the ducts from below, heats up and goes up. Thus, the room warms up quickly, and the efficiency of the furnace increases. And due to the presence of fireclay bricks in the construction, heat is stored longer in the garage.
Assembly
To begin with, we draw on paper a scan of the walls of the furnace - the bottom, the front and rear walls, two side ones. We transfer the drawing to a sheet of steel and cut out the details with a grinder.

We fix metal corners on the side and back walls by welding, on which we will later lay a grate-grate and a steel sheet holding the bricks.The height of the compartments is taken from the calculation of ¼ of the height of the furnace - an ash pan, 2/4 of the height - a firebox, ¼ of the height - a compartment with bricks and a hob.

We make a grate. Its function is to hold the fuel and freely pass the ash and ash into the waste collection box. The grate can be made from a sheet of metal, with a grinder making longitudinal holes in it or from metal fittings, placing short and long bars perpendicular to each other and fastening them either with steel wire or with a welding machine.

We lay the grate on the bottom row of corners. An ash pan will be located under the grate.
Next, make a box for collecting waste. We take its dimensions slightly smaller than the dimensions of the zone for collecting combustion products (ash pan). We make markings on a sheet of steel and cut out the bottom, back and side walls. We connect them by welding. You should get a box without a front wall and top. For ease of use, a small loop should be welded in front, for which we will later pull the box out of the oven and clean it from the ashes.
When this stage is completed, we cut out a rectangle from a sufficiently thick steel (about 5 mm), which will be located on the top row of corners and hold the bricks. It is not recommended to weld the grate and the retaining plate to the furnace, so that in case of defects, they can be easily replaced with new ones.
On the back wall in the upper part of the firebox, we drill a hole with a diameter of about 10 centimeters and weld a metal pipe to it. We will connect the chimney to this pipe.
On the front wall of the furnace, it is necessary to place the blower door and the firebox door.For both, we cut out two rectangular holes, and for a snug fit, we sheathe the remaining metal rectangles around the edges with corners (frame) and with an asbestos cord from the inside, attach latches and handles to them, then “plant” the doors on the hinges. You can purchase ready-made cast-iron doors with or without heat-resistant glass inserts. We take the size of the doors so that it is convenient to load the fuel and get the ash collection box.

After installing the doors, we weld the front wall of the furnace to the body, and lay several fireclay bricks on the steel sheet above the furnace.

We proceed to the installation of convection ducts. For them, you will need sections of the channel, the length of which is equal to the height of the furnace. Each channel must be vertically welded to the furnace walls.

The design of the chimney potbelly stove
It is rational to make a chimney in the form of a T-shape with a sliding damper. To do this, we select two pipes: the first should be tightly put on the pipe coming out of the furnace of the potbelly stove, the second should be long enough to remove flue gases outside the garage.
We make a hole in a long pipe, to which we attach a short section of pipe perpendicularly by welding. Here we will place the valve. We drill two holes with a diameter of not more than 1 cm so that a metal bar passes through them. We bend the end of the rod. We weld a circle inside the pipe to this bar. When the bar is rotated, the circle must rotate accordingly and change the size of the gap in the pipe.

The walls behind the chimney must be insulated with asbestos cardboard or steel.
The last stage of work is the installation of the furnace on the legs.The base (legs) are made: from sections of profiles, attaching them by welding or screws to the furnace body; from a metal box without a front wall (acts as a woodcutter); from bricks or forged elements.
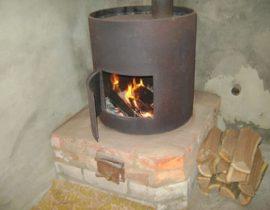
It remains only to connect the stove to the chimney and kindle a fire in it. After installing the potbelly stove in the garage, it will always be warm, dry, and after work there will always be an opportunity to warm the kettle and relax.
Do not forget to also prepare a place for firewood so that it is always available and dry!