Owners of their own car or supplies stored in the cellar of the garage, like no one else, understand the need to heat this non-residential, but often used space. This article will talk about creating potbelly stoves for a garage, if you have experience working with metal, cutting and welding it, you can do everything yourself and the result will pleasantly surprise you! Of course, it may not be so beautiful, but it is very convenient and functional!

Do-it-yourself potbelly stove for a garage
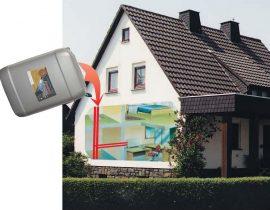
Garages are built mainly from foam blocks and bricks, and the gates are mainly made of steel. In unheated garages in winter, ice often forms on the floor and walls, in such conditions the metal of the car corrodes faster, food freezes or deteriorates due to moisture. And if the garage is an extension to a private house, then you have to spend gasoline every day to warm up the engine, spending time and gasoline on this.
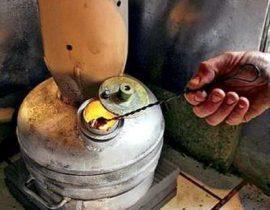
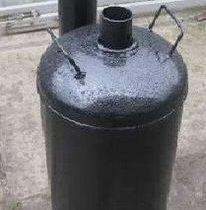
All these problems are able to be solved by a compact metal potbelly stove that runs on any type of solid fuel. In this case, there is no need to connect it to a source of electricity, the furnace is completely non-volatile. And it is quite easy to assemble it with your own hands from used cylinders or sheets of iron and install it in the garage, you just need to have the necessary tools and the ability to handle them.

Content
What is the best way to heat a garage?
Before building a furnace, it is necessary to equip the garage with good ventilation, be sure to take care of fire safety by removing all flammable liquids and materials away from the future potbelly stove, equip the woodshed and design the furnace design in such a way that the furnace hole is away from the car.
Is there a place for a brick potbelly stove?
Metal furnaces are cheap and compact, but due to high temperatures, steel quickly burns out, and the furnace fails, requiring repair. In addition, red-hot surfaces are the cause of burns and fires. Another thing is a potbelly stove made of bricks. Her virtues:
- Such an oven takes up much less space and weighs less than any other stone oven.
- Brick accumulates heat better, the room warms up more evenly, and after completion of work it cools down more slowly.
- The oven is non-volatile.
- The efficiency of the furnace is higher than that of a similar metal one.
Preparation for masonry
Before starting construction, it is necessary to choose a place for a potbelly stove and take care of fire safety. In order to save space in the garage, it is preferable to place the oven against the wall. But at the same time, its location should not interfere with the installation of a long chimney that heats the garage space. Otherwise, there will be large heat losses. Behind the stove on the wall, you must either attach a thick piece of sheet iron, or plaster it with a thick layer.
Foundation
A brick potbelly stove in the garage is installed on the foundation. To do this, dig a small pit. The perimeter of the pit is equal to the perimeter of the furnace, plus 50-70 cm.
For building a foundation will need: crushed stone and sand, cement, container for mixing mortar, water, waterproofing material, shovel, building level and tape measure. When everything is ready, let's start work:
- We dig a hole of a rectangular shape, half a meter deep.
- Pour a mixture of sand and fine gravel to the bottom, moisten the mixture with water, and tamp.
- We fall asleep a layer of crushed stone up to 15 cm thick, ram it again.
- We mix a solution of 1 part of cement, the same amount of water and three parts of sand. The resulting mixture is poured onto a layer of rubble, leveled and wait a day until completely dry.
- We cover the hardened cement with several sheets of waterproofing material, which will prevent moisture from the soil from affecting the furnace structure.

Materials and tools for laying the furnace:
- refractory brick;
- clay, sand, water (the clay solution should not crumble or spread, this must be checked in advance, before the start of work);
- Master OK;
- lace (plumb line);
- furnace hammer;
- building level and tape measure;
- metal elements, a hacksaw (or grinder) and a welding machine (sheets of metal and rods from which doors, canopies, latches, grate will be made).
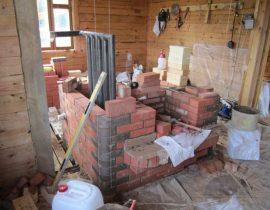
Step-by-step instructions for laying a potbelly stove in the garage
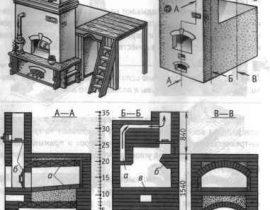
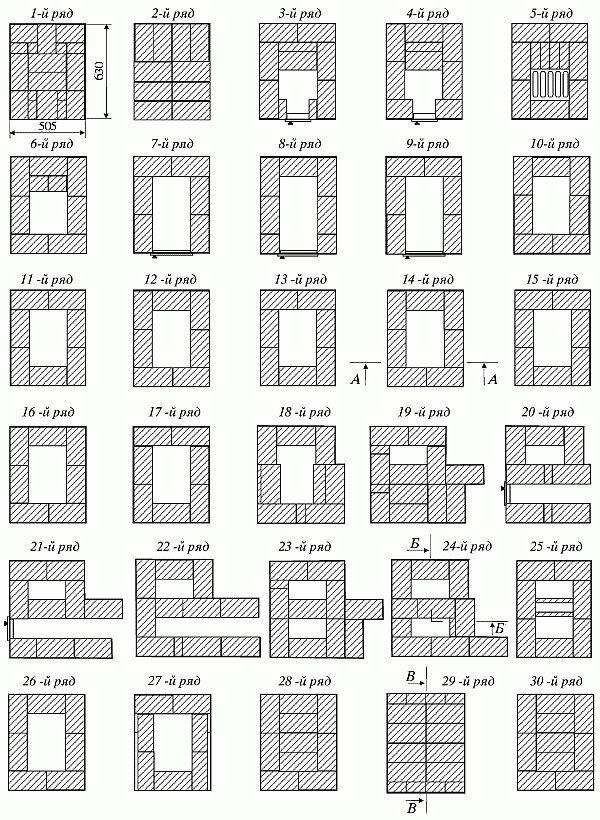
- Brick laying is carried out according to the ordering scheme. Such a scheme is a horizontal section of the furnace, which displays the number and location of bricks in each of the rows of brickwork.

- The first row of bricks is laid on edge, carefully checking the horizontal position. The second row is also solid, but the brick is already on the other side.
- To check the verticality of the furnace from the ceiling to the corners, we attach plumb lines.They will not allow the laying to be taken aside and create a distortion of the structure.
- The next few rows of bricks are laid in such a way that walls and a space between them are formed. This space is designed to collect ashes and ashes. A grate will be laid on top. And on the front side there will be a metal door (blower), designed to regulate the draft in the furnace and the convenience of cleaning the furnace from fuel combustion products. The door is made of sheet steel of sufficient thickness, canopies (hinges) and a handle are welded to it. Fasteners are made by pinching metal fasteners - paws with bricks and clamping the metal wire holding the door with them. For tightness, an asbestos cord is fixed to the inside of the doors.
- The grate can be purchased ready-made or do it yourself if you have a welding machine and some fittings. A mesh is assembled from longitudinal and transverse metal bars, which is laid inside the furnace (5th row), without fixing it with a solution. The longitudinal holes in the grate should be directed towards the door.
- After the grate is laid, the furnace space is laid. If the firebox is small, then firewood or coal will have to be thrown more often. The furnace is closed with a door. Its manufacturing and installation process is similar to the ash chamber door (row 7-9).
- Next, they lay out the arch of the furnace (instead of the brick arch of the furnace, you can lay a sheet of cast iron and use it as a stove in the garage) and bring a metal thick-walled pipe to one of the walls of the furnace, which will heat the garage. A piece of pipe is inserted into the brickwork, fixing it with mortar.If the pipe is not solid, the segments are connected by couplings (clamps) with a heat-insulating layer or by means of a welding machine. Seam tightness is very important. If the tightness is broken, smoke will enter the garage, and heat transfer will be disturbed.
- We bring the pipe out through the roof or one of the walls of the garage to the street, making it high enough to ensure normal traction. To reduce heat loss, the outer part of the pipe is wrapped with a layer of heat-insulating material (for example, glass wool) and another pipe of a larger diameter is put on top. To protect against precipitation and dirt, a metal cone (fungus) is welded to the top of the chimney.


Drovnitsa
A potbelly stove in the garage is heated with coal, firewood or fuel briquettes. All of these fuels need storage space. It is important that the fuel is dry, otherwise, during its combustion, condensate will be released, settling on pipes and soot, and thermal energy will be spent not on heating the room, but on moisture evaporation.

Firewood is made of cast iron, steel and even leather. The storage container can be a capacious tank, a metal box or a large leather bag. The volume of the woodshed depends on the frequency of use of the stove and the amount of fuel stored in the garage.

Firewood racks located outdoors should protect firewood from moisture and dirt, rodents. Inside the garage, the firewood rack is located at some distance from the stove, its function is to compactly store firewood and reduce dirt and debris from them.
Do-it-yourself firewood for a garage is made from a set of bars, mesh and sheets of metal welded together, cut and bent according to individual sketches. About, how to heat a charcoal oven read the following articles.
Brick potbelly stove in one day - video