The potbelly stove always helped out in emergency situations and was reliable assistant to summer residents, motorists with a garage, as well as owners of small private houses.
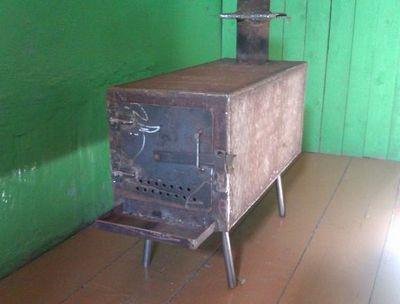
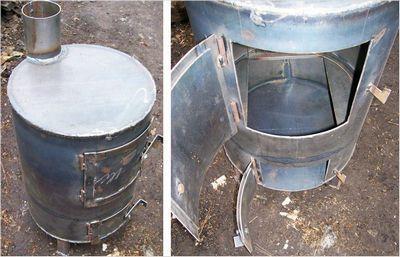
Potbelly stove, welded by a beginner
Today she often, takes on a new look, developed by interior designers, so it fits well into the halls of elite mansions. Is it possible to make this useful, and sometimes simply necessary, heating device with your own hands if you do not have enough experience in welding and cutting metal?
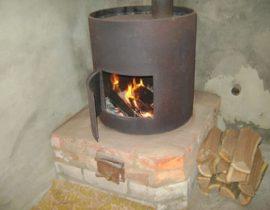
Of course, yes, and once again, yes, in order to weld a potbelly stove, you just need to understand the general principles of metal welding, even if you get a crooked seam - you can always clean it with a grinder, look at the photo below, which furnace the novice welded, which the welding machine held only twice in a lifetime:
Content
Toolsrequired for work
For the manufacture of any metal structures, it is necessary definite a set of tools that include:
- Welding machine, at least, at 200BUT and electrodes, protective mask and welding suit;
- Bulgarian (grinder), cutting and grinding wheels for metal.Some curly parts can only be cut with a gas cutter.
- Skimmer (a hammer);
- Brush metallic;
- Standard hammer, chisel, pliers;
- Tape measure, folding rule and chalk for marking;
- Drill and drill for metal.
Types of homemade bourgeois
For different rooms, you can choose your own type of potbelly stove, which is more fit technical characteristics and appearance. They are made from metal tanks, pipes of medium diameters, barrels, gas cylinders and sheets with a thickness of at least 3—5 mm.
For heating in the garage fit any of the options for a potbelly stove, but for use in a residential area, it is better to refuse some models.
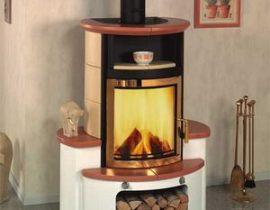
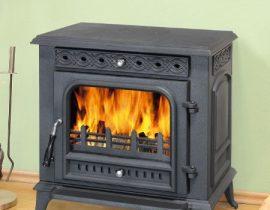
Efficient potbelly stove for heating large rooms
Therefore, you need to consider the most popular options for potbelly stoves in order to find out which one to choose and make yourself.
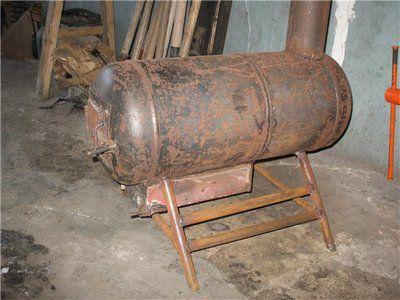
Potbelly stove at work - simple and cheap
This is exactly the option that is not very suitable for use in rooms where people live. Explained simply — when burning, oil mining publishes a specific smell, even if a good hood is arranged.
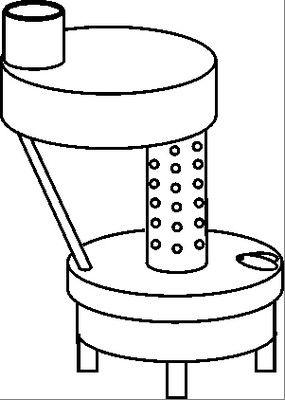
Sketch of a potbelly stove working on oil mining
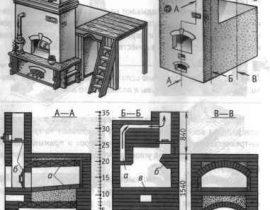
Sheet metal is required for the manufacture thick 4—5 mm, from which all the necessary details will be cut. Also a pipe is needed for the manufacture of some elements of a potbelly stove and a chimney.
In the diagram below, all the dimensions of the parts need to prepare.
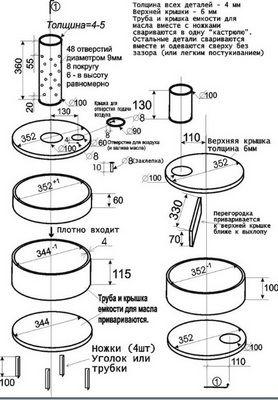
Dimensional drawing
- On a metal sheet, an accurate marking of all elements is made and cut out using grinders. All edges of the parts are carefully cleaned.
- Round holes are drilled in the prepared pipe of the required height.It will connect the top and bottom containers potbelly stoves.
- AT top plane top tank, in the place indicated according to the diagram, a hole of the desired diameter is cut. It is offset from the center to the left side and will be intended for the chimney pipe. On the bottom wall, the hole is offset to the right side of the circle, and the connecting pipe will enter it.
- Two circles are welded to a piece of pipe, which will determine the thickness of the upper tank.
- Do the same for the bottom of the oven. Only a hole for the entry of the pipe is cut into center circle. In addition, cut more one that will serve as the filler neck for the oven. A sliding cover is attached to it.
- Three or four legs are welded onto the lower solid plane.
- For rigidity the upper tank is connected to the lower metal brackets.
- To bake was beautiful and did not rust, all welds are well cleaned, and then all surfaces are painted with a protective heat-resistant paint.
- The last step in the work goes connecting the stove to the chimney.
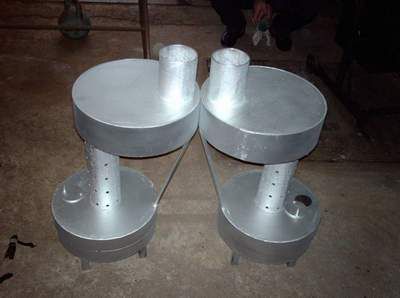
Here's what should happen
Such a furnace works as follows: mining is poured into the lower tank, then with the help of a splinter or rolled up paper, through the hole it is set on fire. The sliding cover on the hole is closed after the mining inside the tank lights up. Oxygen entering through the holes in the pipe that connects the two tanks contributes to intense combustion. Hot air passing through the top of the oven heats her to high temperatures, so her surface, you can easily heat the kettle. Since there is always spent fuel in the garage, there will never be problems for refueling the potbelly stove.
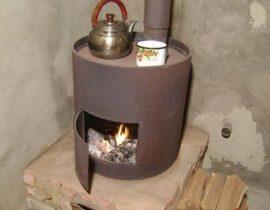
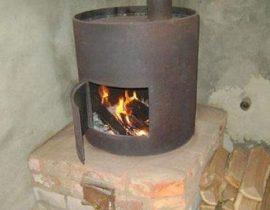
Potbelly stove from an old barrel or pipe
This stove can be made from an ordinary metal barrel or pipe. certain diameter. It is quite suitable for installation in a residential area of a summer residence, and with a beautiful, neat design, it can also be suitable for a residential building.
A simple version of a potbelly stove made of steel pipe
- At the desired level of the future furnace, two rectangular holes are marked and cut out, which will be the entrances to the furnace and ash pan.
- The cut parts are useful for making doors. They are framed with metal strips, bringing them to the desired size, and a special handle with a latch is installed.
- About ten centimeters below the firebox door, inside the barrel or pipe, corner brackets are welded on which the grate will be laid.
- The grate can be independently welded from reinforcement.
- If the stove is made from a pipe, it is brewed her bottom and top.
- Legs are welded to the bottom bottom part.
- A hole for the chimney is cut out in the top panel, and a pipe is welded into it.
- Then on fixed door hinges are installed. According to their location, a hook for the lock is marked and fixed.
- To the furnace had an aesthetic appearance, all welding seams must be carefully cleaned. If you then cover the oven with heat-resistant paint, then her will be indistinguishable from the factory product.
- Then, when the oven is completely ready, her connected to a chimney leading to the street.
Generally, a good option for a potbelly stove, if there is enough space for it in the room, since this model will take large enough area. It should be noted that the upper panel of the potbelly stove is quite large, and on her you can safely install a kettle or, for example, a frying pan.
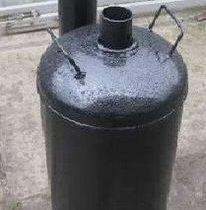
Potbelly stove from a bad gas cylinder
The gas cylinder has an almost ready-made shape for a good potbelly stove.
Potbelly stove from a bad balloon
- The top of the cylinder with a tap is cut off, and a plug is subsequently welded to this place.
- A square hole is cut in its bottom part, which will serve as the entrance to the furnace. The cut part should also not be thrown away. Her scald, and thus the door leaf will be ready.
- Attached to her handle lock, and the door is mounted on welded hinges.
- Holes are made on the wall of the cylinder, which will be the bottom of the future stove. — they themselves will play the role of a grate.
- Under them, a box made of thinner metal is fixed by welding. It will be an ash pan, for dumping waste from burnt firewood, which at the same time plays the role of a blower. It is also necessary to fix the door to the ash pan.
- After that, the legs are welded — they can be made from a metal corner or pipes.
- In the upper back of the potbelly stove cut out round hole, welded into it chimney pipe.
- If necessary, you can also arrange a hob on top. To do this, it is enough to weld a frame of steel reinforcement on the top of the cylinder. On such a hob, it is quite possible to place two items - for example, for cooking and heating water.
Potbelly stove from a gas cylinder is excellent fit both for a garage room and for a room in a country house.
One of the home masters shares his experience on how to make a potbelly stove with his own hands from a cylinder with its vertical arrangement:
Video tutorial on building a potbelly stove from a gas cylinder
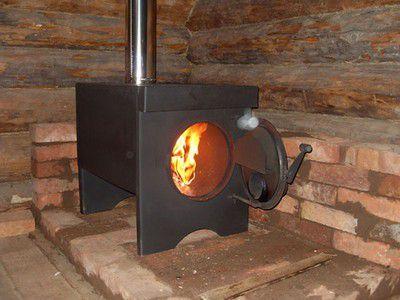
Potbelly stove made of rectangular sheet steel
This is perhaps the most optimal, an aesthetic, compact version of all the bourgeois stoves proposed above. He is the best fit for residential heating. The design of this stove is clearly visible in the two diagrams presented.
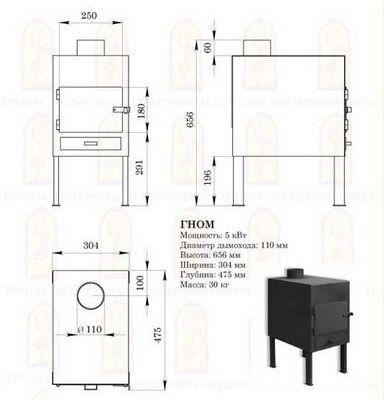
Compact, easy to perform "Gnome"
The first of them shows the oven "Gnome". It has a simple structure: two chambers — firebox and ash pan, chimney pipe and legs.
The second diagram shows a more complex internal design of the potbelly stove, which will help it retain heat for a longer period. This potbelly stove is worth considering.
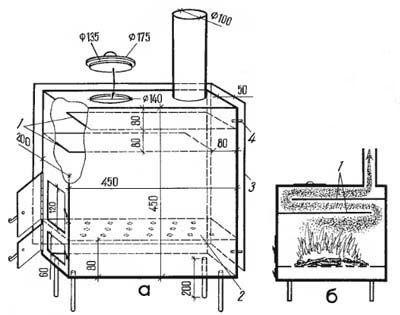
Proven, efficient, multifunctional circuit
- To make this stove, you will need sheet metal, at least 3 mm thick, a 5 × 5 cm corner, a chimney pipe, and a cover for the burner.
- On metal sheets, markings are made and all the necessary details are drawn: the walls of the furnace, the bottom of the potbelly stove, the hob; grate, two internal metal plates that direct the flow of burnt gases, their afterburning, and delaying the rapid release of heat.
- Two rectangular holes are cut in the front wall of the furnace for the firebox and the blower. Here, doors with locks and heck for them will subsequently be fixed on the hinges.
- A neat cut is cut in the upper plane opening for the burner (depending on the size acquired details), as well as a hole for the chimney.
- Legs are attached to the bottom, bottom part.
- The side panels mark the place where the grate will be placed. Corners are welded to these places, they will become brackets for the grate gratings.
- To make a grate, you can drill a large number of round holes in a sheet of metal, or weld lattice from fittings.
- In the upper part of the potbelly stove, at a distance of 16 cm from the hob, a plate is welded, having a length of 8 cm less than the depth of the potbelly stove, those. it should not reach the rear wall of the furnace body by 8 cm.
- The same plate is welded to the back wall, 8 cm above the first plate, it should not reach the front panel also by 8 cm. Thus, after mounting all the parts, a labyrinthine a corridor through which hot air will pass, heating these plates, and not allowing the heat to immediately go into the pipe.
- Further it is necessary to mount together all the details of the potbelly stove by welding. All joints of parts are necessarily reinforced with a metal corner.
- Lastly welded on chimney pipe, and all welds are cleaned.
- For giving spectacular look potbelly stoves, her painted with heat resistant paint.
Rules for the safe installation of a potbelly stove
To homemade potbelly stove brought only comfort and warmth to the house, and did not create problems, it is necessary to follow the safety rules.
- The stove is installed on a fire-resistant surface. Her can be arranged from tiles or in the form of brickwork. Walls around the stove also must be protected from overheating. This can be done with fire-resistant special drywall or other non-combustible material.
- Flammable materials must not be placed near the firebox.
- The room where the oven will be located must have a good ventilation system. This is important in order to exclude the possibility of accumulation of carbon monoxide in the room.
- For the manufacture of any potbelly stove, it is necessary to use only high-quality material.
The potbelly stove will serve both effectively and for a long time, it will be a good helper in household chores and will warm you on winter evenings. The main thing is to think over the model well, carefully her to do and observe all the requirements for safe handling during operation.