In most regions of our country, winters are quite severe, so the issue of home heating is one of the key issues for owners of country houses and summer cottages.
air-heated fireplace
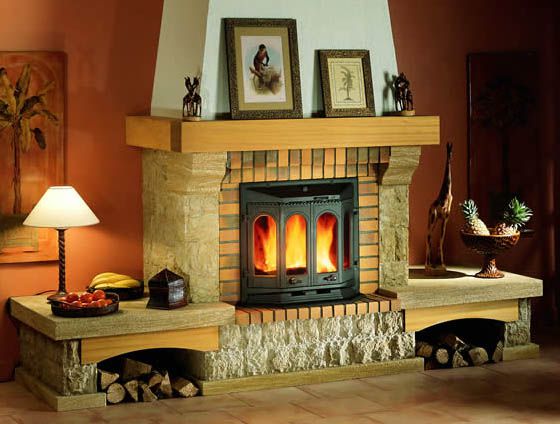
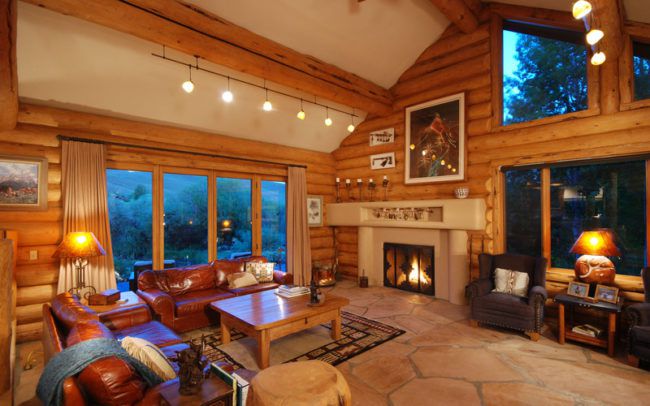
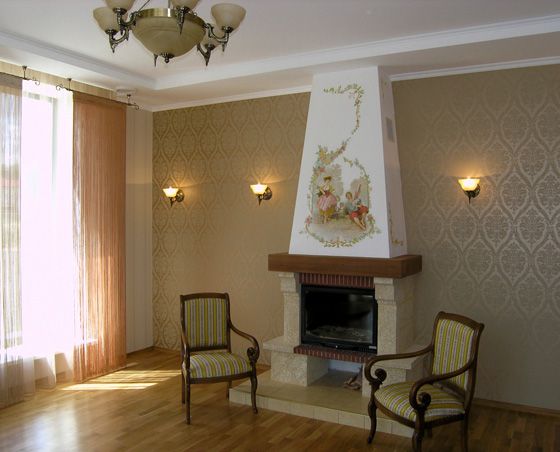
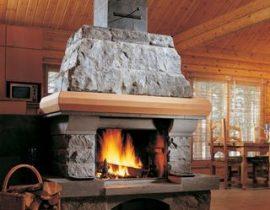
Of all the heating structures for a summer residence or a country house, the fireplace, perhaps, evokes the warmest associations.
It brings a special atmosphere of comfort, creates a homely mood, but at the same time, in its classic version, it does not have the highest efficiency. Because of this, many people think that heating a house with a fireplace is an expensive pleasure. A fireplace with air heating will help to heat even a large house.
To do this, you only need to change the standard heat transfer scheme and implement a convection one. We will talk about how to do it yourself in this article.
Content
- Principle of operation
- Advantages of an air-fired fireplace
- Air-fired fireplace design
- Features of designing a fireplace with a casing
- Basic rules for installing a fireplace with air heating
- Choosing the right fireplace for air heating
- Do-it-yourself fireplace installation with air heating
- Step 1. Preparatory work
- Step 2. Filling the foundation under the fireplace
- Step 3. Laying the base of the fireplace and thermal insulation of the wall
- Step 4. We carry out facing the walls of the fireplace with thermal insulation material
- Step 5. Construction of a pedestal, brick apron and installation of a firebox
- Step 6Chimney system installation
- Step 7: Making the Air Shroud
- Step 8: Fireplace lining and finishing
- Step 9. Lighting the fireplace and checking the draft in all rooms
- Video. Kindling an air fireplace
- Video. Installation of a fireplace with air heating
Principle of operation
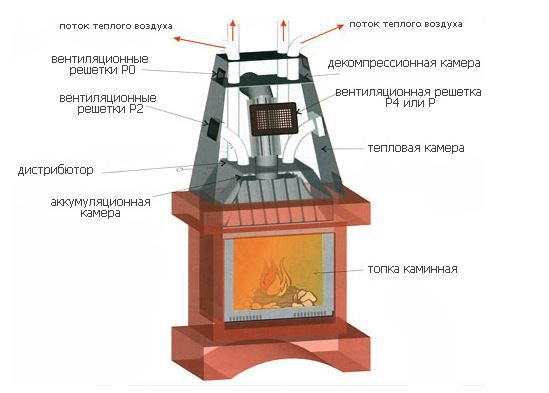
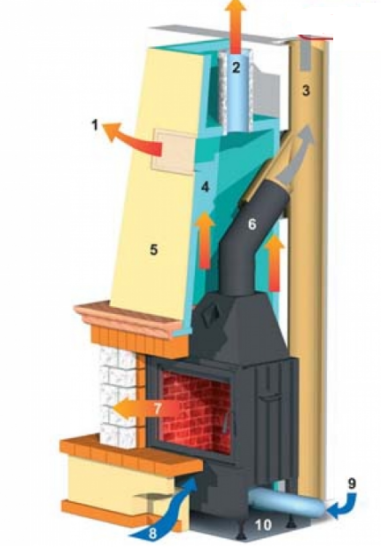
The key to an air-fired fireplace is the casing and ductwork throughout the house.
Principle of operation
The thermal casing of the fireplace not only accumulates heat, but also allows you to redistribute it in the right direction. This minor detail significantly improves the efficiency of heating a room with a fireplace and increases its efficiency.
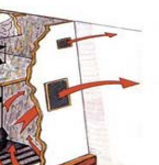
The convection method of heating a room works on the simplest laws of physics. The warm air that comes from the lower pipes rises and heats the room.

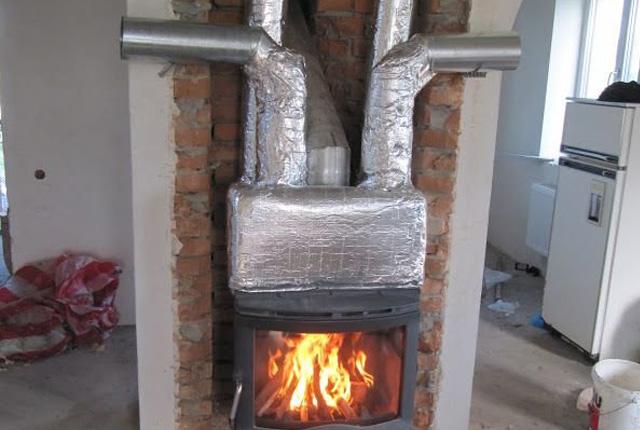
Fireplace with air casing
Thanks to a special insert located in the firebox, the air is heated. In this case, the liner is surrounded by nozzles that are connected to the piping. Due to the operation of the fans, warm air comes into motion and quickly moves around the room, heating it.

Scheme of air heating in the fireplace
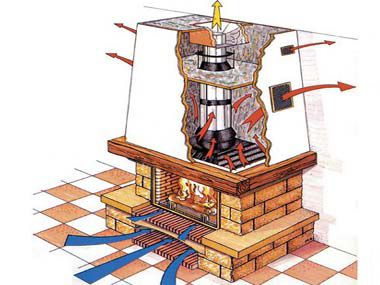
Also, the movement of air can occur not due to forced ventilation, but due to the force of gravitational attraction. The difference in temperature between cold and hot gas ensures the movement of air around the room.
But in this case, the number of pipe turns should be minimal, otherwise the gravity system will not be able to provide natural air circulation.
Warm air circulation in the house
Thus, the work of a convection fireplace is realized in two ways:
- The upward flow from the fireplace insert raises warm air up the room.
- The downward flow, on the contrary, directs colder air towards the firebox.
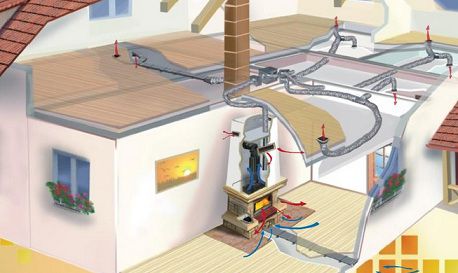
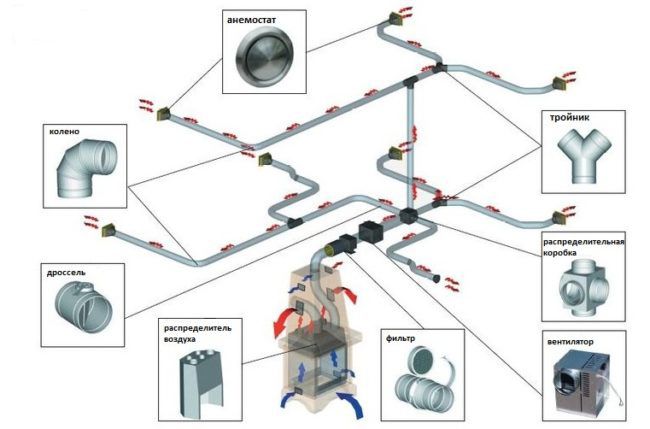
If the owner is faced with the task of heating a large house with a single standard fireplace, then a more complex duct scheme will have to be made, where hot air will be supplied to the premises due to the operation of the fans.
The scheme of air heating in the house
With the correct organization of the system and the precise implementation of all the laws of physics, with the help of one fireplace with an air casing, even a two-story house can be heated.
Advantages of an air-fired fireplace
What is the plus of the convection type of heat exchange compared to the standard scheme of the fireplace device? Let's look at this issue in more detail:
- An ordinary fireplace, without any additional devices, works according to the standard scheme: heat is maintained in it exactly until the firewood is burning.

Fireplace with closed hearth
This is what calls into question the efficiency of such a unit in modern living conditions. If you increase the flow of additional air into the fireplace insert, this will help improve the combustion process and ensure its stable operation. The introduction of air heating into the fireplace reduces fuel consumption by 20%.
- Smoke ducts are necessary for the removal of combustion products. But if, in addition to arranging these pipes, additional channels were laid, into which air heated by convection would enter, they would provide an additional increase in temperature.
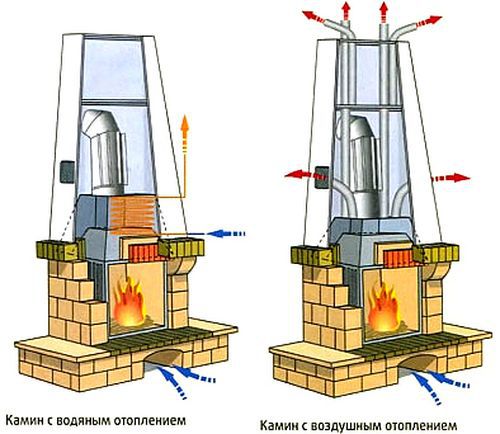
Fireplace with water and air heating
An air fireplace mantle helps raise the temperature in your home in several ways:
- Radiation - direct heating of air from an open firebox in a fireplace.
- Heat transfer - heating the walls of the fireplace and direct transfer of hot air into the room.
- Convection is the process of mixing cold and hot air flows in the house.

Fireplace with water and air heating
The only thing to consider when arranging an air-heated fireplace is the planning of such a device at the stage of building a house. This is directly related to the thickness of the walls of the house and the features of their construction.
Fireplace with air heating in detail
The air fireplace on the closed fire chamber works. Many manufacturers already immediately offer ready-made kits with a casing, which are a mono block. Inside there are gaps through which there is a repeated passage of air.
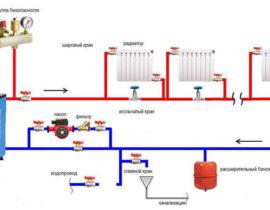
At a cost, an air fireplace is much cheaper than a similar unit with a water circuit. At the same time, it is in no way inferior in terms of efficiency and heat transfer, unless, of course, the ventilation wiring is correctly performed.
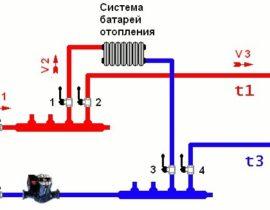
Typical scheme for connecting a fireplace to a heating system
A feature of fireplaces with a water circuit is double heat transfer: first, the firebox heats the water, and then the radiator heats the air itself. Here, instantaneous heat transfer occurs due to convection currents.
Forcedly organized convection allows you to change the heating radius from 3 meters to 10 meters. Also, with the help of convection, you can change the climatic conditions of the house by increasing or decreasing the humidity.
Of course, this method will require additional financial investments, but it will ensure the optimal level of comfort in a country house.
Microclimate in the house
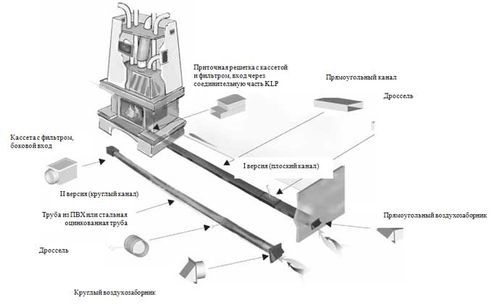
Air-fired fireplace design
Traditionally, an air fireplace consists of the following elements:
- Fireplace insert.
- Portal.
- Air nozzles that increase the thermal efficiency of the unit.
- A casing for a fireplace that distributes heat.
- Fan.
- Filter.
- Ventilation grates.
- Firebox stand.
- Distributor and air tees.
The advantage of such heating is that it can be implemented in areas remote from the benefits of civilization. Where there is no electricity. And at the same time, one fireplace can heat a fairly large house with several rooms.
Air casing for fireplace
The presence of two floors will require a special pump to be added to the standard scheme for arranging an air fireplace, which will perform forced circulation of warm air.
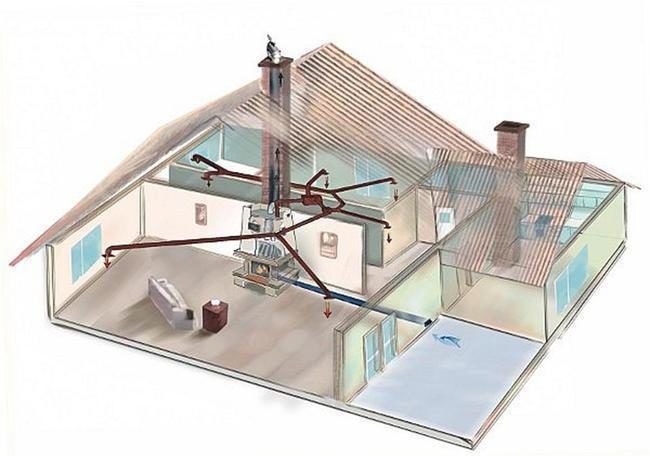
Air heat exchange proceeds in a closed cycle.
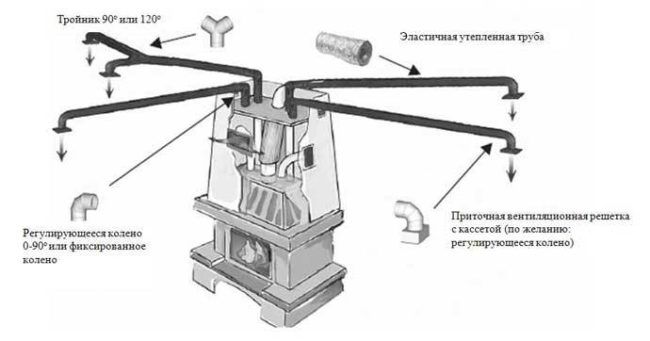
Features of designing a fireplace with a casing
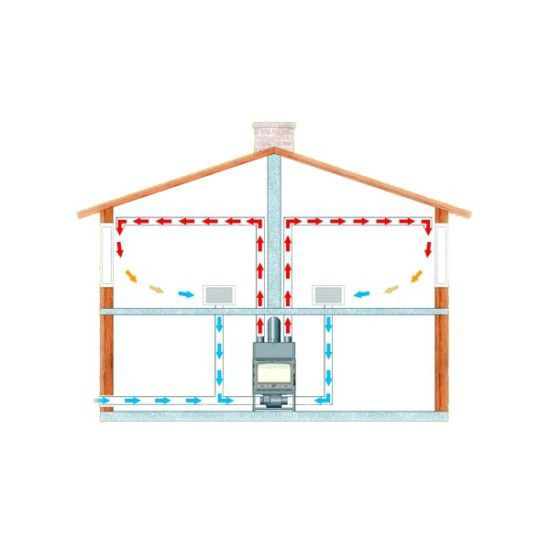
Whatever configuration, power and size you are going to implement a fireplace, a prerequisite for convection heat transfer is the installation of fans. With standard home heating by a fireplace, air circulation will be carried out only due to the temperature difference (air density).
Algorithm for the movement of air in the casing
Naturally, the efficiency of such convection is extremely low. When creating artificial convection, the intensity of the fireplace will be created by the direction of the air currents.
The location of the fans is also of great importance. The main feature of this design is the location in such a way that they supply cold air from below, and not from the inside. Otherwise, the reverse process may occur.
We should not forget about the noise threshold in the room.When arranging a fireplace, it must be minimized, otherwise, despite the heat emitted by the heater, it will be extremely uncomfortable in the room.
Having decided to equip a fireplace with air heating in the country, I immediately want to warn you that this is not an easy event. If you are an absolute beginner in this business, then it is better to order the layout of the fan and pipes from a specialist.
System elements
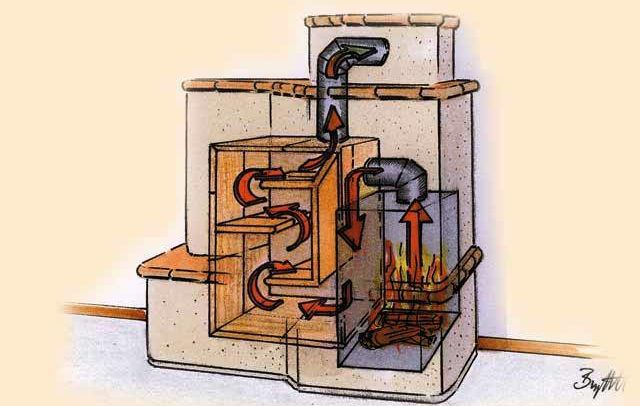
The principle of creating such a design is as follows: cold air is taken from below by fans and goes to the furnace, where it is heated to the required temperature. Then it enters the walls and passes through special channels into the casing of the chimney.
Air movement in the casing
The metal chimney also, in turn, generates heat, increasing the efficiency of the fireplace. Here there is a maximum circulation of hot air, which, under the action of a fan, is directed into the room.
Video. How to calculate air heating correctly
For the design of this heating system, a closed firebox is suitable, which accumulates and retains heat as much as possible. Such a heating system allows you to achieve a maximum efficiency of 80-85%.
In order to achieve maximum efficiency of the design, it is necessary to minimize the network of pipes, channels and the number of their bends. If the length of the pipe does not exceed 3 meters and does not have many bends, then natural circulation may suffice. With other parameters, you can not do without additional fans.
Air channels are best made of steel or aluminum.
Important! An important element in planning an air fireplace heating system is the layout of the house.If the house has two floors, then most likely you will need several fans. For a one-story house with a horizontal pipe outlet, one fan will suffice.
Scheme of air heating in the fireplace
Basic rules for installing a fireplace with air heating
A fireplace fan is best installed in a utility room. Firstly, this will allow not to violate the aesthetics of the interior, and secondly, it will reduce the noise threshold created by the operating device.
Important! The operation of such a fireplace requires a particularly careful approach. Due to the constant operation of the fan, soot accumulates on the filter, which must be constantly cleaned. Otherwise, the efficiency of such a fireplace can be significantly reduced.
To avoid noise during the operation of the fireplace, choose a pipe diameter with a round section. For the efficient operation of such a heating system, each room must have a ventilation hole with a grate. Therefore, the design should take place at the stage of building a house, otherwise it will take a lot of effort and time to equip an air fireplace in the house.
Anemostats or closed diffusers help to heat the room from all sides. The shape of the diffuser can be round and square; this does not affect the functionality of the system in any way.
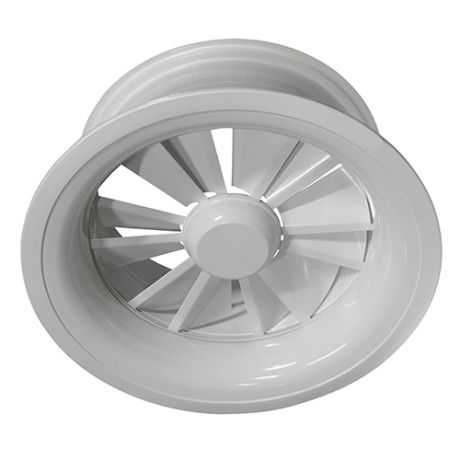
Diffuser
The heating system with an air fireplace is suitable for the whole house, except for rooms where separate ventilation is provided: bathroom, toilet, kitchen. If you omit this factor, then the warm air circulation system may be disturbed in the house.
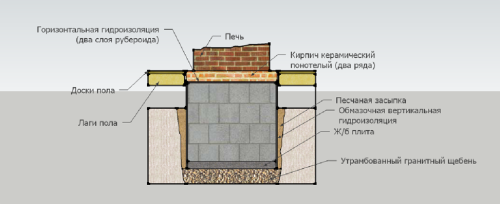
The convection chamber of the fireplace is made of plasterboard, and the frame is made of galvanized profile.
To prevent heat from entering the ceiling, it is necessary to provide a cut-off.

Thermal cutoff under the ceiling
This ensures even pressure, system ventilation and maximum fire safety, helping to prevent fire. For this, heating with an air fireplace must take into account certain security measures not only during operation, but also at the stage of building the unit.
Let's focus on the key points of the arrangement:
- The fireplace insert must be placed on a solid brick base.
- The foundation for the fireplace must be separated from the main foundation of the house.
- The system must be covered with drywall sheets.
- Air ducts should be distributed throughout the house.
- The air duct assembly must be located in the technical room.
Let's look at the main advantages of the casing for an air fireplace:
- Efficiency increase. When compared with a conventional fireplace, which gives an efficiency of 30-40%, then air heating increases productivity up to 80-85%, depending on the duct and pipe arrangement.
- Fuel consumption is reduced by 20%. Even after the complete attenuation of solid fuel, warm air continues to move around the room.
Scheme of air heating operation
- Use of hot smoke. If in a standard home heating system with a fireplace, the chimney is used only as an outlet for combustion products, then here the metal casing provides additional heating of the room, giving warm air into the room.
- The maximum gas temperature during combustion is 1700C. Agree that it is not very rational not to use this resource? A special air duct, which is equipped with an air fireplace, circulates hot air around the house.
Video. Heating your home with an air fireplace
The listed advantages of such a heating system very eloquently speak of the need to implement this project.
Choosing the right fireplace for air heating
Having decided on the installation of air heating in the house, it is very important not only to develop a competent project scheme, but also to choose the right fireplace.
The standard fireplace selection system for the home will not work in this case. If traditionally we choose the power of the furnace, based on the area of \u200b\u200bthe room, but other rules will apply here.
The fact is that too powerful a firebox will lead to overheating of the room, in which the owners will simply be uncomfortable. You will have to constantly control the amount of firewood, ventilate the room, which will require additional trouble and can lead to colds, etc.
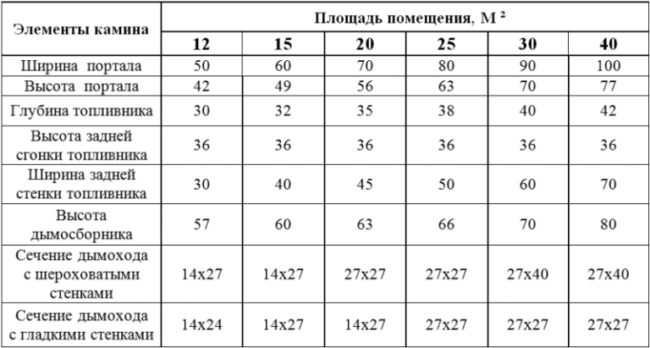
Calculation table for fireplace power
To correctly calculate the power of the fireplace, it is necessary to take into account not only the area of \u200b\u200bthe room, but also the number of rooms, floors in the house, the number of windows and the type of ventilation system.
Do-it-yourself fireplace installation with air heating
Step 1. Preparatory work
- Procurement of material and tools.
Before proceeding with the arrangement of a fireplace with air heating, it is necessary to prepare the following materials.
Materials that will be needed for laying the furnace.
- Red solid ceramic brick (M-150.)
- Chamotte (refractory) brick.
- Masonry mortar (sand, red oven clay).
- Foundation material (cement, gravel, sand).
- Ruberoid.
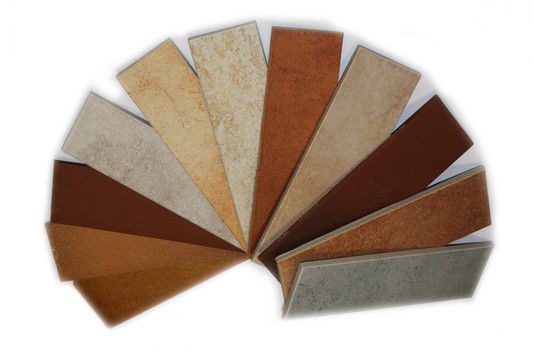
- Ceramic tiles for base and wall cladding.
- Boards for creating formwork.
- Reinforcing mesh.
- Foil for thermal insulation of the casing.
- Cast iron firebox with glass.
- Thick-walled pipes.
- Ventilation pipes - 4 pieces.
- Flexible pipes (footage depends on the area of the room).
- Fans (the number depends on the number of rooms in which they will be installed).
- Metal corners under the firebox.
- Sandwich pipes.
- Clinker tiles for lining the fireplace portal and air casing.
Tools you will need to build a fireplace.
- Building level.
- Owl shovel.
- Construction marker.
- Drill and grinder.
- Hammer and chisel.
- Measuring tape (roulette).
- Construction slope.
- Goniometer.
- We determine the location of the fireplace arrangement and carry out the drawing.
This is one of the key factors in the heating system, which will affect the comfort in the house, ease of operation and heating efficiency. Of course, this factor is largely influenced by the personal preferences of the owners.
Many people want to see a fireplace in the center of the fireplace, the main decorative element of the room. But you also need to consider the location of windows and doors. Do not forget that any doorway creates a curtain of cold air, which will be a barrier to the normal circulation of warm air coming from the heater.
In this regard, it is rational to define the device not in a direct line with the door.
There are several options for installing the unit.
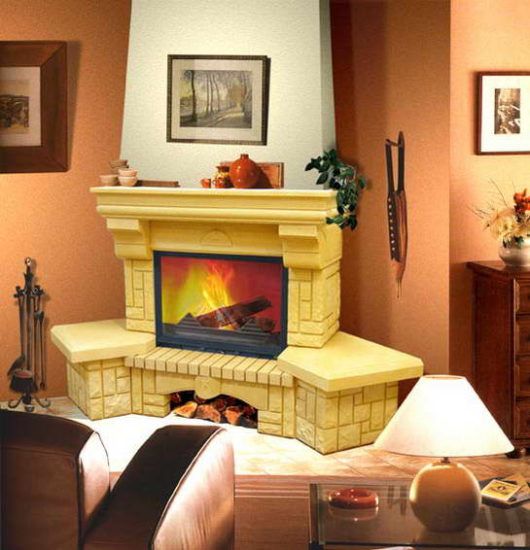
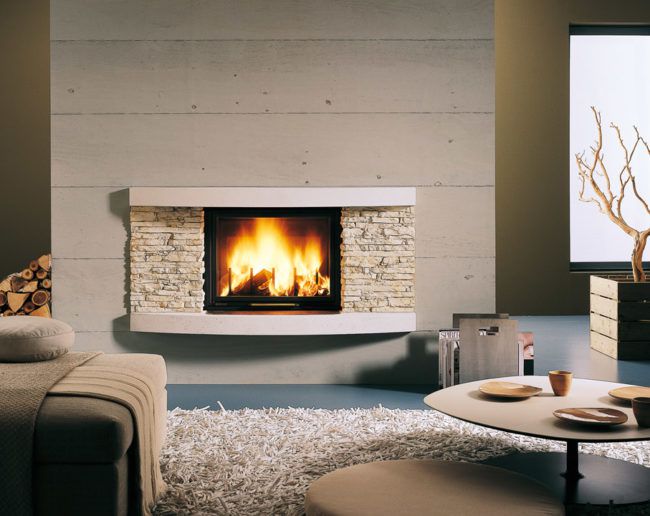
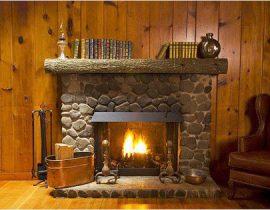
- Wall mounted. This type of installation is one of the most popular. The very name of this method suggests that part of the fireplace structure is leaning against the wall. In this case, the chimney is usually disguised as a wall or is part of it.
wall fireplace
Such installation requires a more thorough approach to the issue of fire safety.It is necessary to take into account the thermal insulation of the fireplace, lay basalt fiber at the point of contact of the device with the wall.
With this arrangement of the fireplace, the unit itself can have a frontal or corner arrangement. This does not affect the functionality in any way, and it all depends on the customer.
The front version is ideal for heating a large living room. For a small room, experts recommend choosing corner fireplaces. Thus, the device will heat not only the room in which it is located, but also adjacent rooms in the usual way of heat transfer.
- Built-in fireplace.
built-in fireplace
This option is ideal for a small room. It is built into a special niche and takes up a minimum of space, but this option must be provided for even at the stage of building a house, since it is necessary to make an exit under the chimney.
- Freestanding fireplace.
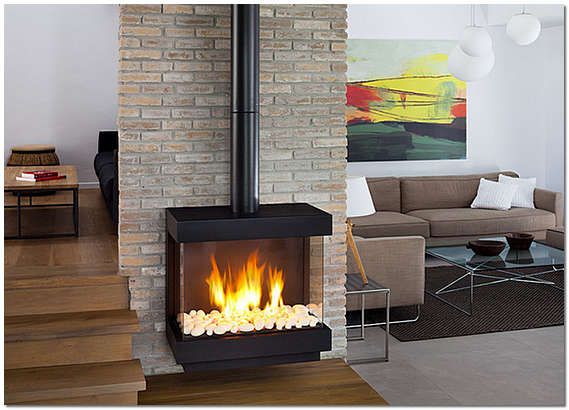
Free standing fireplace
This option is a very effective and stylish decoration of any home. But in this case, it will be necessary to carry out the chimney only through the roof, which must be done even at the stage of building a house.
Step 2. Filling the foundation under the fireplace
This is a very important step, on which the strength, reliability of the structure, and its further efficiency will depend. Ideally, of course, to build it even before the construction of the house. Then both the place and the ideal place for the furnace will be allotted, and the foundation will be laid out at the stage of erecting the floors.
The foundation for an air-fired fireplace should in no case be connected to the main foundation of the house. When shrinking the house or other phenomena, the base of the stove should not be deformed.
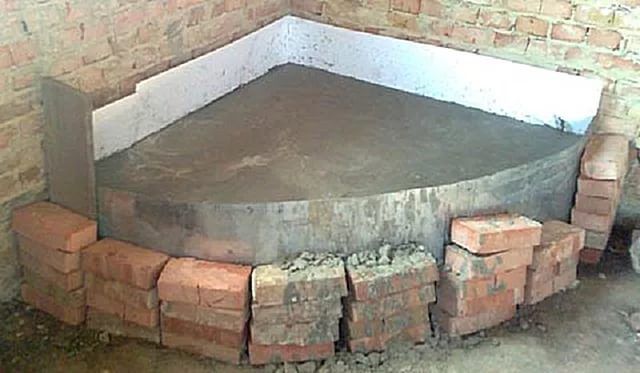
Filling the foundation under the fireplace
- We measure the size of the foundation.It should extend beyond the perimeter of the fireplace by 15-20 cm.
- We tear out a pit of 70 cm to build a solid foundation for a fireplace. Use a bayonet shovel for this. Focus on the layer of soil that will freeze in winter.
The scheme of laying the foundation under the fireplace
- After a foundation pit is dug in the ground along the marking perimeter, we proceed to the construction of a wooden formwork, for which plywood boards, old ceilings, etc. can be used. This will not affect the quality and strength of the foundation in any way. Measure the length and width of the dug hole and cut the boards to this size. Using nails, put together the formwork.
- Formwork waterproofing stage. This will help protect it from the moisture that will be contained in the cement mortar. We line with dense polyethylene and connect it with a construction stapler to the walls.
- We make a solid pillow of sand and gravel before pouring the cement mortar. Pillow height - 10-15 cm.
- We fill the foundation with cement mortar to the height of the formwork, not reaching the clean floor by 15 cm.
- We impose a metal reinforcing mesh on top of the solution. This will stiffen the foundation. Level the top well with a shovel and check with a building level how even the surface is. The technological break will take 2-3 weeks.
Step 3. Laying the base of the fireplace and thermal insulation of the wall
Before proceeding with the laying of the base, it is necessary to check the slope of the floor with a building level. He must be perfect. Subsequently, this step cannot be corrected.
- Laying floor tiles. It should extend beyond the perimeter of the fireplace by 15-20 cm. In order to ensure perfect adhesion of the tiles to the floor, use a special primer for laying tiles.Mix it thoroughly and apply on the floor surface in one layer. Leave the solution for 24 hours until completely dry.
- On the dry soil, apply tile adhesive in an even layer.
- Start laying tiles from one of the corners. If you are laying out tiles for the first time, then make small seams of 2-3 mm. This will visually hide the errors. To do this, use building crosses for laying tiles.
We lay out the base with ceramic tiles
After 24 hours, after the solution has dried, they will need to be carefully removed with a rubber spatula and the cracks closed with a solution.
- After laying a row of tiles, immediately remove all grout with a damp sponge. When it is completely dry, it will be more difficult to do.
- Along the perimeter of the tile, for beauty, you can apply wooden tile layouts to hide the transition from the base to the main floor.
Wooden layouts for tiles
Step 4. We carry out facing the walls of the fireplace with thermal insulation material
When installing a fireplace in a country house, you need to take care of fire safety. Especially if you install a corner fireplace near wooden walls.
- For thermal insulation, you can use basalt fiber or superisol boards. Also, the same tile with which you made the base can serve as a facing material.
- For gluing tiles, choose a heat-resistant mixture. DO NOT forget to check with a plumb line the evenness of the tile or decorative tile laying.
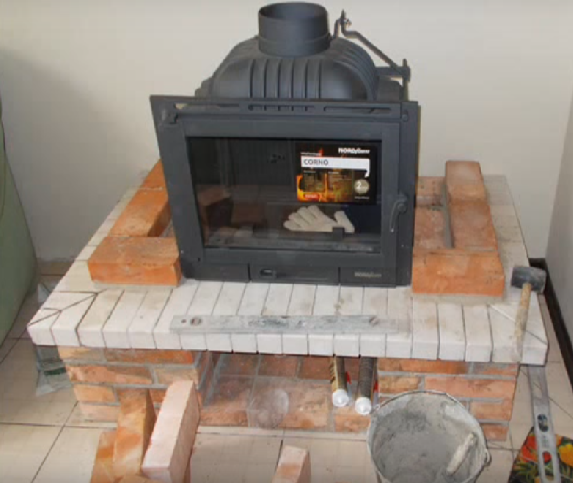
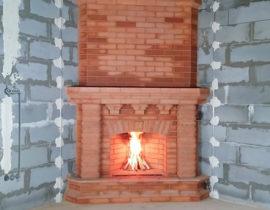
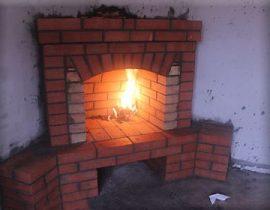
Step 5. Construction of a pedestal, brick apron and installation of a firebox
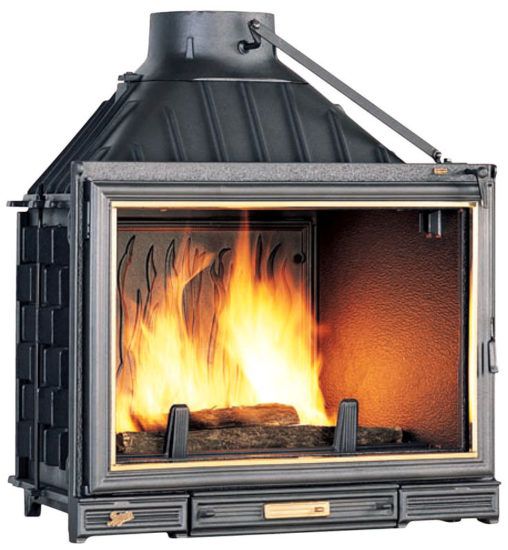
The firebox is the heart of any fireplace. For its arrangement, you can use fireclay bricks or already buy a finished metal structure.

Brick pedestal
Laying a brick firebox will not only require strength, knowledge, but will also take a lot of time. Therefore, we will focus on the installation of a finished cast-iron firebox.
- Fireboxes are being erected on a prepared brick base. The convection of air masses works in such a way that warm air from under the woodshed will come out, mixing with cold.
- We build the base of aerated concrete blocks or bricks. Aerated concrete blocks material have sufficient strength, but at the same time it is much lighter than brick. After all work is completed, the base will need to be decorated with facing artificial stone or plaster.
- We put aerated concrete blocks on building glue.
- We install metal corners that will give the reliability of the structure.
- Using a file, we make grooves in bricks (blocks) into which a cast-iron firebox will enter.
Installing the firebox on a pedestal
- We seat bricks with grooves on metal corners. We strengthen all this with a cement-clay mortar. We check the slope again with the building level.
- We install a cast-iron firebox and immediately check the building level. This work must be carried out by two people, since the weight of the firebox exceeds 40-50 kg.
Cast iron firebox
- A cast iron firebox requires the organization of the correct space under its lower part. About 1/3 of all the heat generated will go through the bottom, so there must be space under the firebox. It is not recommended to install a cast-iron firebox directly on a brick pedestal.
- Now we start building a brick apron. For this we need red bricks, which must first be lowered into the water. So they will pick up moisture well and will not pull it out of the masonry mortar.
- Considering that we are building a fireplace against the wall, the brick apron will surround the cast-iron combustion chamber only from two sides. Depending on the depth of the firebox, calculate the required number of bricks and lay them row by row in a dressing way.
- Carefully remove excess mixture immediately with a spatula so that less time is spent on cleaning during facing work.
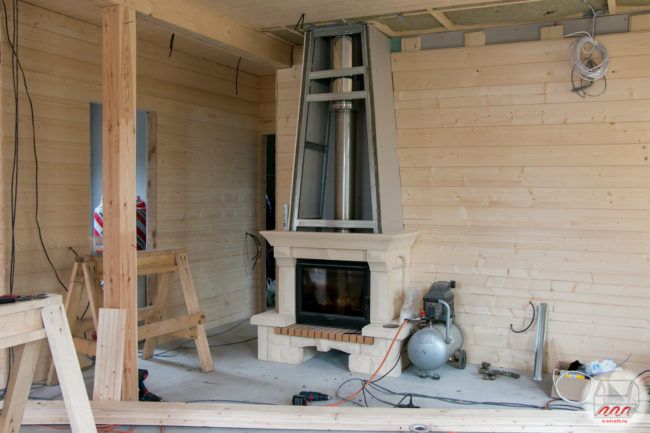
Step 6. Installation of the chimney system
In order to properly implement the combustion products removal system, proceed from the opening of the fireplace chimney. It makes up one eighth of the entire area of the furnace hole.
We carry out the installation of a chimney from double pipes of the sandwich type, which we bring out through the roof or through the wall. The process depends on the design of the house.
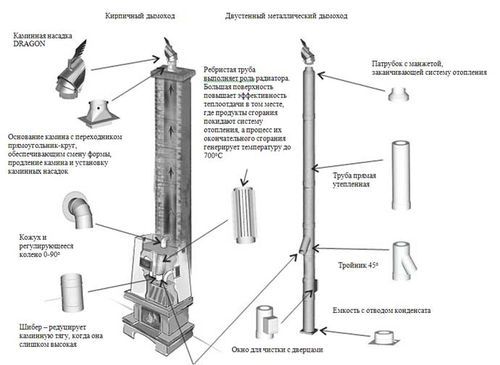
Connecting the combustion chamber to the chimney
- The connection of the chimney starts from the device, and not vice versa.
- Through the gate we connect the outlet of the combustion chamber to the first element of the chimney pipe. We seal the joints well and tighten with a clamp.
- Keep the chimney line straight and try to make as few branches as possible. If the layout of the house and the wiring diagram require it, use a splitter. Avoid narrowing the chimney, otherwise it may adversely affect the draft.
- When the chimney structure reaches the wall through which the opening or roofing is to be made, use a mineral insulated metal spigot.
- We gradually build up the entire chimney and bring it out above the roof, securely fixing it with clamps.
- We cover the upper part with a cap and a grate, which prevents precipitation and debris from entering the chimney.
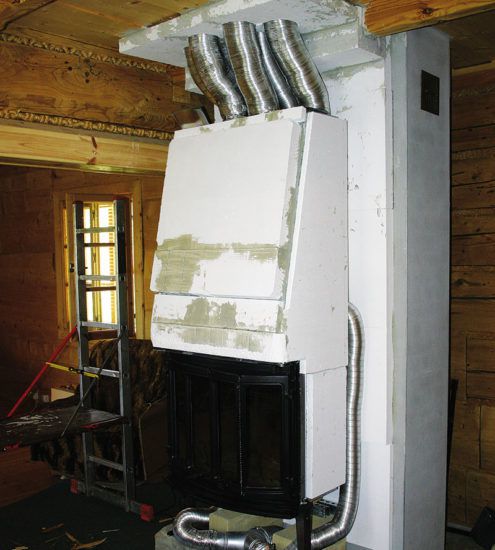
Step 7: Making the Air Shroud
After the firebox is connected to the chimney, we proceed to the construction of the air casing. This stage can be attributed to both functional and decorative tasks.
A kind of air pocket that will be created inside the cardboard structure will serve as an additional source of heat.
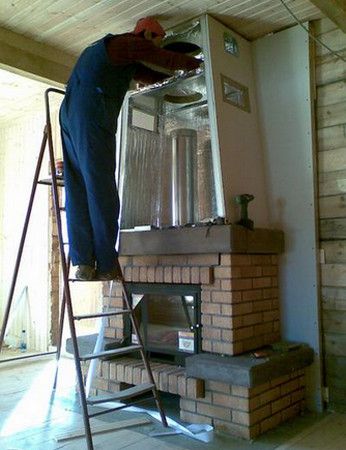
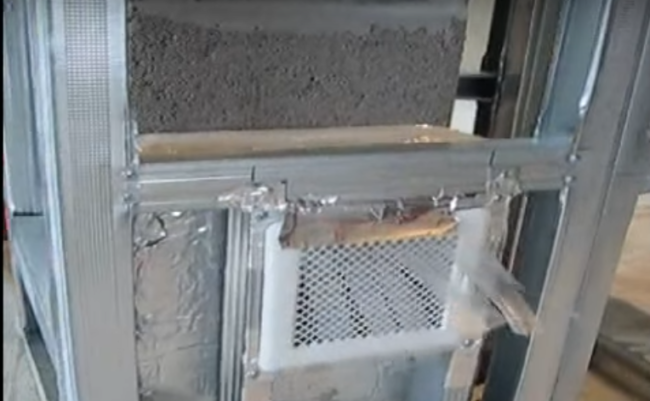
We build a casing of drywall
- We are building a frame from a metal profile around the fireplace.
- We measure the drywall according to the drawing and cut it out with a grinder or saw. The shape of the casing can be any - it all depends on your personal preferences.
Plasterboard casing
- Using an electric drill, we fasten sheets of drywall to the profile.
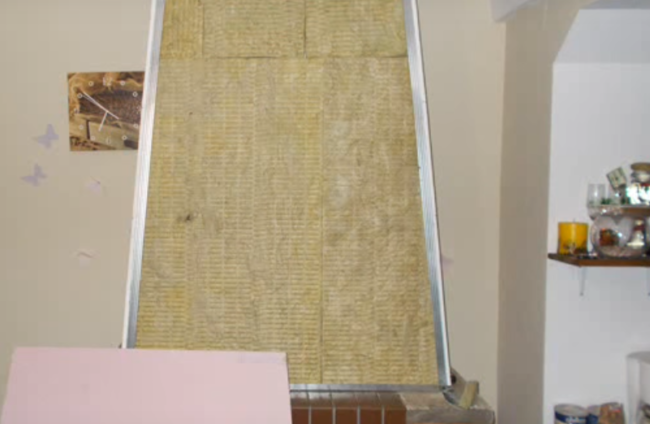
- We insulate the plasterboard sheathing with special foil "fireworks". The inner part is sheathed with magnesite.
Casing for a fireplace
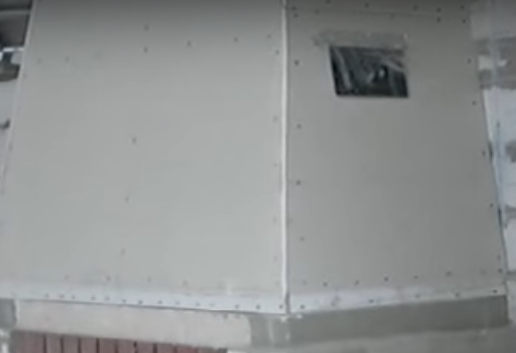
- We make markings in drywall for ventilation holes and carefully cut them out - 4 pieces.
Making holes
If you do not plan to make air pipes around the house in the future, then it is better to make the holes square. If you want to increase the efficiency of heat transfer and lay a duct system, then it is better to make the holes round for connection to pipes. Install pipes.
Outlet pipe for air system
- We carry out thermal insulation of the inner part of the casing. We glue mineral wool on cerosite to drywall.
Laying thermal insulation in the casing
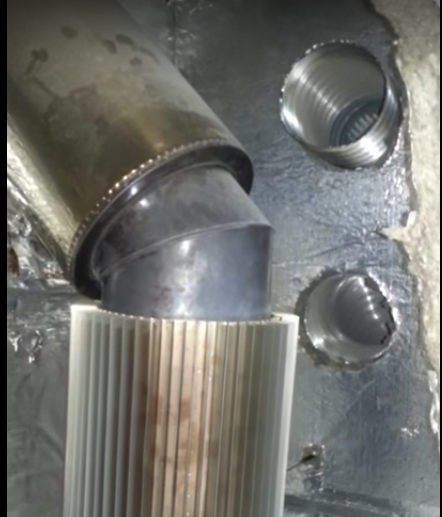
- For better energy efficiency and heat dissipation, we recommend wrapping the chimney with a radiator.
View from inside the box
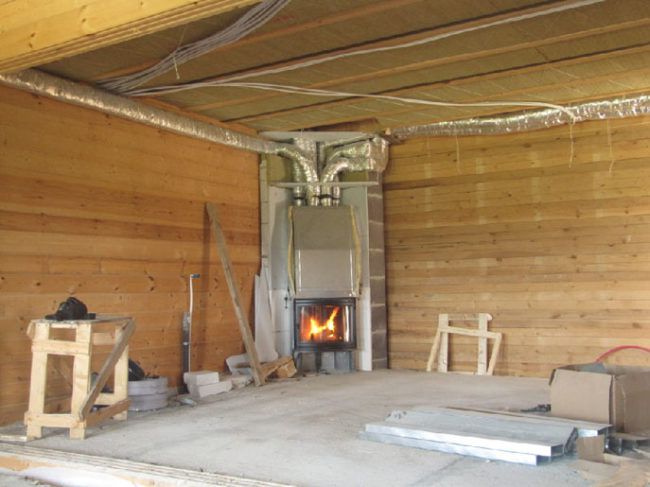
- We connect air ducts made of metal flexible pipes to the convection pipes, through which warm air will exit and we lay this system through the rooms.
We make the distribution of air ducts with flexible pipes
- If the channel needs to be brought to the second floor, then you will have to make a horizontal move and install a more powerful fan at the top.
Running a horizontal channel
To create forced draft in each room, we install a fan. It is better to stretch flexible pipes under the ceiling, as hot air tends to rise.
Air piping under the ceiling
- We install a decorative bar between the firebox and the convection casing.
Duct connection


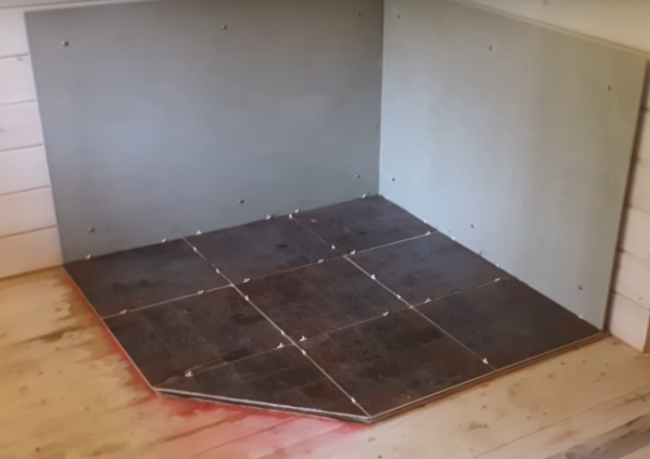
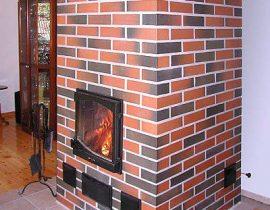
Step 8: Fireplace lining and finishing
The final stage in the form of facing has not only a decorative function. The tile facilitates the maintenance of the fireplace, there is no need for constant painting of the plaster, etc. In addition, a good cladding will perform a protective function that will increase the strength of the entire structure and protect it from cracking.
Glazed tiles
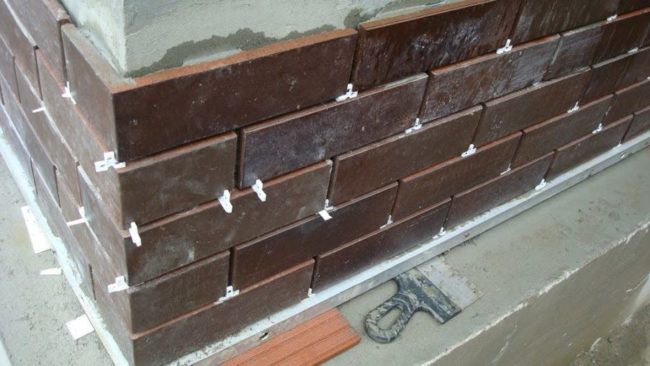
As an outer layer, you can use facing decorative stone, ceramic tiles, red brick - it all depends on your personal taste and interior style.
Clinker tiles
It is best to lay decorative tiles using special adhesive mixtures that are designed for high temperatures. If you are on a budget, then a masonry clay mixture is also suitable.
Remember that any additional material applied to the outside of the stove will reduce heat output. An excellent solution would be to cover the drywall with a thin layer of decorative plaster.
- Mark up clearly according to the size of your tile. Consider clearance. First, calculate "dry" how many solid tiles you need. It is better to cut into ½ and ¼ of the tile after the “wet” row has been laid out.
- If the design of the fireplace provides for a plinth, then step back along its height and start laying out the tiles.
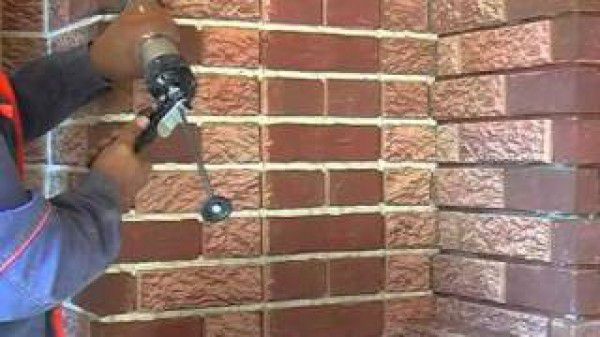
- Carefully, starting from the corner, start laying the tiles, applying the mortar in a thin layer on the tiles. Remove any remaining solution immediately.
Installation of clinker tiles
To maintain an even row and the space between the rows, you can use special building breaks, or you can cut drywall. After the tile has completely hardened, it will need to be carefully removed.
- Tap the row firmly with a rubber mallet and check with a plumb line how evenly the row is made.
- After the row is laid out and there are not enough missing parts, you can measure the parts on solid tiles and cut them off with a special tile cutter. If this is not the case, then use a diamond-coated grinder.
- When the solution dries, you can start grouting the seams. If you used smooth tiles for cladding, then it is better to grout the joints with a rubber spatula. Movements should go diagonally with respect to the tile. If you have chosen structured, embossed tiles for cladding, then it will be easier to seal the seams with a glue construction gun.
The process of filling the seams with a gun
The cladding of the fireplace and the casing itself can be made in any style, since it mainly has a decorative function.
We propose to consider original ideas for decorating the air casing:
Casing painting

Cladding option
Step 9. Lighting the fireplace and checking the draft in all rooms
When all finishing work is completed and the air exhaust system is completely laid, it is necessary to carry out the first kindling of the fireplace. But it is better to wait a few days until all adhesive and cement mortars dry well.
- Move flammable items away from the fireplace and lay a small amount of firewood. Use only well-dried firewood.
- Close the firebox door tightly before the flame ignites.
- Do not immediately give a strong heat to the oven, warm up gradually.
- Check the draft in each room to see if the fans are working properly.
If you have done everything correctly, then you will have a very efficient heating system. Thanks to air channels and forced circulation of warm air, even a large house can be heated with a single fireplace.
Video. Kindling an air fireplace
Video. Installation of a fireplace with air heating


It would be clearer if they showed the casing pie in the context. And then on top of the drywall "fireworks", magnesite from the inside, and then from the inside onto the mineral wool to the drywall. So drywall is already between "firework and magnesite." What kind of drywall do we glue it on?
Good afternoon, in the near future we will try to analyze this issue and give a more detailed description.
Good afternoon! Are ERA flexible corrugated aluminum air ducts (sold in Leroy) suitable for organizing the removal of hot air from the casing of the fireplace insert? Declared operating temperature up to +300 C. Length 3 meters.Air ducts of which manufacturers would you recommend for air heating? Do I need to additionally insulate the air ducts?