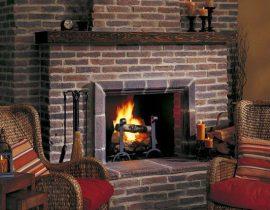
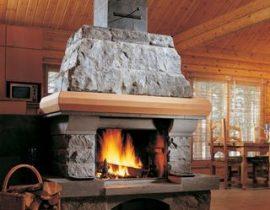
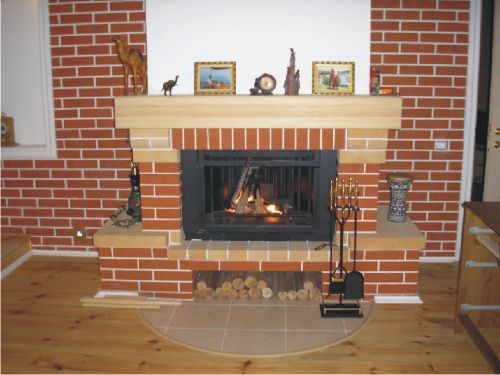
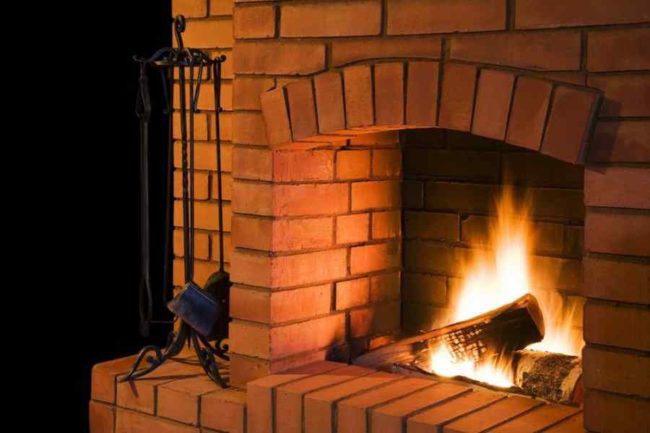
Thinking about building or purchasing a country house, almost every owner dreams of a beautiful fireplace.

brick fireplace
It adds an elegant and romantic sophistication to the interior and allows you to truly enjoy the atmosphere of home comfort.
In this article, we will tell you in detail how to make a fireplace with your own hands, and our step-by-step instructions will allow even a beginner to cope with this difficult job.
Any fireplace, no matter what size and shape it is, consists of the following main parts:
- firebox;
- ash pan;
- grate;
- portal (body);
- chimney.
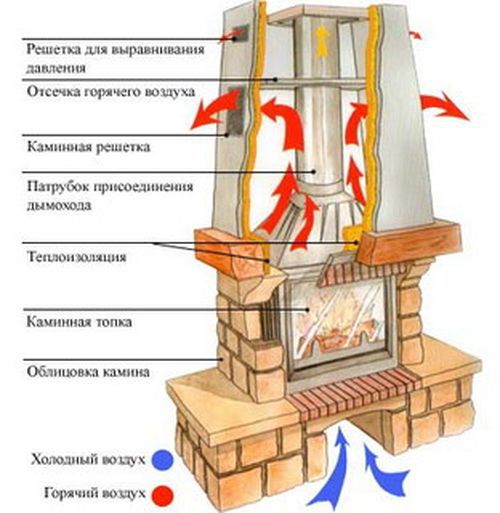
Fireplace device
The combustion chamber, in turn, can be of an open or closed type. If you have chosen a fireplace with a closed firebox, then the design will include additional elements: a damper, transparent doors made of heat-resistant glass.
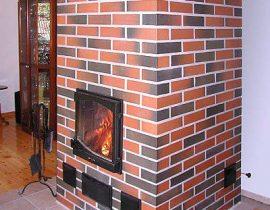
The efficiency, service life and reliability of the fireplace are also affected by the materials from which it will be made. You can completely build a fireplace out of brick, making the furnace part of heat-resistant (fireclay) material, and the rest of the structure of red ceramic.
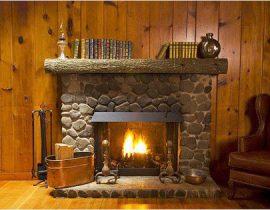
Fireplace with cast iron firebox
And you can buy a ready-made cast-iron firebox, around which to build a body, a portal and a brick chimney.
Of particular importance is the good thermal insulation of the combustion chamber, because if a fireplace is erected in a house made of wood, there is a high risk of fire. Therefore, great attention should be paid to the thermal insulation of the fireplace and the protection of the flooring, walls, and roof.
There are several classifications of the fireplace: according to the appearance of the portal, according to the shape and size of the firebox.
If the width of the portal does not exceed 51 cm, then such a fireplace is classified as a small form.
Width up to 63 cm - to medium.
Over 63 cm - to large fireplaces.
Content
- Fireplace device
- Types of fireplace: configuration and location
- Basic rules for the construction of a fireplace
- We calculate the dimensions of the fireplace correctly
- How to make a fireplace with your own hands: step by step instructions and ordering
- Instructions for laying a fireplace with a cast-iron firebox and a metal chimney
- Video. Fireplace masonry
Fireplace device
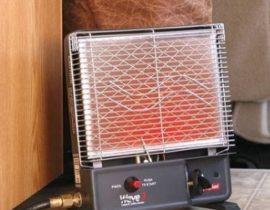
fireman
The combustion chamber is made of steel or cast iron. The purchase of a ready-made firebox will greatly facilitate the process of building a fireplace. In addition, a closed-type cast-iron firebox looks very stylish in a modern interior.

fireman
Some experts recommend laying out the inside of a cast-iron or steel combustion chamber with fireclay bricks in order to minimize metal contact with fire, especially when it comes to steel. Under the fuel chamber, as a rule, there is a fuel basket.
The working processes in the fireplace are as follows:
- Logs and firewood are placed in the combustion chamber on the grate and set on fire.
- The intensity of combustion is controlled by a slide gate, which opens or closes the access to oxygen. With an open type of firebox, the intensity of combustion can only be regulated by the amount of firewood.
- As the firewood is burned, the ash is collected under the grate, in a special ash pan, which must be cleaned regularly. The ash pan can be built-in, or you can make a retractable design, which will greatly facilitate the operation process.
- Gases from the combustion of logs are discharged through a special pipe to the street. It is possible to equip the chimney with forced draft, which is a fan. In this case, you can adjust the draft by turning the fan on or off, which will increase the heat output of the fireplace.
Chimney
The fireplace chimney can be made of steel or brick. Ceramic ready-made structures can also be found on sale today, but their construction requires special skill.
Chimney
When developing a fireplace project for a home, great attention should be paid to fire safety measures.
- The fireplace must be on a solid foundation. The foundation for it should be separate, especially when it comes to a structure with a brick firebox and a chimney. The weight of such a structure will exceed 1 ton, so in no case should such a fireplace be erected on a single foundation with a house. In the process of shrinking the house, the fireplace should not move, otherwise the tightness of the chimney pipe may be broken, and all carbon monoxide will go inside the house.
- The base must be made of fireclay bricks or a sheet of iron, a sheet of asbestos should be placed under the fireplace. In this case, the sheet should protrude along the perimeter by at least 50 cm. This will prevent sparks from falling on the wooden floor or protect the coating from accidentally falling firewood.
- The protection of interfloor ceilings during the removal of the chimney is also made of asbestos material. In the same way, we isolate the walls that are next to the fireplace.
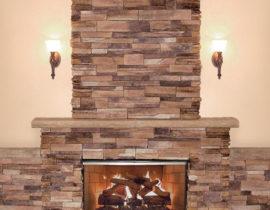
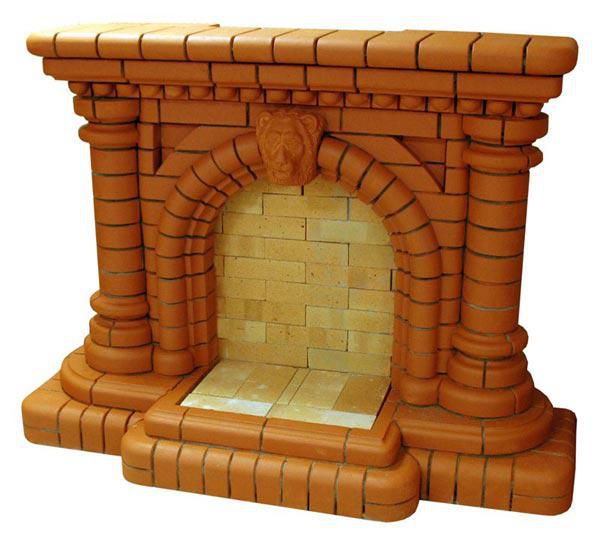
- Facing the fireplace depends on the style of the interior and the preferences of the owners.

Fireplace cladding may vary
It can be made of ceramic tiles, decorative stone, artificial marble. You can make a blind box of drywall, giving the fireplace the desired shape and tiling it.

The construction of the fuel chamber is one of the most difficult and critical stages of work. The firebox is located under the chimney. A special role is played by the chimney tooth, which is integral with the back wall of the firebox.
Base
As for the base, in itself it can have a completely different size and shape. This is a structural part that is located under the fuel chamber. It depends only on the owners where exactly the firebox will be located: below the floor or at the level of the kitchen table.
fireplace pedestal
The lower the firebox is located, the more heat it will give, taking the cold part of the air from below.
It is preferable to make a firebox, under which it is located at floor level, but this is not always possible. In a multi-storey modern cottage, it is impossible to build a fireplace of this configuration, because the ash pan should be located under the stove. Ideally, this is a working basement where the foundation is being built.
But you can implement another version of the ash pan, placing it below the hearth of the fireplace with a retractable system. Then the operation of the fireplace will not cause any difficulties at all.
Separately, you should stop at the level of the slope of the back wall of the fireplace.
Tilt rear of firebox
Here, the opinions of experts are divided into 2 camps. Some argue that it should be erected strictly vertically. Others insist on erecting the back wall of the fireplace at an angle of 300 inward.Why is it necessary to perform this slope.
The laying of the fireplace also depends on the size of the combustion chamber. So for structures with increased heat transfer, it is necessary to put the walls "on edge". The inclination of the rear wall of the firebox gives improved heat reflection into the room area.
Portal
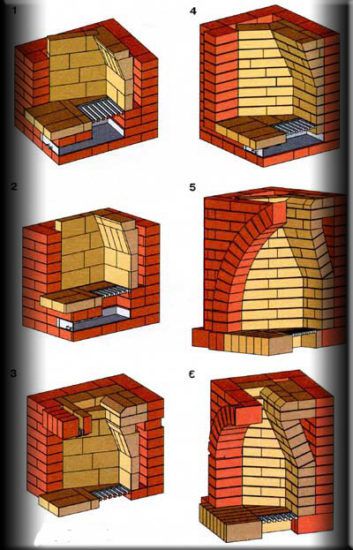
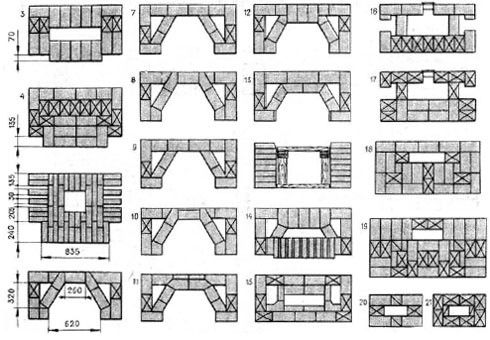
There are two options for covering the portal: straight and arched. In this case, the radius of the arch should be equal to half the width of the portal.
fireplace portal
The arch is the most reliable overlap of the portal. It transfers the entire vertical load of the upper row of masonry. According to their shape, they, in turn, are divided into 3 types: arched, straight and semicircular.
A semicircular arch is ½ of a circle. This option is the simplest and most reliable. The radius of curvature is equal to ½ of the width of the firebox.

semicircular arch
The bow arch is flatter than the semi-circular and is best used for wide fireboxes. Or, in the event that you are forced to limit the height of the firebox.
Bow arch
The bow arch is not a ½ circle, but only its 1 sector.
Arched fireplace portal
And finally, a straight arch is suitable if you need a direct overlap of the fireplace portal. Despite its simple appearance, it is considered the most difficult to manufacture. Here it is necessary to very accurately calculate the angle of the cut of the brick.
Direct brick fireplace portal
The firebox, located under the firebox, usually has a rectangular or trapezoidal shape, and above the firebox there is a mouth where smoke rushes during the combustion of firewood.
A small lintel or overlap is built in front of this mouth, and a “tooth” is behind it. Above the firebox is a smoke bag (smoke box), where smoke is collected and directed up the pipe.In order to regulate this flow, a damper is installed in the front.
Types of fireplace: configuration and location
Starting a project for arranging a fireplace in a house, first of all, you need to consider its location.
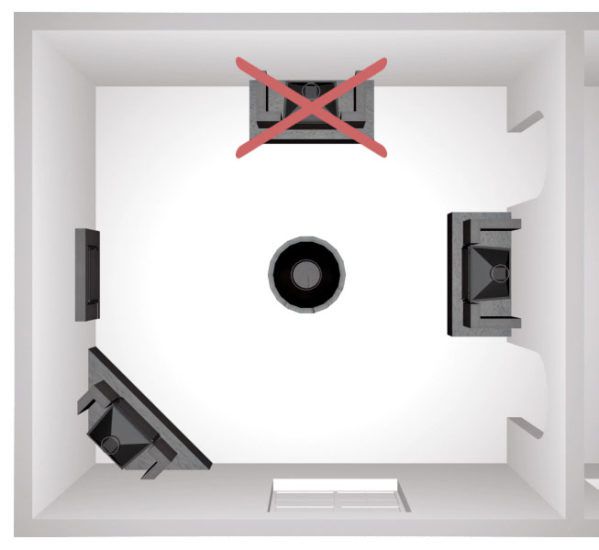
There are several options for placing this heating unit:
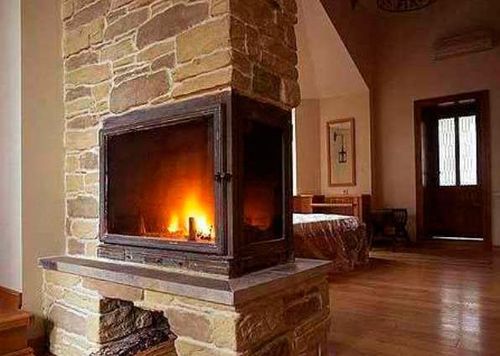
- Central location. By placing a fireplace in the middle of the room, you certainly make it the main focus. It looks stylish and allows you to give the interior a special charm of country comfort. This arrangement also allows you to effectively heat the room, as warm air will circulate freely throughout the room.
Central location of the fireplace
But there is a drawback to such a location: the fireplace will occupy most of the area and interfere with movement. Therefore, if you are cramped in square meters, then it is better to refuse this option.
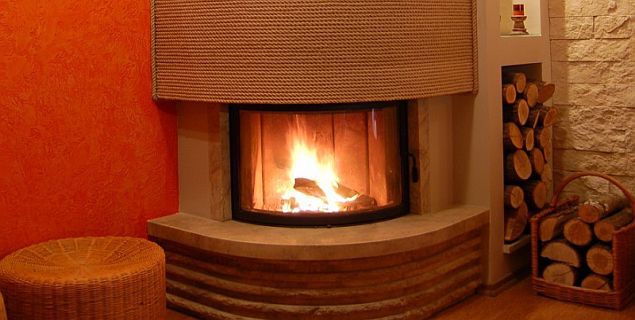
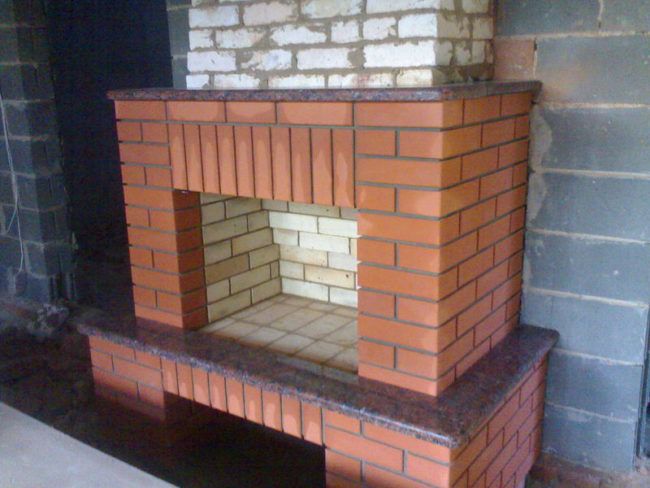
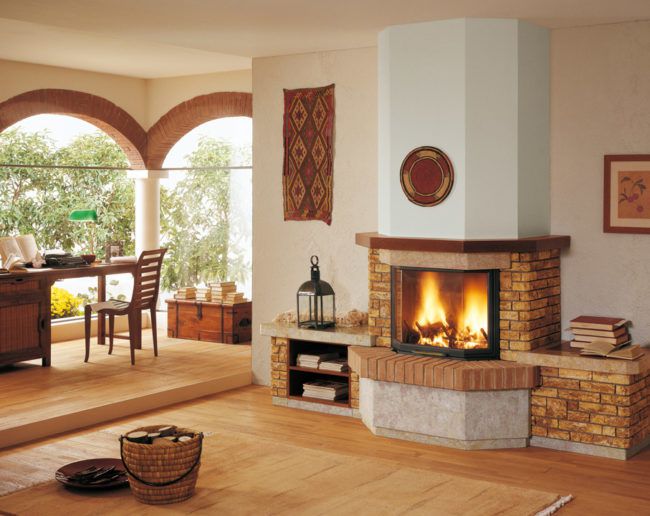
- Wall fireplace. One of the most common options, which has a lot of advantages: saving room space, efficient heating, the ability to create a separate recreation area, etc.
Fireplace against the wall
The only drawback is that you will have to properly take care of fire safety and lay an additional layer of insulation between the fireplace and the wall.
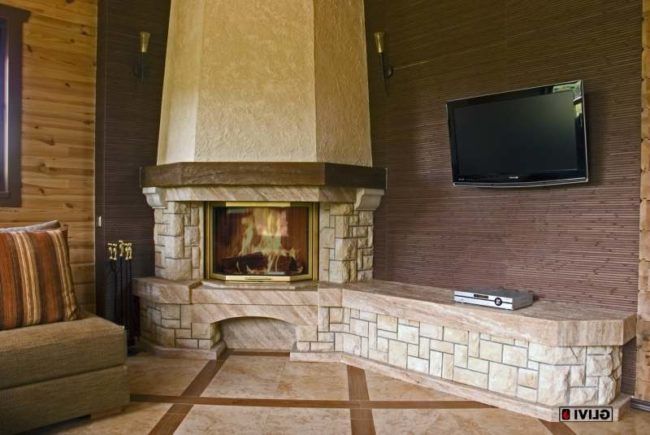
- Corner fireplace. This option is suitable even for the smallest room, as it takes up a very small area. In addition, the corner design looks especially stylish. Another advantage of this arrangement is a simple ordering scheme that even a beginner in the furnace business can handle.
corner fireplace
If for the construction of a free-standing fireplace you need to have certain experience, knowledge and skill, since all the walls are in sight, then the corner design will hide all the flaws. The main thing is to do the front part well, all other sides can be hidden from the eyes with finishing materials.

The following factors must also be taken into account:
- The wall opposite the entrance to the room is not the best solution, as the cold air blown in will prevent the natural circulation of warm air.
The location of the fireplace in the house
- It is better to choose a place where the fireplace is slightly offset from the entrance. Avoid drafts in the path of the fireplace.
Basic rules for the construction of a fireplace
In order for the fireplace to serve for a long time and please with its warmth, it is necessary to strictly follow the basic rules during its construction:
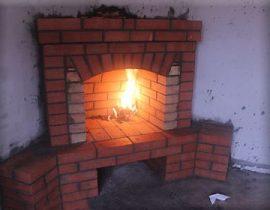
- A brick fireplace is built on a separate foundation.
- For laying the firebox, it is necessary to use only fireclay (heat-resistant) bricks, which should not be tied with the main one.
- In the places where the door and ash pan are installed, it is necessary to lay an asbestos cord and leave a gap for the expansion of the metal.
- The inside of the combustion chamber should not be plastered.
- The rear wall of the fuel chamber should be slightly inclined.
Do not forget about fire safety, because any design that runs on solid fuel presents an additional risk.
Fireplace in the house
The main point of fire safety in arranging a fireplace in a country house or in a country house is the installation of cuttings in the path of smoke.
If the wall is adjacent to the fireplace, then heat-resistant material (basalt fiber, asbestos, felt, etc.) must be laid between it and the heating unit.The thickness of such an overlap should be at least 20-25 mm.
If the fireplace is installed on a wooden floor, then a metal sheet must be laid around the perimeter or covered with ceramic tiles with an indent of 30-35 mm on each side.
Within a radius of 150 mm from the chimney, where it passes through the ceiling, it is necessary to organize reliable thermal insulation with a double layer of clay-impregnated felt or asbestos fiber.
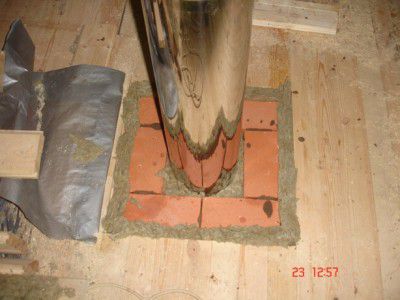
Felt layer between pipe and roof
The chimney must work autonomously with only one fireplace.
There are also certain fire safety rules for the operation of the fireplace:
- Do not bring the fireplace to the maximum temperature.
- Carry out a systematic cleaning of the fireplace from ash and soot.
- The safe distance between the fireplace and nearby flammable objects must be at least 70 cm.
- Use only suitable fuel for your outdoor fireplace.
We calculate the dimensions of the fireplace correctly
When designing and creating a drawing of a future fireplace, it is very important to correctly calculate its width and height.
| Dimensions of elements, mm | Room area | |||||
|---|---|---|---|---|---|---|
| 12 m2 | 15 m2 | 20m2 | 25 m2 | 30 m2 | 40m2 | |
| Portal Width | 400 | 500 | 600 | 700 | 800 | 900 |
| portal height | 420 | 490 | 560 | 630 | 700 | 770 |
| Firebox depth | 300 | 320 | 350 | 380 | 400 | 420 |
| Back wall height | at least 360 | |||||
| Back wall width | 300 | 400 | 450 | 500 | 600 | 700 |
| Smoke box height | 570 | 600 | 630 | 660 | 700 | 800 |
| Chimney section with a rough inner surface | 140*270 | 140*270 | 270*270 | 270*270 | 270*400 | 270*400 |
| Chimney section with a smooth inner surface | 140*140 | 140*270 | 140*270 | 270*270 | 270*270 | 270*270 |
The size of the firebox depends on the area of the room. There is a simple formula that will allow you to correctly perform all the calculations:
Measure the area of the room and divide it by 50.
The resulting value is the size of the furnace window.
To heat a small room of 20 square meters, a fireplace with a furnace opening of 0.50 m is enough2.
We also suggest using the table to correctly calculate all the necessary parameters for the future fireplace.
After calculating the width of the firebox, you need to decide on its depth. The efficiency of heating the fireplace directly depends on this parameter. According to the standard calculation formula, it is equal to 2/3 of the furnace height.
If you ignore this factor and, for the sake of appearance, decide to increase the depth of the furnace, then this will directly affect the heat transfer of the fireplace.
Almost all the heat received from the combustion of firewood will go through the pipe to the street. In this case, the fireplace will perform more of a decorative function, delighting with a beautiful glow of fire. You will only have time to put firewood in the firebox.
When reducing the depth of the combustion chamber in relation to its height, there may be a possibility of smoke in the room.
In addition to the correct calculation of the firebox, great attention must be paid to the arrangement of the chimney, on which fire safety and good draft depend.
First of all, you need to correctly calculate the diameter of the outlet of the pipe and its height.
According to the norms of SNiP, the diameter of the chimney must be at least 150:170 mm. If you chose a chimney with a rectangular section, then its width should be equal to 1/10 of the size of the combustion chamber.
The height of the chimney must not be less than 5 meters. But sometimes, with high floor heights, you will need to raise the chimney even higher. In this case, we focus on the ridge of the roof and the place where the pipe exits.
The figure shows how to correctly display the height of the chimney.
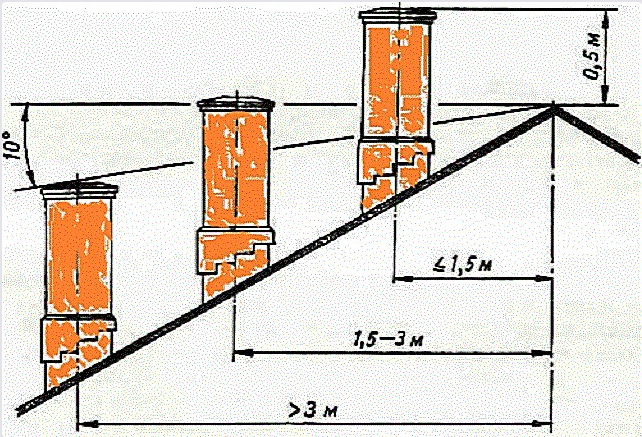
Chimney height above roof
Therefore, it is good to calculate all these parameters before you start building a fireplace with your own hands.
How to make a fireplace with your own hands: step by step instructions and ordering
We give a diagram of laying a fireplace with a fuel chamber of the following size:
Portal width - 62 cm.
Height - 49 cm.
The depth of the fuel chamber is 32 cm.
The cross section of the chimney is 26*26 cm.
We will lay out the back of the structure from ½ of the brick, and the side from the whole.
Step 1. Sketching and Drawing
Whatever size and configuration you choose for your fireplace, you must complete the drawings and sketches before you start building it.

Fireplace scheme
- Drawing a sketch and making a drawing.
Having decided on the place where you want to place the future fireplace, draw a drawing on paper. Now decide on the size of the unit and calculate each side. Make a detailed drawing. Make sure that the flue system will not come to floors and beams. Decide which side the blower will be on, and which firebox will be.
ordering
- We prepare tools and materials.
Immediately you need to decide what kind of lining you will cover the fireplace. If the design is being prepared “for jointing”, then the brick must be purchased red ceramic. If you plan to decorate with clinker tiles, then you can buy a more budget option.
We offer a detailed scheme for the construction of a red brick fireplace "for jointing" with a stone firebox.
For this we need:
- Fireclay refractory brick for the combustion chamber (not lower than M200).
- Red ceramic brick for whole fireplace. - 250 pcs (excluding pipes). You can additionally take 10% of the total, taking into account defects and errors.
- Mortar for laying the foundation (cement, fine sand, gravel and water).
- Mortar for laying bricks.
- Roofing material for foundation waterproofing.
- Boards for the construction of formwork.
- Grate.
- It blew.
- Metal door.
- damper.
- Metal rods and wire for reinforcement.
- Metal wire 0.8 mm for dressing.
- Asbestos cord.
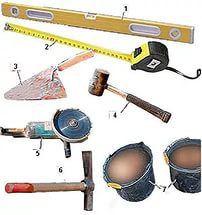
Tools
From the tools prepare:
- Trowel for laying bricks.
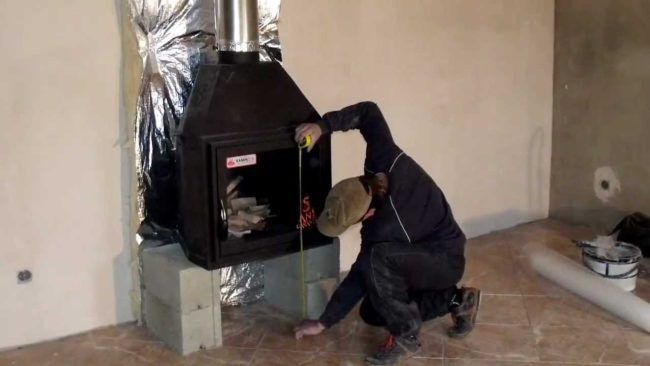
- Roulette and marker.
- Rule.
- Bulgarian for turning bricks.
- Building level, protractor and plumb.
- stapler.
- Shovel and bayonet shovel.
- Solution bucket.
- Construction mixer or drill with a nozzle.
- Rubber mallet for laying bricks.
- Construction hammer for the construction of formwork.
Step 2. Preparatory work
- Foundation arrangement.
The construction of the foundation should be given special attention, since all further operation of the fireplace depends on its reliability.
Foundation for a fireplace
When arranging the foundation in an operated cottage, you must immediately take into account the location of the beams, roof lintels, rafter legs, etc.
Do not save time and effort and make a separate foundation for the heating unit so that during shrinkage, the general foundation for the house does not deform the structure of the fireplace.
When arranging the foundation for a fireplace at the zero cycle of building a house, this process will not cause any particular difficulties. You simply perform work on the construction of the base of the fireplace according to a single scheme:
- excavation to the depth of freezing.
- creation of formwork;
- execution of the underlying layer of sand and gravel;
- waterproofing with roofing material or polyethylene;
- reinforcement with metal rods;
- pouring the foundation for 2 bricks to the final floor;
- technological break 20 days.
We have previously discussed in detail how to build a foundation for a furnace with your own hands. The scheme for laying the foundation for a fireplace is no different.
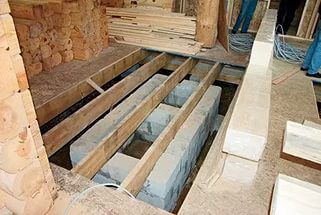
Another thing is if you decide to build a fireplace in an already operated house. This process will be accompanied by the stage of dismantling the flooring at the installation site of the fireplace.
To do this, use a marker to measure the required size of the fireplace according to the drawing, make an indent of 15-20 cm on each side and cut a hole in the floor with a grinder.
Remove the used boards and start deepening the soil. Next, proceed according to the standard scheme for pouring the foundation.
After removing the base of the fireplace to the level of the finished floor, you will need to beautifully arrange the gap between the floor covering and the stone structure.
Advice! No matter how carefully you work, in the process of laying a fireplace in the house, dust and dirt will inevitably form. Before starting construction work, cover all furniture and floors with polyethylene.
- Fire safety works.
When arranging a fireplace in a wooden house, it is very important to protect the walls adjacent to it from overheating.
You can lay an asbestos sheet between the fireplace and the ceiling, or you can tile the wall with ceramic tiles.
- Preparing bricks for laying.
After the foundation is completely dry and set, you can start building.
Select the entire brick, sort it by size and soak the part that you will work with at this stage. This must be done so that it does not absorb moisture from the masonry mortar.
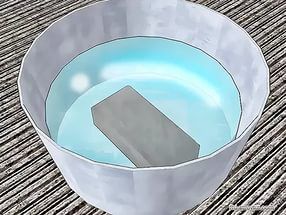
brick in the water
Before erecting a fireplace, according to the order, even experienced stove-makers first “dry” lay out the bricks. So you can see all the difficult places that you have to face, and avoid serious mistakes that will be hard to fix later.
Advice.Laying out the rows “dry”, number each row on the bricks and put a serial number. So you can get the job done faster.
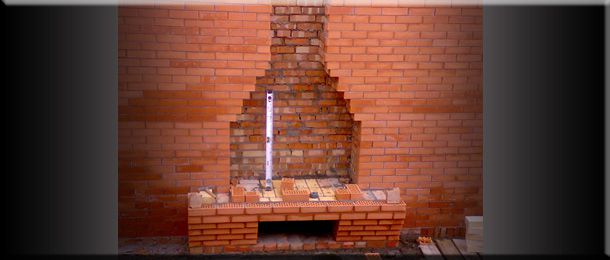
Step 3. Laying the fireplace
The fireplace must be built on a base that is well waterproofed. To do this, measure the size of the structure on a roofing material sheet, cut it out and lay it in layers on the base.
Now you can start laying the fireplace itself. For laying a fireplace, use a mortar that is also suitable for laying stoves.
Soak red clay for several days in a trough of water.
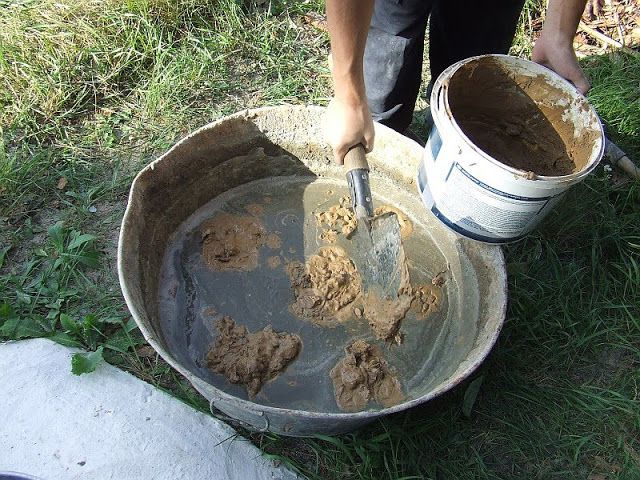
soak clay
To prepare the solution, we combine 8 parts of sand and 8 parts of clay, add 1 part of water and mix thoroughly with a construction mixer.
Now we check its readiness. By consistency, it should resemble thick sour cream. If it turned out to be too liquid, you can add a little sand.
Dip the trowel into the solution and see if the mixture flows off it or not. If it is glass, leaving a thin layer of 2-3 mm, then the solution is ready. If it gets thick, dilute with water.
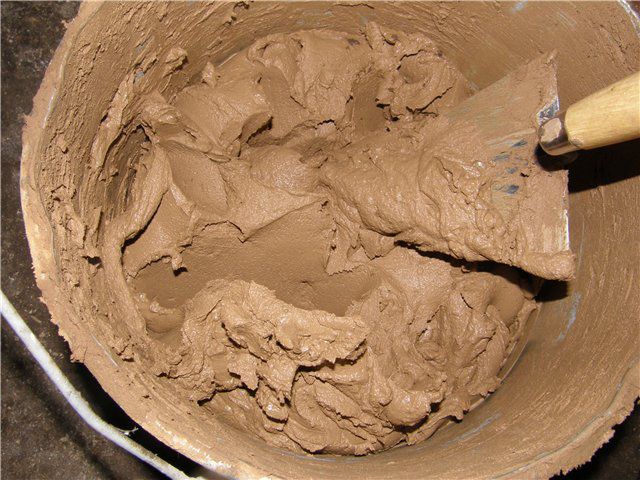
thick mortar
In order to clearly erect a fireplace vertically, you can pull the plumb lines. They will serve as a kind of beacon by which you will navigate.
1st row is the base of the fireplace.
Base for fireplace
The correct layout of the entire structure depends on it. For this row, it is better to use a masonry mortar with a small addition of cement. The recommended joint thickness is 5 mm. Check the level horizontally and diagonally, determine the angles with a goniometer. They must be strictly 900.
If you want to give the shape of the base of the fireplace an unusual look, then you can lay out the bricks on the edge on the basement row. The base must be raised by 25-28 cm at the level of the finished floor.
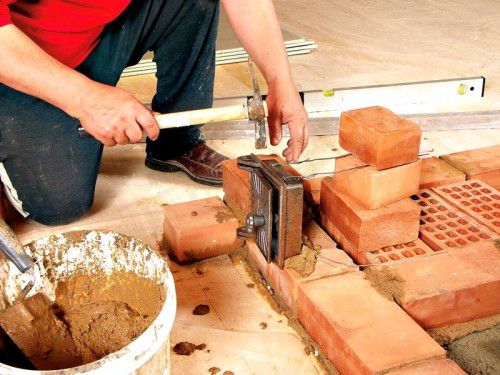
Maintaining the same thickness of the seam when laying a fireplace is not so easy, especially for a beginner. There is a little trick. Use wooden slats 0.5 cm thick as a guide.
Use slats for the same seam
Make sure that the masonry mortar does not get on the front side, because we are building a fireplace “under the jointing”. After completion of work, it will be troublesome to wipe off the frozen solution.
When laying a brick on the rail, press it gently with your hand and tap it with a rubber mallet over the entire plane. So he sits well and grabs. Make sure that the solution is not squeezed out of the cracks.
Wooden slats are removed after 3-4 rows of bricks have been laid.
2 row. It is laid out similarly to the first red brick, according to the scheme. Completely fill this row with bricks.
3 row. Here we begin to build the bottom of the fuel chamber, laying fireclay bricks on edge. It is not necessary to bind the refractory brick with red.
We install the grate, taking into account the metal expansion gap of 3-5 mm.

Grate installation
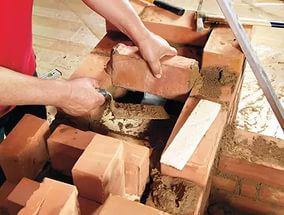
4 row - we begin the formation of the firebox. Laying out several rows, wipe the bricks with a damp cloth so that the mortar sets better. Here in this row, we install the fuel chamber door. Consider the metal expansion gap.
Installing the fuel door
the door, for reliability, is mounted on a metal mustache, which is laid in the seam between the rows of bricks.
In the 5th row we install a blower.
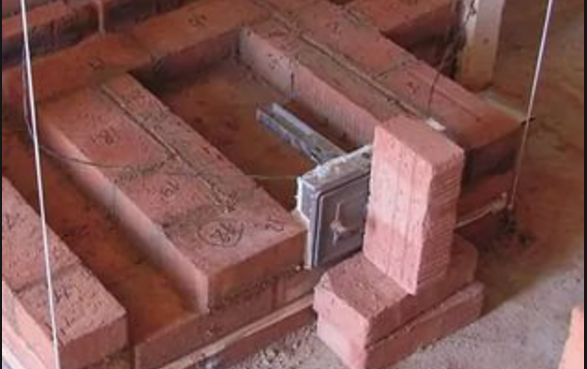
Blower door
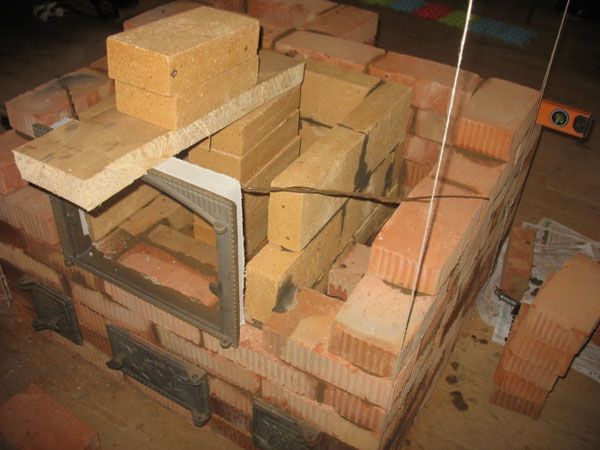
8 row. We carry out the slope of the rear wall of the firebox at 300. This element is also called the "mirror" of the fireplace.
9-14 row. We proceed to the formation of the arch.
The overlap of the portal is largely determined by the design of the fireplace.This part of the work will not cause much difficulty.
The easiest option would be to use steel corners on which bricks are placed. But with such masonry, it is better to veneer the fireplace with decorative material in the future, which will cover the steel corner.
Considering that we have chosen the option "with a fireplace" we will not use this method.
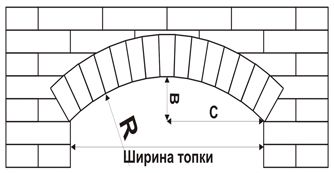
In order to accurately perform a semi-cylindrical arch, it is necessary to make a circle from a sheet of plywood.
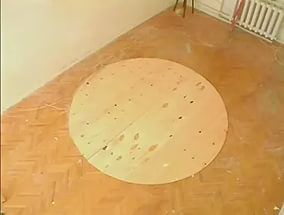
plywood circle
We draw a circle on the sheet with a compass, divide it into 2 parts of the required radius (1/2 of the width of the firebox) and cut out 2 semicircles using a grinder.
Place these 2 parts of the circle on the floor and insert 11 cm long wooden bars between them. Fasten the structure with self-tapping screws. The circle is ready.
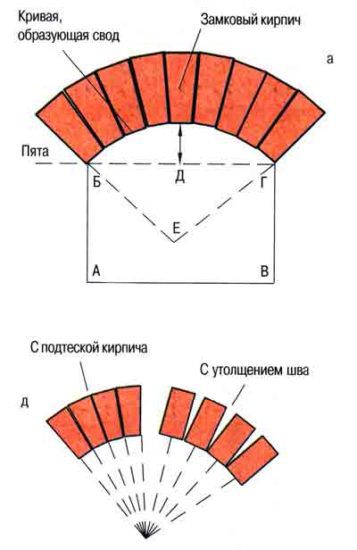
All bricks must be ground into a wedge. How to accurately determine the size of the wedge. You can, of course, calculate it according to the formula, or you can use the proven method manually.
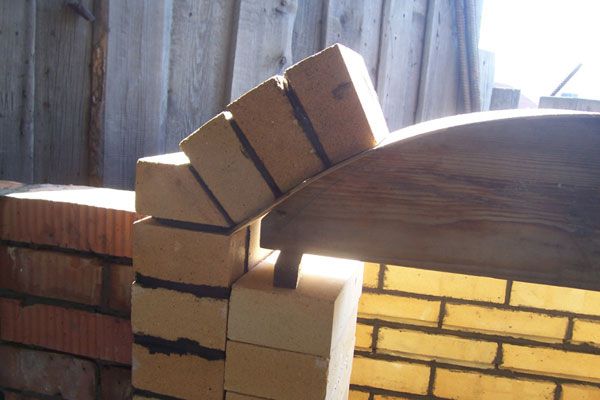
arch masonry
Place the circle on the floor and attach 1 brick to it.
Take the thread and pull it from the center of the circle to the upper left corner. Draw with a pencil along the stretched thread.
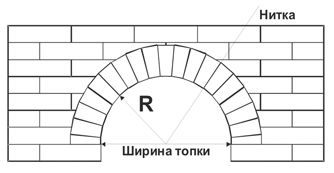
using a thread, we calculate the wedge of a brick
Do the same procedure with the right side - this way you got a batch of bricks with measured markings for a wedge. It remains now to carefully cut off the grinder according to the markings. Remember to number the bricks first so that you can easily lay them in the correct order.
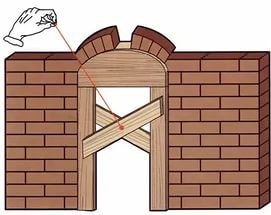
Using thread
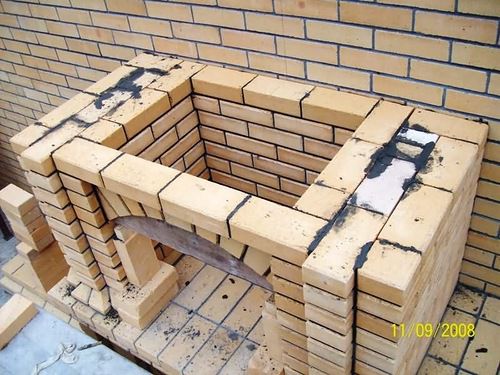
Lay out the arch symmetrically, bringing the bricks from the corners to the center.
Masonry in a circle
15-18 row. We make a fireplace tooth. This is the name of the protrusion in the fuel chamber, which prevents precipitation and ash from entering the fireplace and improves traction.
portal overlap
Step 4Chimney construction
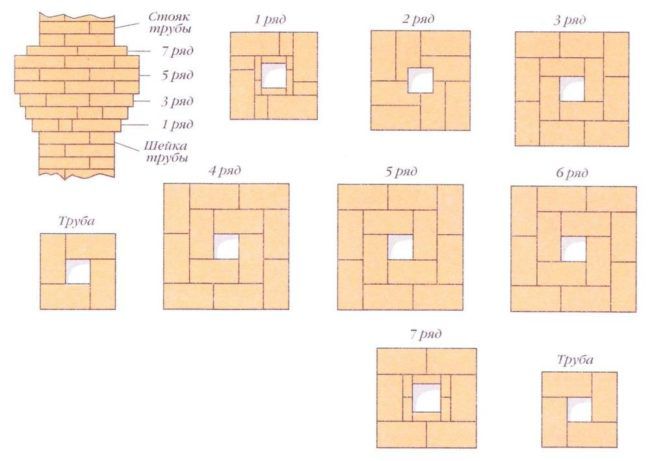
Chimney masonry
19-20 row. We run a chimney.
21-22 row. We continue to run the chimney. In the 22nd row, we install a fireplace valve.
23 row we make fluff, giving the structure the shape of a dovetail. Fluff or "otter" is done in the place where the chimney pipe is in maximum contact with the roof.
Exit the chimney through the roof
The height of the fluff can vary from 29 to 36 cm. A drain is discharged above the fluff, which is laid out until it comes into contact with the roof. The size of the riser and the chimney must match.
A metal umbrella follows on top of the chimney to protect against precipitation and debris.
To improve traction, it is recommended to install a weather vane, which will help improve traction.
Step 5. Facing work
In order to grout the fireplace, add clean, sifted river sand to the clay mortar and mix thoroughly. This mass should be thick and plastic.
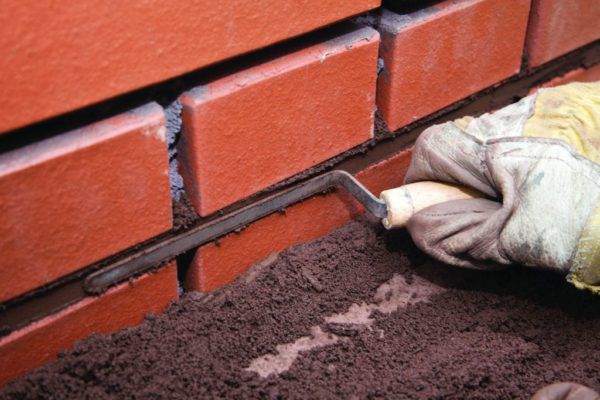
Stitching
Step 6. Putting the fireplace into operation
Considering that the fireplace is laid with wet bricks, before the first kindling, the structure must be well dried.
In the first week, natural drying occurs. To do this, it will simply be enough to open the door of the ash chamber and the firebox. And in the second week, it is necessary to kindle the fireplace every day and not bring it to maximum heat. Check traction.
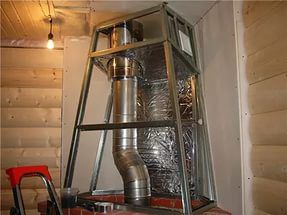
Instructions for laying a fireplace with a cast-iron firebox and a metal chimney
The advantage of installing a steel chimney (in our case, sandwich pipes) is that it can be led out through the wall. This greatly expands your options for placing a fireplace in the house.
To build such a fireplace, you will need the same tools as in the previous instructions, and from the materials you need to prepare:
- Cast iron firebox with glass.
- Sandwich pipe kit.
- Silicone sealant.
- Clamps, tee.
- Knee 450 or 900 (depending on the location of the chimney structure).
- Bracket for supporting the chimney pipe.
- Mineral wool (to isolate the passage of the pipe through the ceiling).
- Protective umbrella on the pipe (from precipitation and debris).
- The arrangement of a separate foundation is carried out as standard with deepening of the soil, erection of formwork and cementing.
- Fireplace insulation. It is impossible to mount a fireplace close to the wall. Therefore, between the wooden wall, which will have a fireplace, it is necessary to lay out superisol. If space allows, you can build an additional thin wall of sand-lime brick. Please note that the wall in this case must be built on the same foundation as the fireplace. Please take this into account when designing. The size of the wall should exceed the size of the fireplace by 50-70 cm on each side.
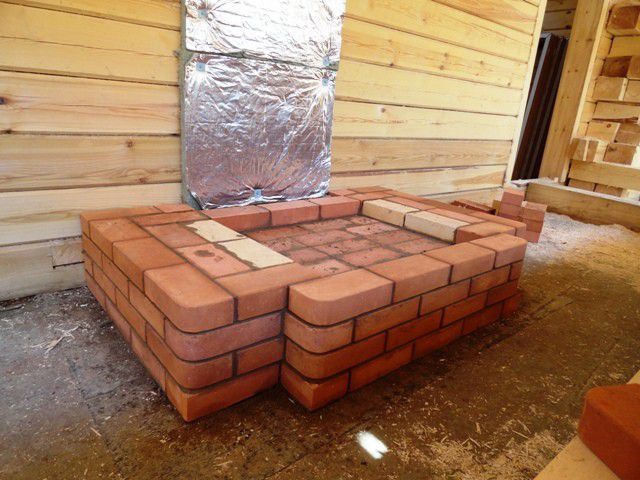
- Base laying (2 rows are laid with solid bricks).
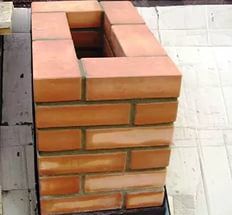
Under the fireplace
- The erection of the pedestal - lay out 4 rows of red brick in the form of the letter P. If you have chosen a wide firebox, then the width of the pedestal should also be increased. Use cement-clay mortar when laying bricks. The pedestal will increase the heat transfer of the fireplace, because cold air will climb from below and, passing through the firebox, rise up.
- Ash pan installation.
- On the 4th row of bricks, we make grooves using a file, and insert metal corners into them with the ribs up.
- We put the 5th row of bricks, which will go under the base of the firebox. We apply a layer of refractory mastic on it.
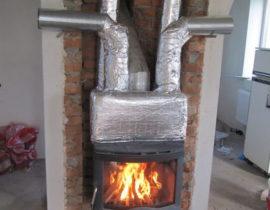
- Install cast iron furnace.
Installation of a cast-iron firebox
For this work, you will need an assistant due to the heavy weight of the structure. It is necessary to carefully lower the fuel chamber from the bottom up, while indenting from the back of the wall by 5 cm. While the mastic or refractory glue has not hardened, check the degree of horizontal inclination with a building level. At this stage, errors can still be corrected.
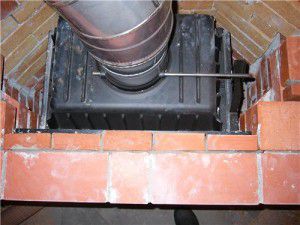
Connecting the pipe to the furnace nozzle
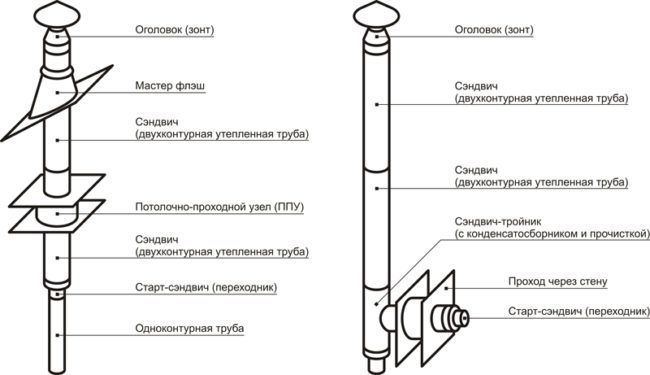
- Chimney pipe installation from sandwich pipes.
Scheme for mounting sandwich pipes
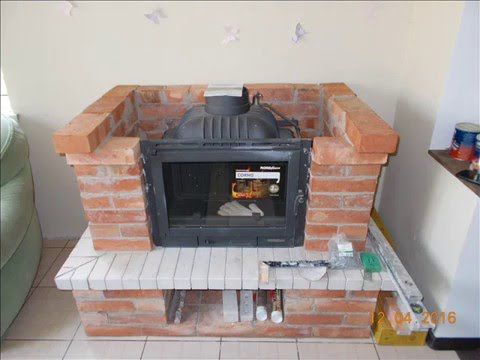
- Furnace lining with bricks. After the firebox is connected to the chimney, it is necessary to overlay it with bricks using heat-resistant glue or cement mortar.
Brick lining of a cast-iron firebox
When lining the firebox, it is very important to take into account a thermal gap of 5 mm between the cast-iron wall and the outer casing. The order in this case is not important, since, in fact, you are building a brick box according to the size of the finished firebox. At the stage of finishing the chimney, it is very important to ensure that the lining does not rest on the pipe.
- Chimney lining with plasterboard. Immediately according to the scheme, a frame is erected from a metal profile, onto which drywall is screwed with self-tapping screws.
Portal around the chimney
From the inside, it must be insulated with heat-insulating mats made of non-combustible material. In this case, they should be attached to the firebox and chimney with the foil side.
- The outer part is sheathed with drywall.
- Facing work. You can beautifully decorate the fireplace with any facing material: clinker bricks, decorative stone, plaster, etc. After the cladding work is done, the flooring can be done. Keep in mind that parquet or laminate cannot be laid close to the fireplace.The distance must be at least 80 cm.
- Fireplace drying and heating.
When all work is completed, you can decorate the fireplace with a stylish woodcuttermade by hand.
It is unlikely that anyone will argue that you can look at the flickering fire in the fireplace for an infinitely long time.
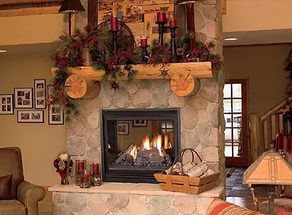
Fireplace with firebox
And if everything is clearly done according to our instructions, then such a fireplace will delight not only with the creation of a special aura of home comfort, but also give warmth, heating the house.
To make it easier for you to deal with the construction of a fireplace with your own hands, we suggest that you familiarize yourself with the detailed video instructions.
Video. Fireplace masonry