Of course, one of the most important elements in the arrangement of the bath is the stove.
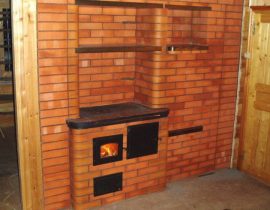
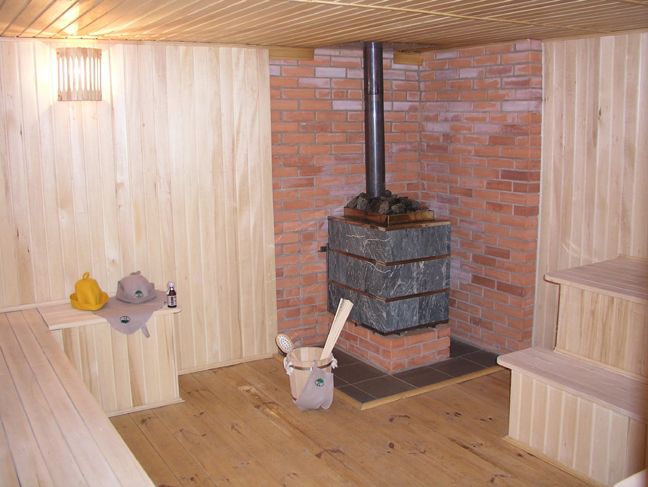
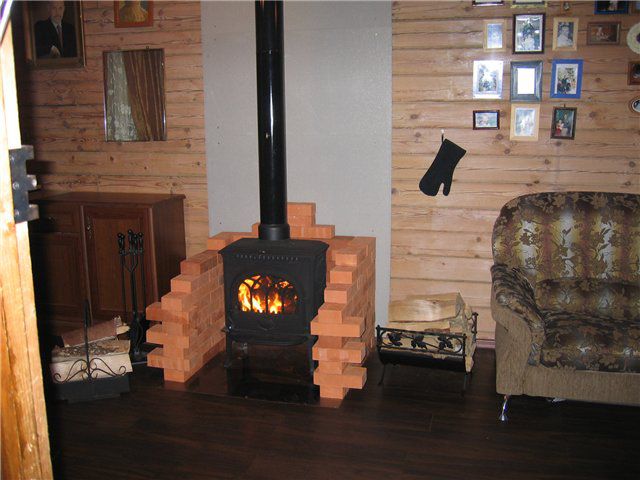
Metal stove lined with brick (in the steam room)
Before proceeding to study the instructions for proper brick laying, you should answer the main question: why do you need brick lining in a bathhouse, maybe your stove model does not require this action ?!
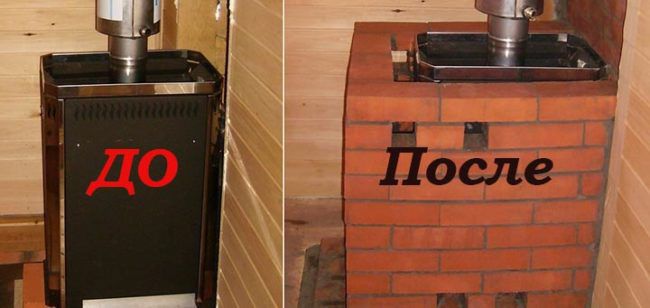
Before and after
Compared to metal, brick retains heat much longer, which means that the oven will cool down much longer.
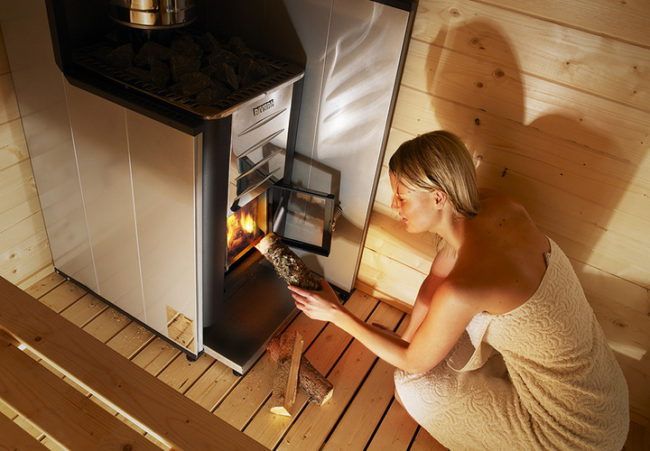
The stove in the bath plays no less important role than in the house. The effectiveness of all bath procedures and a comfortable atmosphere depend on how quickly it heats up and retains heat. It is unpleasant to be in a cold room, and in an overheated room - dangerous for health.
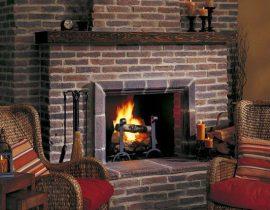
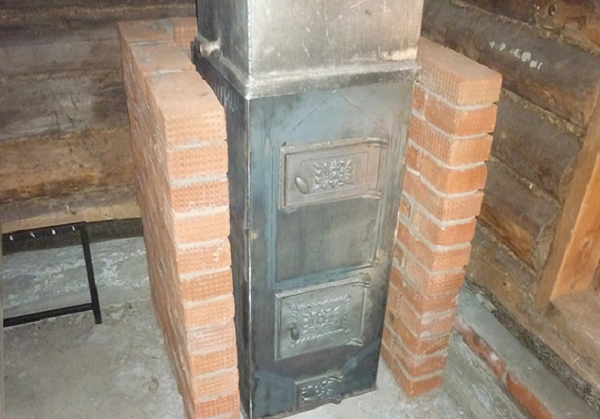
Metal stove in a steam room with 1/2 brick
Content
Advantages of using a metal stove in a bath
Today, a metal stove in a bath is already a standard equipment, without which it is difficult to imagine a wellness procedure loved by many. Compared to other types of ovens, it has several advantages:
- Ease of installation. It is easy to make with your own hands.
- Easy and simple operation.
- She melts quickly.
- Has good traction.
- High performance.
- Economical in fuel consumption and democratic in price.
But in order to really appreciate all these advantages, you need to learn how to use it correctly!
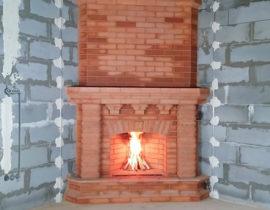
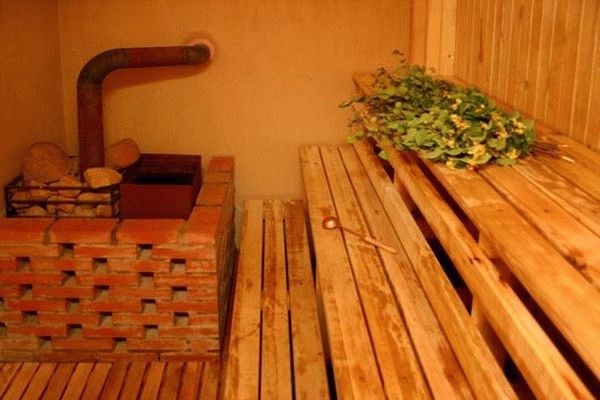
Furnace in the steam room
Of course, no one will argue that a stone stove is ideal for a bath. But it needs to be melted for at least 5 hours so that it really begins to give off its heat, imagine how much firewood will go away during this time. And this, in turn, does not suit everyone. And the price of a brick structure will be many times higher than that of a metal stove lined with stone.

Scheme of the movement of air masses
In addition, in order to fold a brick stove for a bath, you need to have the initial skills and knowledge of a stove-maker, since in this design you need to take into account many nuances that are invisible, but play a decisive role!
brick oven
A metal furnace can be bought ready-made, and the lining will not entail large financial costs.
Even if the metal stove itself, bought ready-made in the store, is already a decoration for the steam room, it is better to make a small stone apron around it. This will greatly increase the efficiency and productivity of the furnace. Yes, and people who are in close proximity to the metal structure will be more comfortable, because the metal “fries” more than stone or brick!
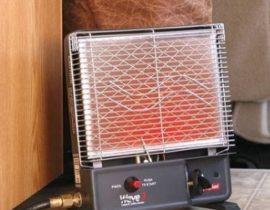
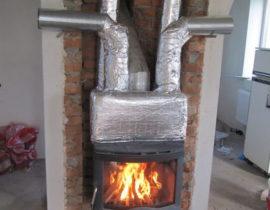
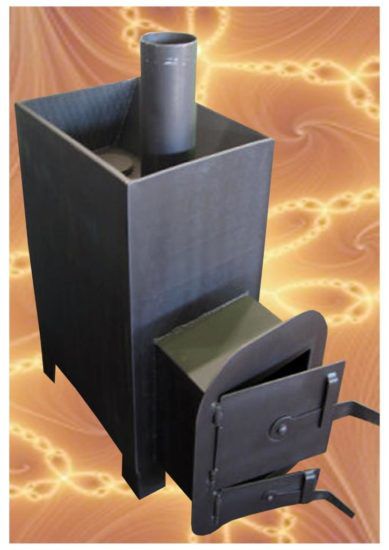
Metal oven without brick lining
What are the necessary parameters should a metal stove for a bath have?
- It should be small in size so as not to clutter up the space.
- You should not choose too much power, as the sauna room is usually small. It will be difficult to control the optimal temperature.
- The characteristics of the furnace must clearly comply with fire safety regulations.
In addition, it is necessary to take into account the place where the furnace is located. According to the norms of SNiP, the metal unit should be located at a distance of at least 15 cm from the wooden floors.
Sauna oven
The most optimal way to fire a metal furnace in a bath is small but frequent fuel deposits.
Why is it necessary to brick the oven in the steam room?
If up to this point you are still in doubt, check out this list:
- The metal structure heats up very quickly, which does not allow the body to have time to adapt to the high temperature.
- A metal stove cools down as quickly as it heats up. You have to constantly monitor the temperature, throwing up logs, which is not very economical.
- The brick-lined material will not heat up and dry the air so quickly, which means that the atmosphere in the steam room will be more comfortable.
- There is a high probability of burns on the walls of a metal structure. People sitting next to the stove will not be comfortable.
All these small flaws can be easily eliminated with the help of lining, which will increase the productivity of the stove, improve its design and neutralize harm to health, because people go to the bathhouse for recovery, and not vice versa!
This is the most optimal solution in terms of economy and labor costs - to combine the advantages of a metal and stone stove.
Factory metal stove for a bath "under the lining"
At the moment, the factories are producing such stoves that were originally intended for their further brick cladding, such a design is the golden mean that will make it possible to profitably equip an excellent steam room.
For lining the furnace, you need to use only these types of bricks:
- red ceramic brick;
- fireclay brick.
You can not search the forums, it makes no sense for us to deceive you! If you take any other brick, it may crack on its own or peel off the adhesive mixture, and you will need to shift it over and over again!
Do not take silicate brick. It is great for facing the house, but for lining sauna stove no good. Lime-based brick is simply not able to endure the constant temperature drop and high humidity in the steam room.
After a few weeks of operation, it will begin to collapse. Yes, and from the point of view, it is not suitable for decor and additional cladding will still be required.
A good option would be a refractory fireclay brick, which is just designed for sudden changes in temperature.
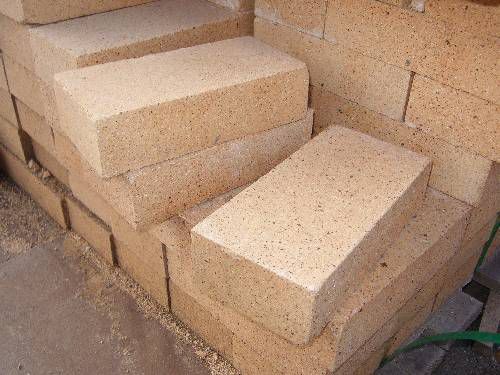
fireclay brick
Outwardly, of course, it is inferior to red ceramic bricks, but this moment can be completely solved with a decorative finishing cladding.
If there are no remains of bricks in the household, it is better to buy a new one! Give preference to ceramic red brick. Its specific gravity is much lower than that of fireclay. It demonstrates excellent technical properties, reliability and durability.And externally, the stove, lined with red ceramic bricks, will delight you for many years with its stylish authentic look.
The very process of lining a sauna stove with bricks is not very complicated, and if you follow the detailed instructions exactly, even a beginner can handle it.
Brick lining scheme
The most common ways of lining a metal furnace in a bath
Given that stone cladding acts as a heat shield for a metal structure and does not take on the main heat, there are several options for cladding.
- Solid cladding. This option involves a rapid release of heat, which to a certain extent reduces the productivity of the furnace. This option is not often performed and will happen more for decorative purposes, when the efficiency of the furnace does not play a big role.
- The heat shield looks like a small stone fence. It creates comfort for people in the immediate vicinity of the stove and increases heat transfer.
- Facing-convector with products. This option is the most optimal for a bath, so it allows you to adapt absolutely any metal structure. At the same time, even the volume of the steam room itself does not play a big role.

Products in the oven
The cladding scheme largely depends on the functionality of the furnace. If the lining has a purely decorative function, then it can be made thick, into a whole brick.
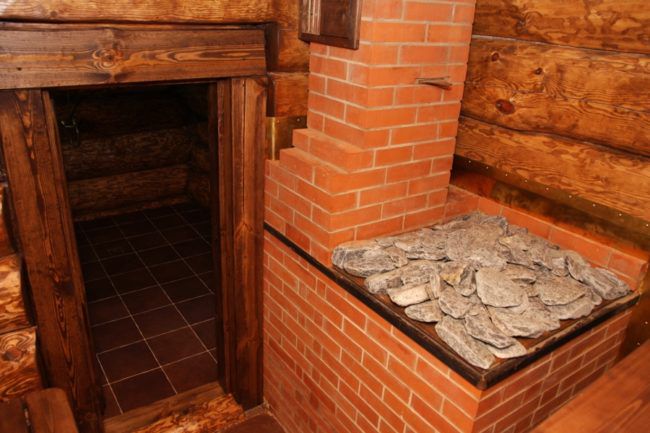
If the stove has the function of a water heater, then the lining is made into a brick floor.
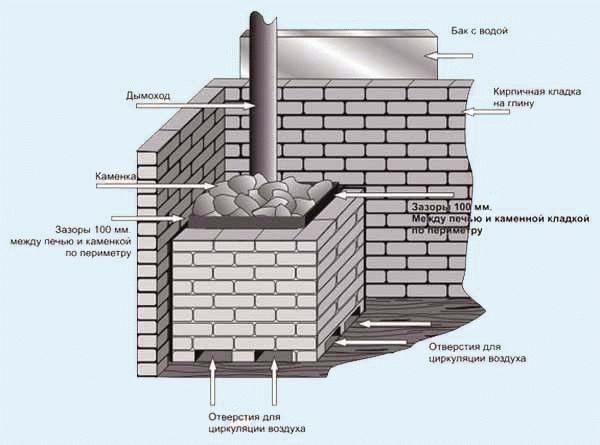
The gap between the stone screen and the metal body of the furnace is easy to calculate. For each kW of power, we add 2 cm to the standard 3 cm. If the furnace power exceeds 12 kW, then we do a maximum of 15-20 cm. Otherwise, the lining of the furnace will not fulfill its direct task.
Step-by-step instructions for work + photo
Before starting construction work on lining a metal furnace in a brick bath, you need to stock up on all the necessary tools and materials.
Materials that will be needed for laying the furnace.
- Red solid ceramic brick (M-150.)
- Masonry mortar (sand, red oven clay).
- Foundation material (cement, crushed stone, sand).
- Ruberoid.
- Boards for creating formwork.
- Reinforcing mesh.
Tools that will be needed for laying the furnace.
- Building level.
- Owl shovel.
- Construction marker.
- Measuring tape (roulette).
- Construction slope.
- Trowel.
- Goniometer.
Before starting work, it is also necessary to determine the location of the metal furnace.
It can be placed in the very corner of the bath. This way you will reduce the consumption of bricks. And you can install a metal stove on a brick base, raising it above the floor by 50-60 cm.
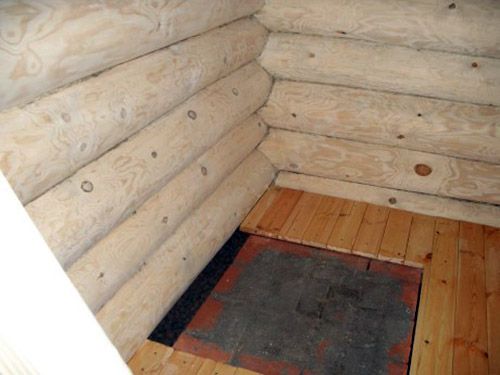
If the stove is installed in a bathhouse from scratch, it is necessary to take care not only of building a foundation, but also of reliable protection of wooden floors.
To increase the fire safety of the room, it is necessary to lay out a wooden floor (walls, floor), near which the stove is located, with basalt slabs. In this case, the height of the plates should exceed the size of the structure by 40-50 cm.

The wall near the furnace should be lined with basalt slabs
For secure fastening, use self-tapping screws.
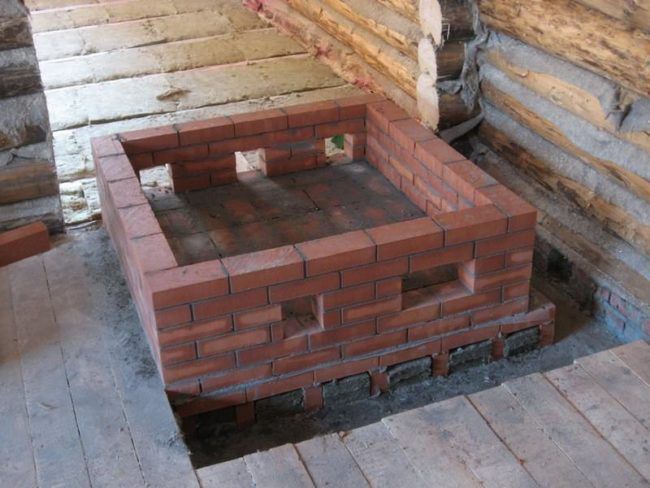
Step 1. We build the foundation for the furnace.
The foundation for the furnace is the most important stage of construction work, on which the strength and durability of the entire structure depends.If at the construction stage of the bath, you have already paid great attention to the construction of the foundation for the stove, then for the cladding you will not need to additionally build another base.
base for oven
If you are not sure about the strength of the old foundation, then it is better to spend time and build a new one, because the weight of the structure, after facing, will increase significantly.
Important! The foundation for the stove should in no case be connected with the main foundation of the bath. In case of structural shrinkage or other phenomena, the furnace base must not be deformed.
If the mass of the furnace together with the brickwork does not exceed 700 kg, then a separate foundation can not be erected.
If a metal furnace has already functioned in the bath, then it must be dismantled before starting work.
Marking the foundation for the furnace. Example
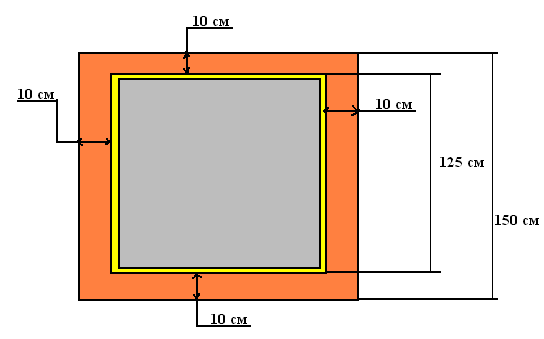
- After you have decided on the location of the stove, mark a rectangle on the floor with a building marker on which you want to cut the boards. Keep in mind that the size of the foundation should exceed the size of the oven by 10-15 cm on each side.
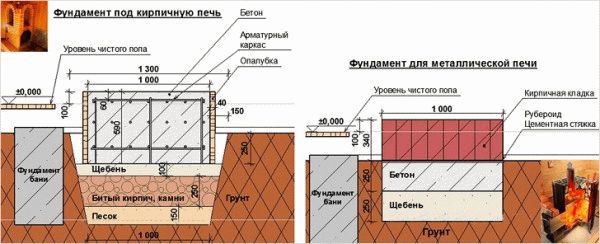
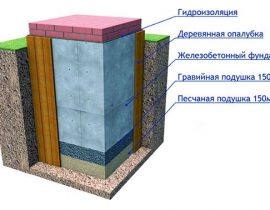
Scheme of pouring the foundation for the furnace
- Cut out the boards and put them aside.
- Now dig a pit 40 cm deep. Use a bayonet shovel for this work.
- We build a wooden formwork, which performs the function of a skeleton that forms the foundation. For formwork, you can use plywood boards, old floors that you have on the farm. Measure the length and width of the dug hole and cut the boards to this size. We connect the boards and lay inside the pit.
- Now we proceed to the waterproofing of the foundation.
Waterproofing with roofing material
This is the most important component of the work in the construction of the foundation.If the frozen, moisture-saturated soil comes into direct contact with the concrete base of the furnace, then the foundation may collapse over time.
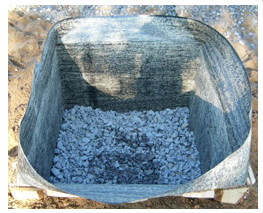
- After the formwork is firmly installed and waterproofed, we pour a pillow, the task of which is to retain moisture. At the bottom of the pit we pour crushed stone of the middle fraction and sand (about 10-15 cm).
- We fill the foundation with cement mortar and lay the reinforcing mesh on top. Do not forget to check with the building level how even the foundation is. If necessary, correct the error.
- We make a technological break, waiting until the foundation has completely hardened. This may take 2-3 weeks. Take your time and do not start facing work ahead of time, as a damp foundation will not provide adequate strength.
Step 2. We make the base for the oven.
- After you have made sure that the foundation is completely frozen, you need to lay out the base in one layer of brick.
- Check the level of the masonry with a building level.
- We create a waterproofing of the base with roofing material.
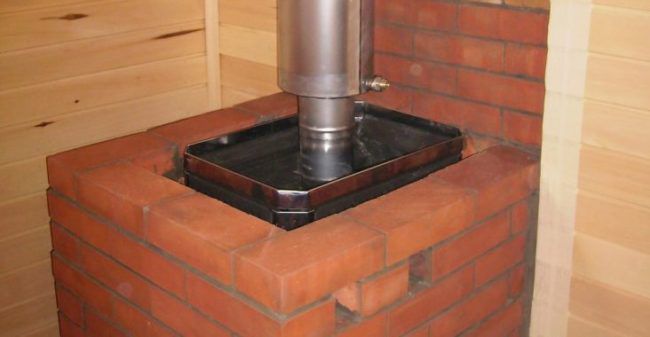
- We lay an iron sheet on top, which should exceed the size of the brickwork by 10 cm around the perimeter.
- We put a metal furnace on top and once again carefully check the horizon with a level. So that after completing the work you do not have to clean the oven from the solution, wrap it with polyethylene.
We wrap the oven in polyethylene
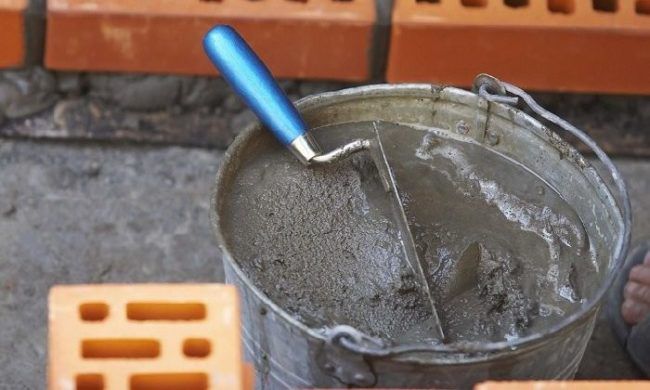
Step 3. Prepare the solution.
The ideal solution for lining a metal furnace is a mixture of clay and cement. There is no exact proportion, to be guided here, rather, it is worth the consistency. In appearance, it should resemble thick sour cream, without lumps and pebbles.
The stove-makers are advised to take an equal amount of clay and cement, adding about 30% of river sand.
The solution for facing the sauna stove is easier to prepare than for the usual laying of the stove. The main condition is to achieve a homogeneous mass.
Mixing mortar for masonry
- To do this, stir the dry mixture in a separate metal container and add water. Add water gradually, otherwise it will be very difficult to get rid of lumps.
Masonry clay mortar check the mixture
- Stir the mixture with a construction mixer or a drill with a nozzle until a homogeneous consistency.
- Let the solution thicken - 30-40 minutes. If you are not sure that you can overcome all the construction work in one “run”, then do not prepare the entire solution at once. Do only as much as you need to lay bricks. It gets thick pretty quickly and will be hard to work with. If for some reason you still have a large amount of the previous solution, then it is better to dilute it not with water, but with sand and water.

To test how good a masonry mortar is, take a small amount of the mixture and apply it to the brick with a trowel.
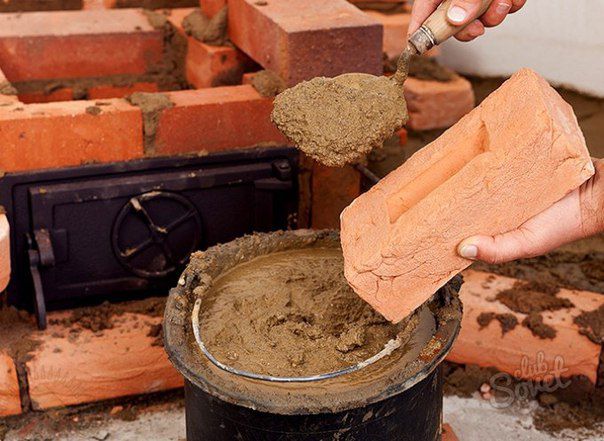
Apply mortar to brick
The solution should not slip and flow from the brick. If the density is not enough, then you can add a small amount of sand to the mixture.
Step 4. Preparing the brick for facing.
Measure the amount of brick that you need for the first stage of work. Select a portion of red ceramic brick, clean it well and soak for 12 hours in water.
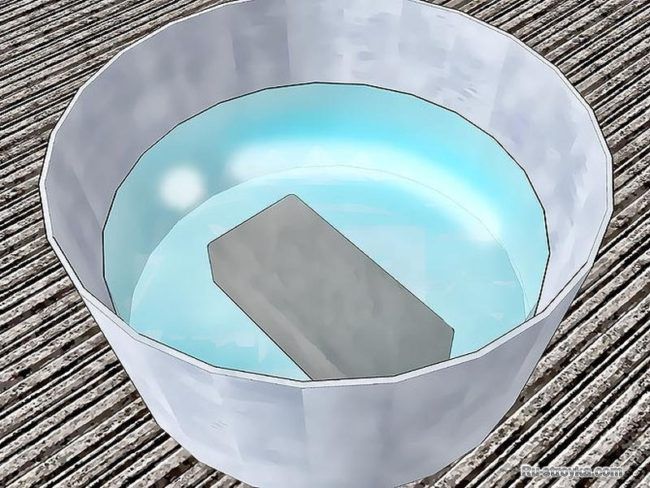
Soak a brick in water
This is necessary so that it does not absorb moisture and mortar during masonry.
If using an old brick, then clean it well before laying.
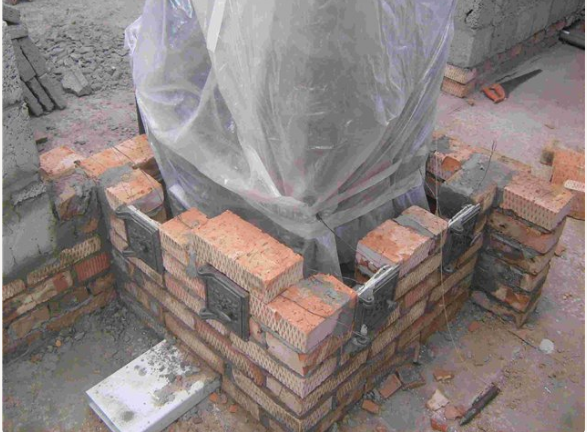
Step 5. Furnace lining.
There are several masonry options: solid well or lattice. The lattice version looks more decorative, but due to the large number of holes, the effectiveness of the thermal screen is significantly reduced.
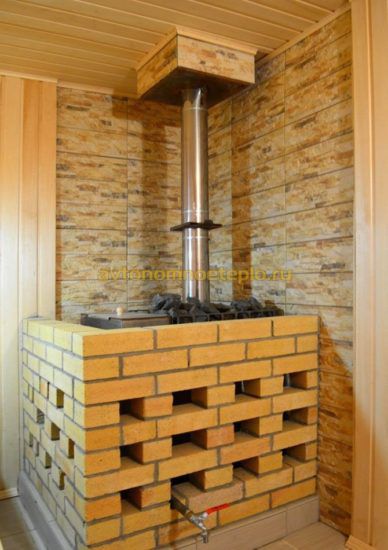
Lattice masonry
If the furnace body is round, then the masonry must be carried out in strict accordance with the shape of the furnace. This, of course, will require much more effort and skill, but the ordering technique itself will not change.
The distance between the metal body of the furnace and the stone should be at least 4-5 cm, and there is no need to make any jumpers or place spacers between the two materials. When heated, the metal will expand, which in turn will put pressure on the brick, or the furnace body itself may be damaged.
Brick-lined oven
Here it is very important to calculate the optimal distance between the brick wall and the metal body of the furnace. If you make it too small, the brick will quickly become unusable and crack. If you make it large, it will interfere with the high-quality heating of the stove and there will not be the required temperature in the steam room.
The average oven size is 13-15 rows. It is better to divide the work into 2 stages. On the first day, lay 7-8 rows and leave overnight. On the second day, check the structure for shrinkage and work the remaining rows.
The thickness of the laying is made in the brick floor. This will be enough for the stove to accumulate heat and quickly warm up the room.

Furnace lining process
Laying bricks for the purpose of facing a metal furnace is no different from laying a conventional furnace.
- We start each row from the corner, and after laying it, we check the horizon with a building level. To clearly observe the laying angle, use a goniometer or a plumb line.
- With a trowel, carefully apply the mortar to the brick and immediately remove the excess mixture. Make sure that no solution remains on the inside of the heat shield. Otherwise, it will dry out, and this will reduce the air circulation inside the structure.
- Lay a reinforcing mesh on the second row to stiffen the structure. And tie the 2-1 and 3rd row together with wire.
- The second row involves air gaps through which hot air will come out. It will be enough just to leave two gaps in ½ bricks for this. Repeat this on rows 6 and 8. Too many of these vents should not be made, as this can reduce the effectiveness of the heat shield. Two at the bottom and at the top will be enough.
- We lay out the third row in the same way as the first, but we observe a checkerboard pattern. Maintain a seam of 5 mm.
- Depending on which row you will have a hole for the firebox door and blower, we lay the row on a metal corner. To stiffen the structure, it will not be superfluous to strengthen this row by tying it with metal wire. Take into account the movement of the firebox door, which in no case should touch the walls when opened.
- The last row can be made arbitrarily, decorating with a ladder or simply pouring on it stones.
Some people prefer to finish laying bricks at the level of the slab where the coals are located. This allows you to admire the hot coals, and some close the chimney with masonry.
The order does not change from this, so choose the most optimal option for yourself.
Step 6. The first heating of the furnace.
After you have laid out a stone well around a metal furnace, it is very important to prepare it for further use.
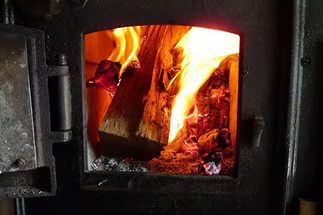
Kindling the furnace
No need to immediately give the maximum temperature. Run 2-3 test fires using the minimum amount of wood and without bringing the stove to the maximum temperature.
This will allow you to dry the solution well and the oven will last you a long time, and the bath will delight you with a good temperature and a cozy atmosphere.
Video: how to overlay a metal furnace with your own hands - a master class