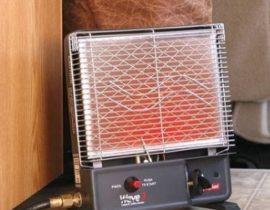
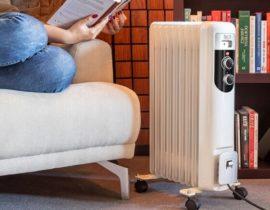
There are many options for heating a summer house today: centralized gas, boilers, electric heaters.
Furnace for giving
But if it is not possible to realize all this due to the remoteness of the area from civilization, a do-it-yourself brick stove will be an excellent solution.
Reliable and durable - it will gather around itself more than one generation of households, providing the house with warmth and filling it with comfort.
The services of a good stove-maker are not cheap pleasure. Therefore, if you decide to implement a brick oven project in your country house, it will be useful for you to read this article, in which we will talk about the principle of operation, features and layout of the oven structure.
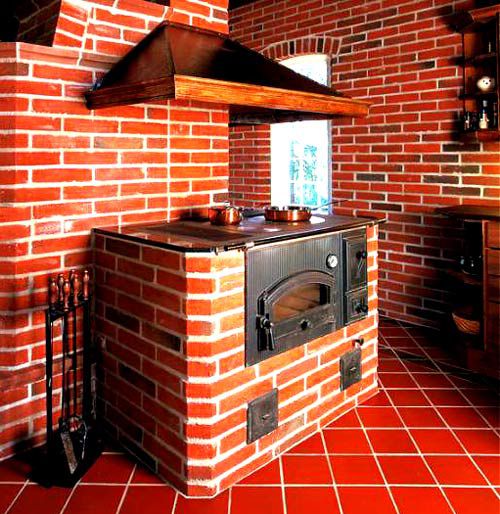
A brick oven can become not only a functional device, but also the main highlight of the interior, if it is properly beaten. Today, there are many ways to beautifully veneer and decorate a stone oven.
Content
- Varieties of furnace structures
- The device of the furnace for giving and its features
- 10 basic rules for laying a country stove
- Which brick stove to choose for a summer residence?
- Do-it-yourself oven masonry
- Video. Master class on laying a stove for a summer residence
Varieties of furnace structures
No matter how much time has passed since the appearance of the first stove structures and no matter how far home heating technologies have gone, the stone stove still does not lose its relevance. Compared to other types of heating (electricity, gas), it is more economical. At the same time, thick stone walls allow you to retain heat for another day after the firewood has burned out.
According to their purpose, furnaces are divided into the following types:
- heating;
- cooking;
- multifunctional;
- combined.
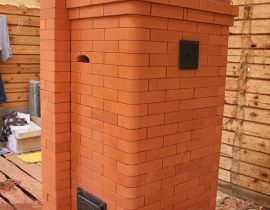
- The heating design is perhaps the simplest and most common. As the name implies, the function of such a stove is aimed only at heating.

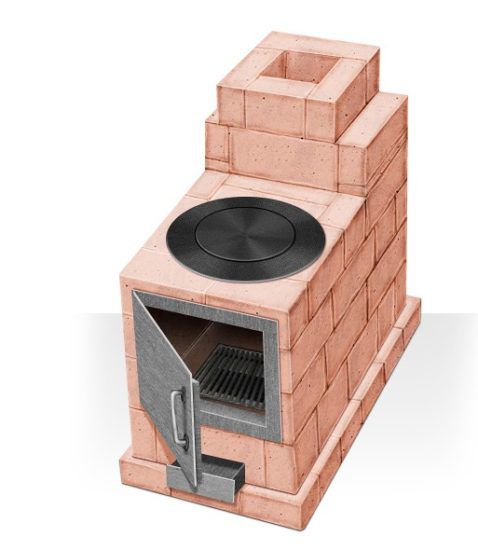
Stove with hob
Basically, such an oven is chosen for cottages where there is electricity and a stove is used for cooking. Or the owners of the house want to create a special country comfort with the help of a fireplace stove. The design of such a furnace consists of:

- a combustion chamber, which is purchased ready-made, or laid out with fireclay bricks;
- an ash pan where the ashes are collected;
- chimney.
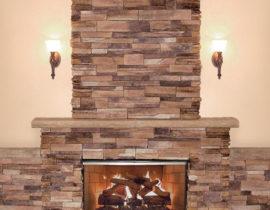
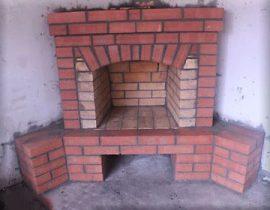
A fireplace with an open or closed firebox can also be attributed to the same type of design. It is used not only for decorative purposes, but also allows you to effectively heat a room with an area of 15-20 square meters. meters.
Depending on the selected material, wall thickness, masonry scheme, heating stoves may have different heat output.
The most popular type of oven is the one-brick construction. This allows you to warm the walls up to 600C. According to this scheme, the famous Dutch ovens are laid out.
In terms of dimensions, the heating stove can be wide and full-bodied, or it can have an elongated rectangular shape.It all depends on the area of \u200b\u200bthe room, the style of the interior and the personal preferences of the owners.
Tiled tiles, decorative plaster, decorative stone are usually used for facing such a furnace.
Brick heating stoves in the form of a three-sided prism look very stylish and original, but this option will not work for a beginner, since it requires a lot of experience. Of great difficulty is the hewing of bricks and the requirements for maintaining an angle strictly under 600.
Round stoves also look beautiful and unusual, which are laid out according to the scheme of the famous Russian engineer in the stove business V.E. Grum-Grizhimailo. The furnace works on the principle of free movement of gases. To ensure tightness, the outside of the structure is covered with sheet metal. Such a stove is able to heat a large country mansion and will become a real decoration for any home.
- Cooking oven. It is advisable to choose this option for giving, where the owners are only in the summer. In this case, heating the house is not needed, and if you equip the structure with an additional water tank, it will serve not only for cooking, but will also create comfortable living conditions.
cooking oven
Often this option is installed in country cottages, where gas and electric heating is provided, but in order to save resources, owners sometimes use a brick oven.
The design of the furnace consists of a brick body, inside of which there is a combustion chamber, an ash pan, a chimney. There is a metal plate on top (an oven can be built in).
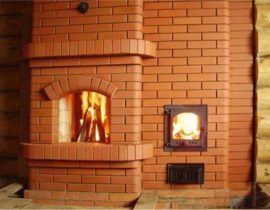
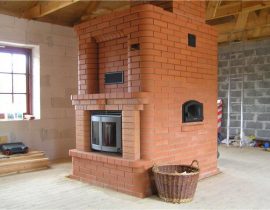
- The heating and cooking stove is already a multifunctional design.
This is a more difficult project to implement, as it consists of:
- combustion chamber;
- chimney;
- ash pan;
- hob;
- oven.
The stove looks massive and is usually chosen for summer cottages, where there is no other heating option.
In our country, heating and cooking stoves are the most popular, allowing you to heat the house and cook a delicious dinner for the whole family.
It can be additionally equipped with a drying chamber, where you can make preparations for the summer: mushrooms, berries, fruits. In cold and damp weather, in this chamber you can quickly and safely dry clothes and shoes.

Oven with drying chamber
By the way, ovens with drying chambers were first invented in the countries of Northern Scandinavia, where hunters and fishermen had to dry their clothes and boots overnight.
Many schemes of heating and cooking stoves have additional devices in the form of a comfortable stove bench, a dryer for firewood, an oven, and a hot water tank.
The device of the furnace for giving and its features
The main elements of any brick oven for summer cottages are:
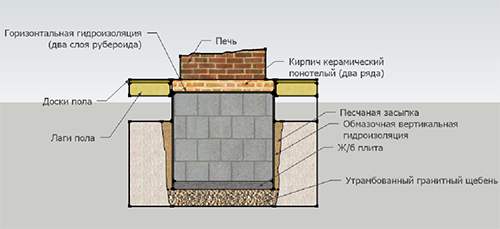
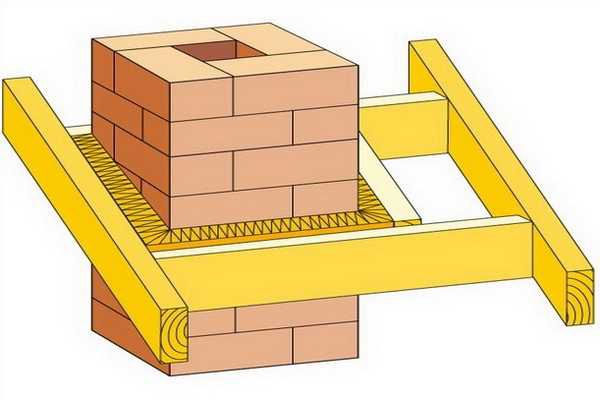
- Foundation. For any furnace, it is necessary to build a separate base that is not connected with the main foundation of the house.
The foundation is built separately
- Furnace body. It consists of a combustion chamber and a chimney. If the furnace scheme involves additional elements, then a hob, an oven, a hot water tank may be included.
- Furnace chamber. The size of the firebox depends on the area of \u200b\u200bthe room and the required power. If the stove is planned to be fired with wood, then the height of the firebox should be at least 40 cm. The thickness of the firebox should be at least 1/2 of a brick. The firebox can be laid out from fireclay (heat-resistant) bricks or purchased in a ready-made form of their cast iron.
- Ash pan (ash chamber). This element of the furnace is designed to collect products during the combustion process.Also, oxygen is taken through the ash pan, which is necessary for the combustion process.
Ash pan
The ash pan is located below the combustion chamber and is always equipped with a metal door through which cleaning takes place. A grate is laid between the ash pan and the combustion chamber. The standard ash chamber is 3 bricks high.
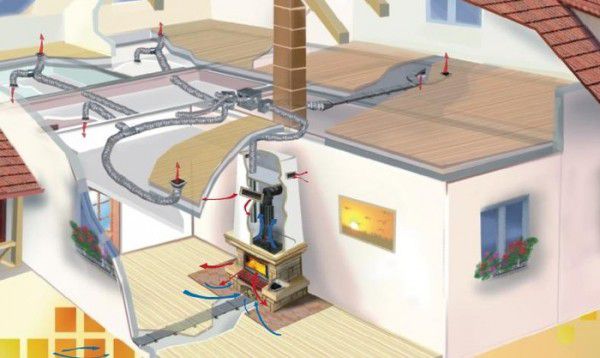
- Chimney. The main element of the furnace, through which the products of combustion of fuel are discharged. The chimney can be made of brick or made of steel pipes. This does not affect the functionality and efficiency in any way. The chimney is removed from the stove either directly through the roof or through the wall to the street. When building a chimney, many branches and horizontal sections should be avoided, as this negatively affects the draft and can reduce the efficiency of heating the room.
10 basic rules for laying a country stove
- The brick used for masonry must be soaked in water for 5-6 hours so that it absorbs moisture well and does not take it from the cement mortar.
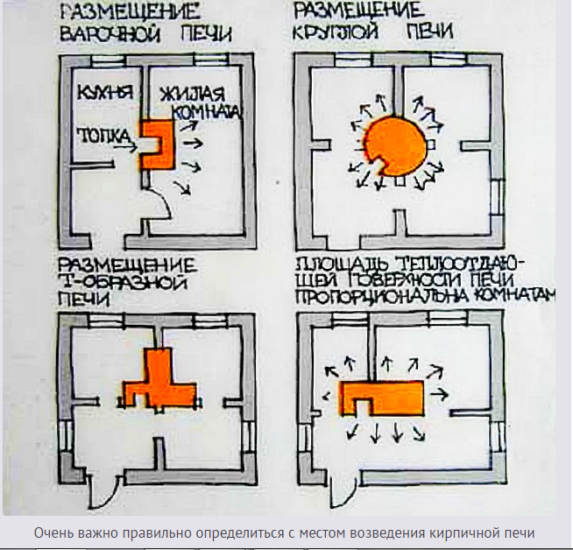
- Having decided on the location of the furnace, be sure to follow all fire safety measures for its further operation. This is especially true for houses with wooden floors.
Choosing a place for construction
If the oven is planned to be placed in the corner of the room, make an apron made of sheet metal or ceramic tiles around.
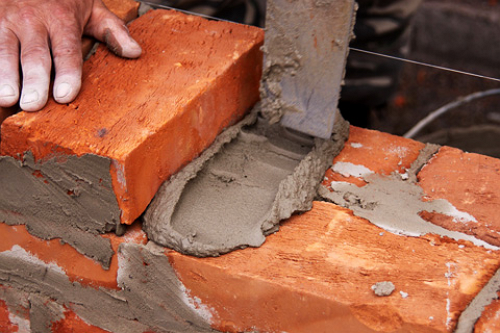
- During laying, monitor the thickness of the seam. It should be 5 mm.
We make the seams thin
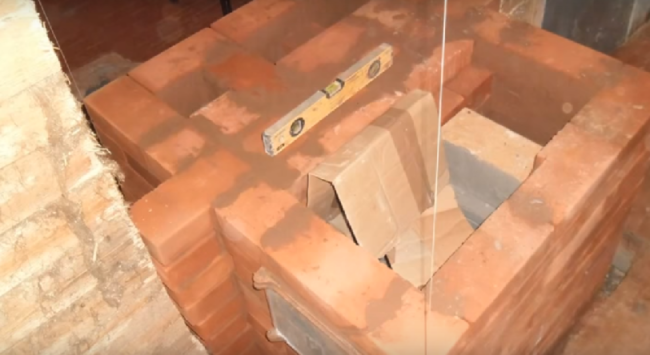
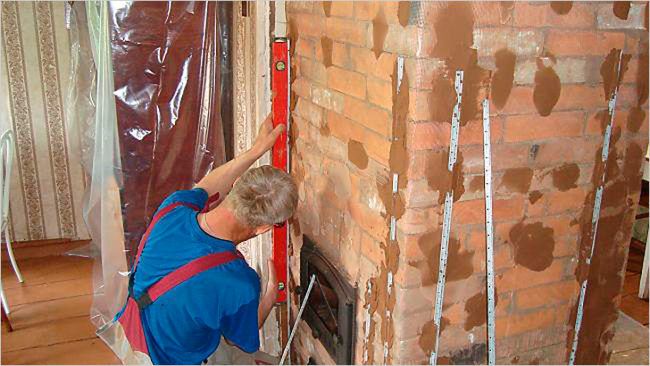
- Use a level at all times to ensure that the laying is correct.
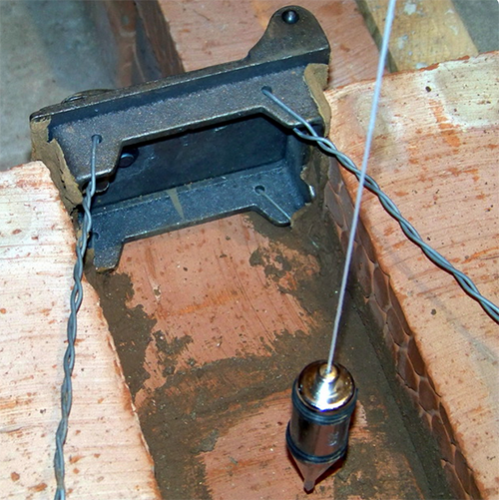
- Stretch plumb lines from threads at four corners so that the stove does not “leave” to the side during laying.
Stretch the corners
- If you feel that you cannot assemble the oven in 1 day, do not knead the entire solution at once.
- The foundation for the furnace is carried out separately from the main one.
- At all stages of the installation of metal fittings, consider the gap for thermal expansion. Place the grate not on the mortar, but in the grooves of the bricks. It should be free to remove and get out of the oven.
- In order to ensure good draft and prevent the formation of condensate, use a short gas outlet path (summer operation). Through this path, gases enter the chimney. After the stove flares up well, the damper is closed and it “works” not for heating, but allows you to cook food.
- Start each row from the corner.
Which brick stove to choose for a summer residence?
The choice of oven design determines the size and type of room. For large cottages, a massive stove structure with thick walls will be required, which will heat up for a long time, but at the same time be able to maintain the temperature for a long time. Folding such an oven is not an easy task. This will require some experience and knowledge.
But even a novice can handle a small stove for heating a small cottage, if you follow a clear scheme and do not change the rules of masonry.
small ovens
In the first place in terms of popularity of heating and cooking stoves is a Swede, who enjoys well-deserved love and respect among Russian stove-makers.
This design is a compact ergonomic shape with a small cooking surface, a three-channel chamber. It is ideal for a small cottage, the length ranges from 880 to 1250 mm.
For the location of such a stove, a place is most often chosen between the kitchen and the living room.Thus, the stove performs a dual function: serves for cooking and decorates the living room with a fireplace.
On the Internet today you can find hundreds of different masonry schemes for a Swedish stove with a hob, so it will not be difficult to implement it for a summer residence. Many stove makers have added additional options to the standard masonry scheme, so each design is called by the name of its creator: Buslaev's stove, Kuznetsov's, etc. But the principle of work in them is the same.
Traditionally, a Russian stove can be called a bulky massive structure, which is decorated not only with a hob with an oven, but also with a spacious stove bench.
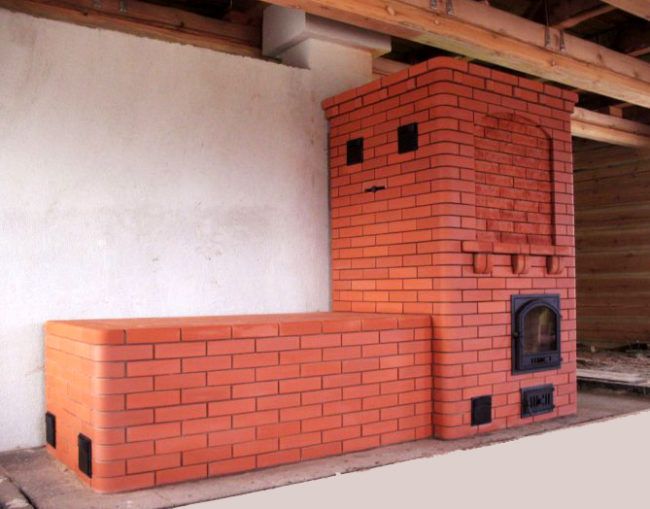
Stove with stove bench
This oven is already not only a functional device for cooking, but also a place to relax. It allows you to warm up the room well, retaining heat for a long time, has a beneficial effect on the human body, so that the owners of such stoves are less susceptible to colds.
The building usually has two fireboxes (main and additional). Due to the special design of the furnace, heating is carried out evenly, from the bottom up. Any solid fuel is suitable for kindling, and especially strict requirements are not imposed on the materials for laying a Russian stove.
A special place among small heating and cooking stoves is occupied by baby V.A. Potapov, created by a famous engineer at the beginning of the 20th century. For its masonry, only 211 bricks are needed, and the dimensions of the furnace are only 630 * 510 mm.
At the same time, such a baby contains a single-burner stove, a small oven for baking and a hood. This stove option will be an excellent solution for a small garden house or a one-room cottage.
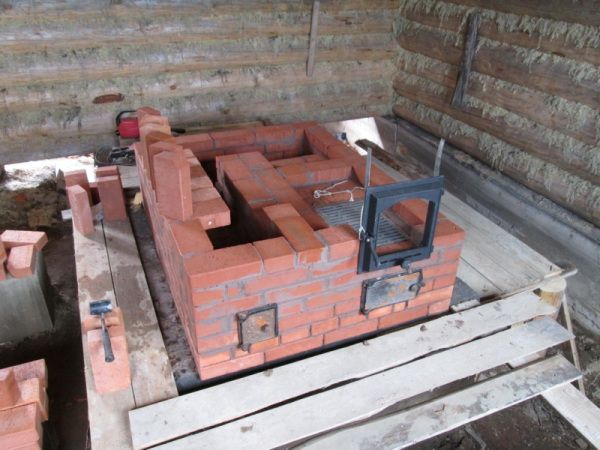
In this article, we suggest that you study the rules and highlights of laying a small heating and cooking stove.
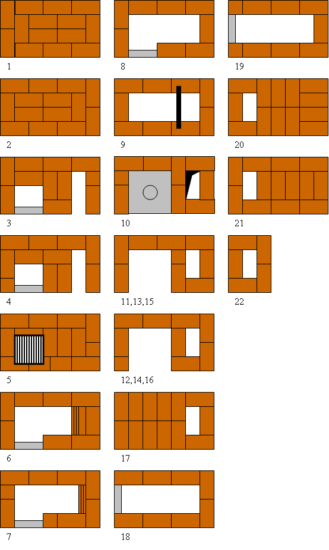
Cooking oven order
Do-it-yourself oven masonry
Step 1. Choose a brick and prepare tools
Which brick for laying a small country stove to choose? We will need 2 types of bricks: fireclay (heat-resistant) for the construction of a firebox and red ceramic (not lower than M-150). You should not save on materials, further operational properties, safety and efficiency of the furnace depend on this.
Fireclay bricks can be easily recognized by their yellowish color and porous surface. The composition of this material includes refractory clay and chips. This material, in addition to its heat-resistant properties, is also valued for its ability to accumulate heat for a long time. Even after the complete attenuation of firewood, such a stove is able to give off heat for a long time.
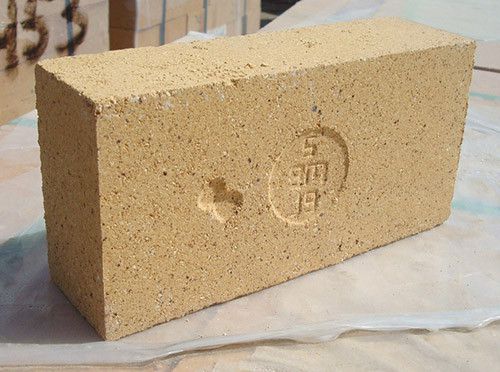
fireclay brick
Heat-resistant fireclay bricks can withstand temperatures up to 15000C, so the combustion chamber should be laid out exclusively from this material.
The smaller the mass of fireclay bricks, the greater the number of pores it contains, which creates aluminum oxide. Such a brick will conduct heat very well. The cost of this material is almost 5 times the price of red brick, but there is no need to save.
But laying out the entire oven from fireclay bricks is also not worth it, the outer part of the structure does not heat up much, and the red ceramic brick looks more attractive.
When choosing a brick for the oven, pay attention to the color and shape.
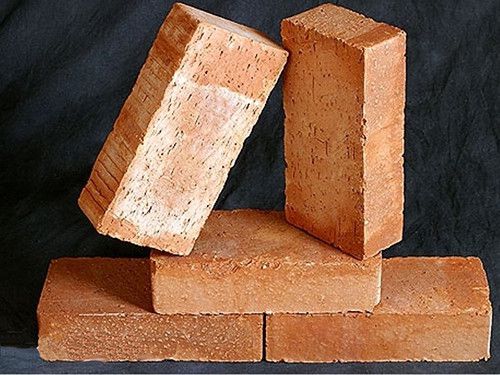
Red brick
You can test the material. If you throw a brick from a height of 1.5 meters, and it does not crack, take this batch. But a bad, overexposed brick can break into several parts.Such a brick makes a dull sound when it falls.
The brand of brick for facing the furnace should be M150 or M200. The number in this case means how much weight the brick can withstand per 1 cm3.
Do not take silicate and hollow bricks. It's not even about the ability to withstand high temperatures - they can handle it. Silicate brick does not conduct heat well and it will not be very comfortable in a room with such an oven.
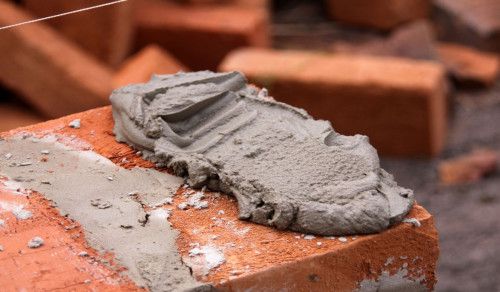
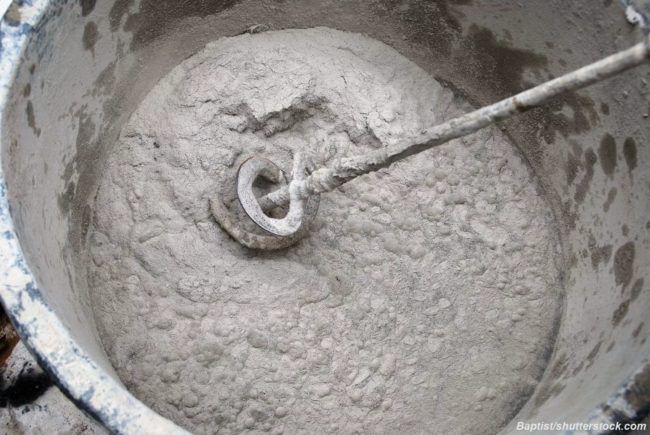
The solution should be of medium density
For masonry mortar, you will need sand, red oven clay and water. The appearance and durability of the furnace directly depends on its quality and consistency. To prepare it, you should use red oven clay of medium liquid. In a frozen form, it should not fall off, crumble.
The masonry will be made with a thickness of 0.5 mm, in which case the precious heat will not quickly leave.
Also, for construction, you can use ready-made masonry mortar, which is sold in stores. Usually, various impurities are present in its composition, which add strength and heat resistance to the structure. In this case, it will be enough to dilute the dry mixture with water and bring it to a homogeneous state using a construction mixer.
The consistency of such a solution should resemble thick sour cream. If the mortar rolls off the trowel, more dry mix must be added. If it turned out to be too thick, then it will be difficult to work with it and make thin seams. Add some cold water and stir again.
So, for the construction of the furnace, we need the following materials:
masonry tools
- Masonry mortar (sand, red oven clay).
- Red ceramic brick M150 - 120 pieces.
- Chamotte brick - 40 pieces.
- Foundation material (cement, graphite, sand).
- Ruberoid.
- Asbestos cord, galvanized wire.
- Plywood or boards to create formwork.
- Reinforcing mesh for arranging the foundation.
- Grate.
- Metal plate for one burner (cast iron).
- Ash pan and ash pan door (blew).
- Cast iron firebox door.
- Chimney valve.
- Chimney flue.
- Metal cap for the chimney.
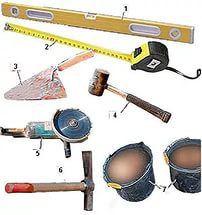
Tools you will need to build a furnace.
- Building level.
- Owl shovel.
- Construction marker.
- Goniometer.
- Spatula, rule.
- Master OK.
- Measuring tape (roulette).
- Construction slope.
Important! When laying a stove, a lot depends on the quality of the clay. Ideally, use red river clay of medium fat content, which has been outdoors for at least 2 years. Make exactly as much solution as you can master in "1 call". The solution quickly becomes thick and difficult to work with.
Step 2. We prepare a brick for laying the furnace
Before proceeding with the laying of the furnace, it is necessary to lay out the entire brick in advance and prepare it according to the ordering scheme.
This stage includes dividing the brick into ½ or ¼ parts, squeezing in the corners.
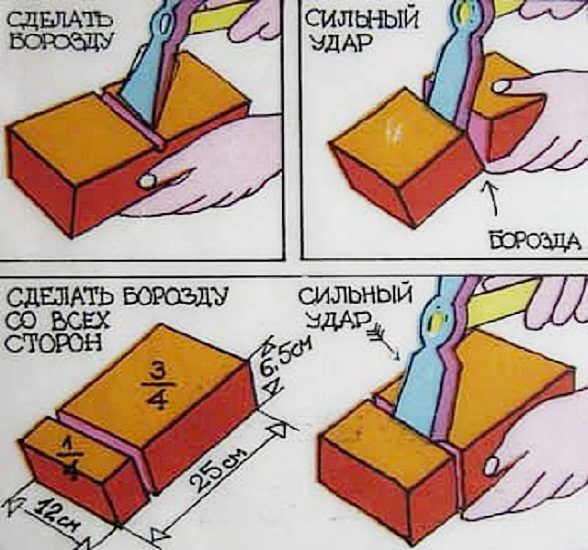
Brick splitting techniques
Study the diagram carefully and see what parts of the bricks you will need for each row.
If necessary, you can number the brick, so that later it is easy to navigate in which row to insert it.
How to split a brick? Before “beating off” the necessary part of the brick, according to the scheme, you first need to make a groove. This can be done with a hacksaw or file.
To make ½ brick - draw 1 groove.
For 1/6 or 1/8 bricks, make a groove on all sides of the brick.
Step 3. Choosing a place for the furnace
This is a very important stage in laying the furnace, which is advisable to carry out even at the stage of building a house.
But there are times when the decision to lay the stove arises from the owners of houses already in the process of operating the cottage. In this case, determine the place from where it will be easiest to remove the chimney.
Determine the place for the oven
It is also important to estimate the distance between the oven and windows and doors. After all, cold air blowing from the doors can interfere with the natural circulation of heat in the house, reducing the efficiency of the stove.
In addition, the stove should not interfere with free movement around the room. It should become one with the space, without creating inconvenience. In many ways, the placement of the furnace depends on the purpose.
The heating and cooking model is best placed in the kitchen, and the fireplace stove will look beautiful in the living room.
When determining the location for the installation of the furnace, evaluate the following points:
- The distance to the nearest wall must be at least 25 cm.
- The chimney must not pass through the beams.
- The floor and wall will have to be lined with fire-resistant material.
- The fireplace is best located near the inner wall of the house. To increase efficiency, it makes sense to install the stove in the space between the kitchen and the living room. Thus, one stove will heat two rooms at once.
An excellent place to place the stove is the corner of the room, only if there is no front door opposite the corner, from which cold air will blow out the flame.
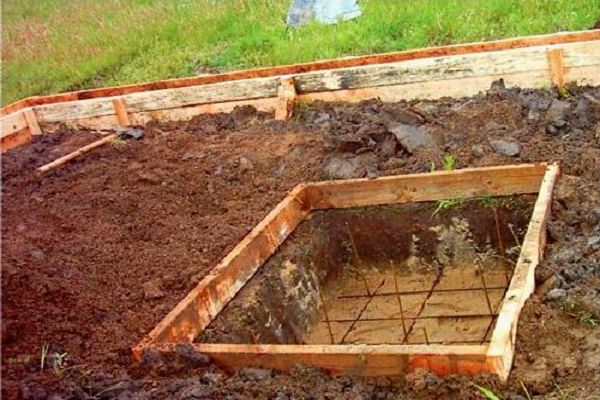
Step 4. Building the foundation
For the construction of a brick oven, it is necessary to make a separate foundation. If it is laid on the same cycle with the construction of a house, it is not a difficult task to complete it.
Foundation laying
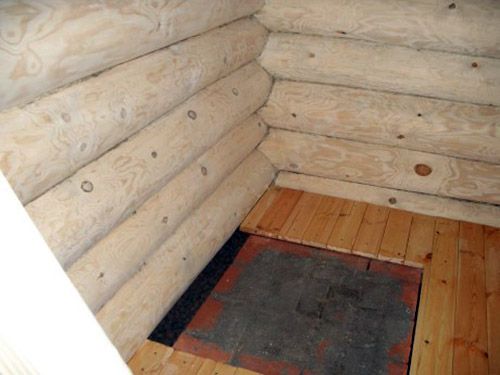
If you have decided to lay the stove after the completion of the general construction, then it will be necessary to remove part of the finished floor and go deep into the ground.
Why is it so important to carry out a separate foundation? A brick oven, no matter what size it is, has a lot of weight, which will create a lot of pressure on the foundation. When shrinking, the house will sag. This should in no way affect the shape and design of the oven.
That is, the general foundation of the house should not pull the stove along with it, as this can lead to a violation of its sealing and deterioration of technical properties.
base for oven
- Using a pencil, mark on the floor where the oven will be located. Step back 15 cm on each side and draw a line. This will be the size of your foundation.
- Remove the boards with a grinder and set them aside.
- Now, with the help of a bayonet shovel, it is necessary to go deep into the ground and dig a pit with a depth of at least 50-55 cm.
- We fill the bottom of the pit with gravel, sand and pour water. This will serve as a kind of air "cushion" of the foundation, which will give strength and reliability to the base.
- We create wooden formwork from old plywood boards and make waterproofing using roofing material.
- We are preparing a solution for the foundation (sand 4 servings + crushed stone of the middle fraction 1 serving + water). We fill the hole, not reaching the level of the subfloor by 10-12 cm.
We prepare a concrete solution
- Put a metal reinforcing mesh on top, which will give strength and prevent the foundation from cracking. You can make a reinforcing mesh from steel rods, twisting them together with a wire. Check the level of the foundation with a building level.
- We level with a bayonet shovel and make a technological break for 24-28 days. Do not rush to start building a furnace on a wet foundation. Otherwise, the oven will quickly sag and deform.
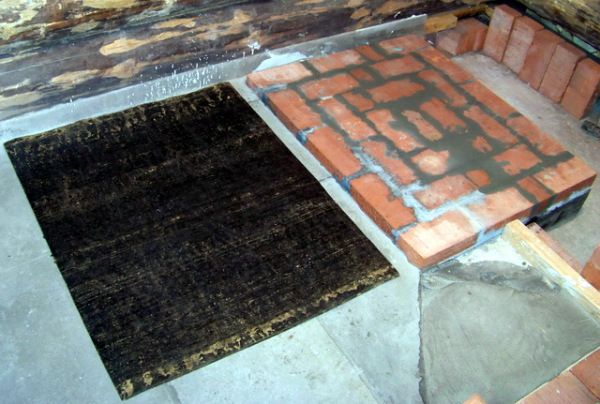
- On a solid surface of concrete, along the perimeter of the foundation, we lay two continuous rows of bricks, bringing it to the level of the finished floor.
Ruboroid as insulation
- On top we lay 1 layer of roofing material, which performs the function of waterproofing.
- After complete solidification, you can proceed to the laying of the furnace.
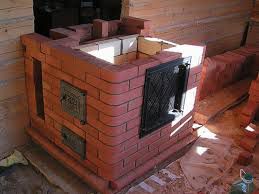
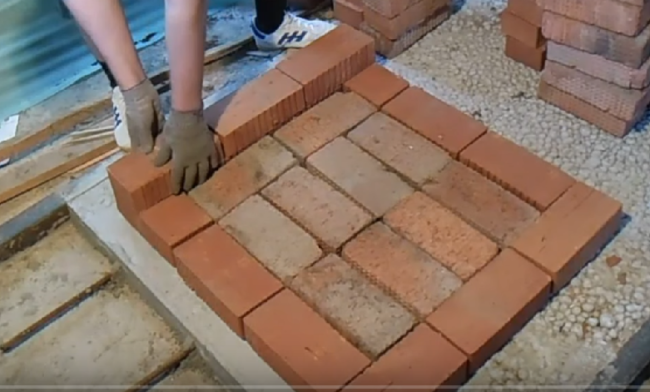
Attention! Before laying bricks on the mortar, lay out the entire brick "dry". First, it will allow you to see if you have enough material. And secondly, even at the draft stage, you will be able to see difficult moments that you will have to pay special attention to.
Step 5. Laying the stove
Attention! Before laying the stove, dip the bricks in a bowl of cold water to absorb moisture. So they will not pull water from the masonry mortar.
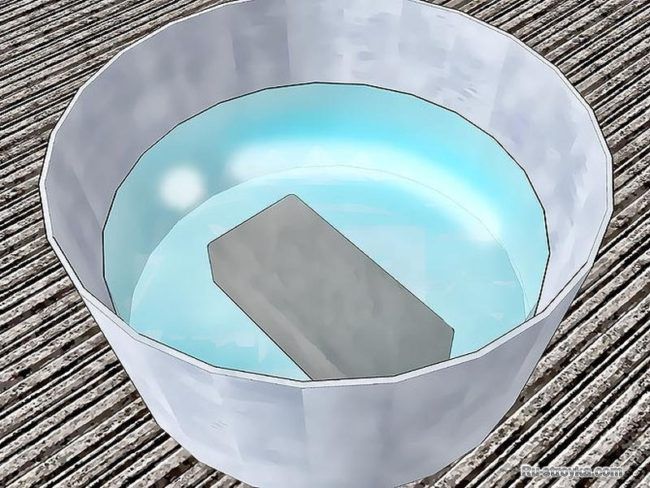
Soak a brick in water
- 1-2 rows are solid.
1 row solid
Each row must be checked for horizontality with a building level. Use a plumb bob for verticality and a goniometer for angle accuracy. Here, on a thin layer of solution, a blower door is installed. First, the door must be wrapped with asbestos cord moistened with cold water.
2 row
We pass the burnt metal wire through the factory holes and twist it into a bundle. We lay the other end of the wire between the bricks and coat with mortar.
- 3 row - we begin to form the ash chamber. The bottom of the ash pan is best covered with a metal sheet. So it will be easier to keep the furnace clean and remove the ashes.
3 row
- 4 row begins to form a combustion chamber, which must be laid out with fireclay bricks.
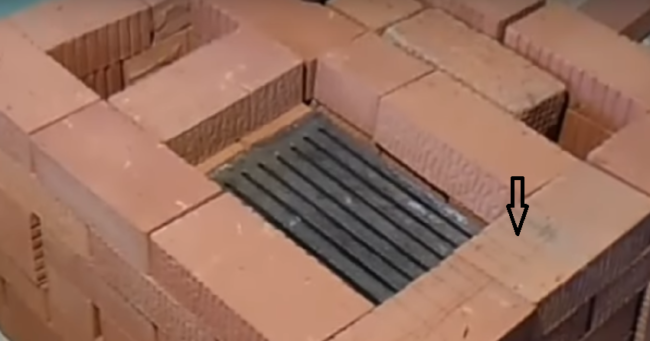
- On top of the 5th row, above the blower door, we install a grate with a gap in mm (for metal expansion). It is necessary to prepare a brick in advance for installing a grate on it. To do this, with the help of a grinder, you need to drink the thermal gap necessary for the expansion of the metal (about cm). It is unacceptable to install the grate on the masonry mortar. The grate should be freely removed and put in place without disassembling the stove.
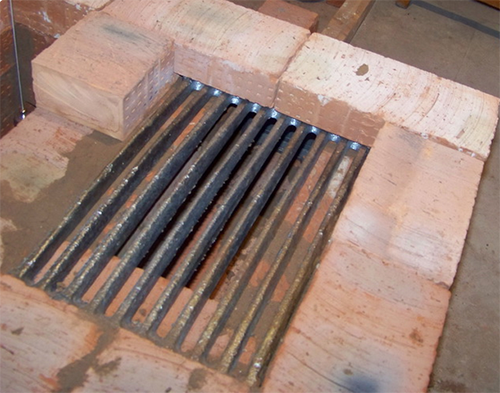
Fill this gap with sand. The entire under the stove will practically be occupied by grates, which will ensure good and simple maintenance of the stove, as well as complete burning of firewood.
We block the door of the blower with a brick.
Installing the furnace door
We install the furnace door, after wrapping it with an asbestos cord. To make it easier to mount it, put the door on a thick wire and support it with bricks on both sides. Then these bricks will need to be removed.
We support the door with bricks
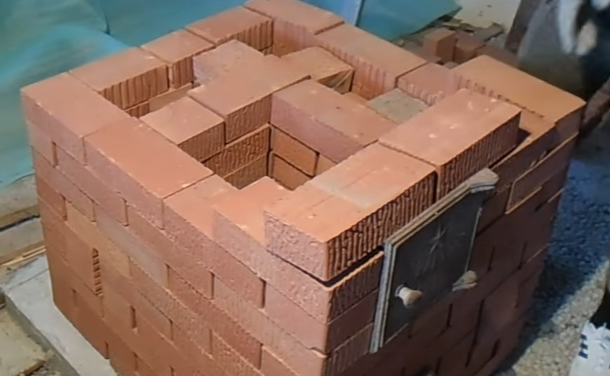
- 6th row. Closes the furnace door.
Here we begin to form a smoke channel pipe, creating overlaps for two vertical channels.
We lay the base of the firebox, which we make of fireclay bricks.
- From row 7-9 we lay out the firebox with fireclay bricks according to the scheme.
In this row, the two bricks that overlap the grate should be cut at a 45 degree angle.
- 10 row - close the oven. We create a partition from a brick, raising it by 2 cm. On the oven, to the level of the partition, we apply a clay-sand mortar. We are preparing a place for the installation of the hob.
It is necessary to make recesses in the bricks for reliable fixation with the slab and create thermal niches for the expansion of the metal.Immediately put the slab on a dry slab and number the bricks - so it will be easy for you to lay the brick on the mortar later and not make a mistake with the correct recesses under the slab.
We lay the asbestos strip on the brick (to expand the metal).
- 11 row - we mount the hob. Please note that the slab is placed directly into the recesses on the brick, which must first be made by a grinder.
these bricks must be cut at an angle of 45 degrees
- From the 12th to the 16th row - we begin to lead the chimney. Do not leave mortar on the inner walls, they must be smooth. Otherwise, it may cause a decrease in traction and the efficiency of space heating. You can immediately clean the inner walls of the chimney with a damp cloth.
Covers for two vertical channels

- 17.18th row. We cover the hob, carefully filling the seams with a 3-5 mm solution.
- 19-20th rows - we install a smoke valve.
Smoke damper installation
- We make the 21-27th rows according to the ordering scheme of the chimneys.
- 28th row - a hole for the chimney.
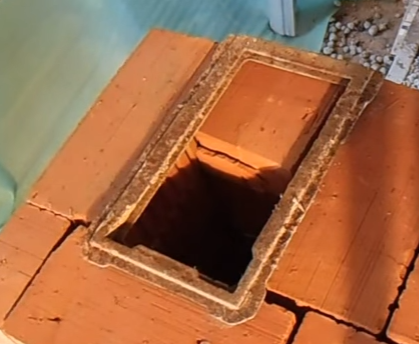
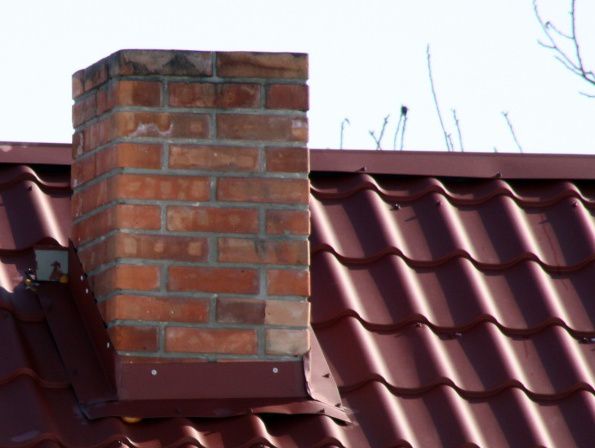
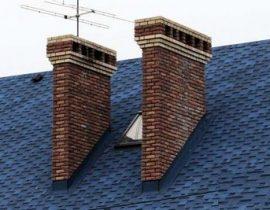
Step 6. Chimney outlet through the roof
This is a responsible step, which should ensure the complete safety of the operation of the furnace.
Be guided by the norms of SNIP when removing a brick pipe through the roof. According to these standards, the gap between the roof and the chimney must be at least 13-25 cm.
Around the place where the pipe passes through the roof, it is necessary to insulate with thermal insulation materials. This will provide reliable protection against blowing cold air and ensure reliable fire safety.
If the oven is installed in a residential building with a finished roof, it will be necessary to remove part of the roof.After the pipe is wired, it will be necessary to fully ensure the integrity of the roof in this place so that during rain or snow, moisture does not get inside.
For waterproofing a stone pipe, a special plate is used, which resembles a kind of pedestal around the chimney. The joining of the slate and the metal plate is carried out using a sealant.
The integrity of the roof must be ensured
If you want to simplify the task, then the chimney will not be difficult to make using steel sandwich pipes. They are stylish and easy to assemble. In addition, they have much less weight than bricks and will not create such pressure on the foundation.
When determining the required height of the chimney, be guided not only by the height of the roof, but also by the height of the ridge.
The efficiency of space heating and the presence of traction directly depend on correctly calculated parameters.
Chimney outlet
The edge of the pipe must protrude above the “ridge” of the roof by at least 0.5 meters, otherwise the turbulence that forms around the roof can prevent good draft and will constantly blow cold air into the chimney.
We complete the construction of the chimney - a metal grate. It will prevent debris from entering the chimney.
From above we put on a metal cap, which reliably protects the pipe from precipitation.
Step 7 Furnace lining
There are many ways to beautifully veneer a stove for a summer residence.
Facing
Clinker tiles, tile tiles, decorative plaster, artificial stone, etc. can act as a decorative material.
Or you can just leave the stove in its original form, especially if you bought a high-quality beautiful brick.
Keep in mind that any facing material reduces heat transfer. Therefore, if you do not want to lose thermal properties, you can cover the stove with a thin layer of decorative plaster.
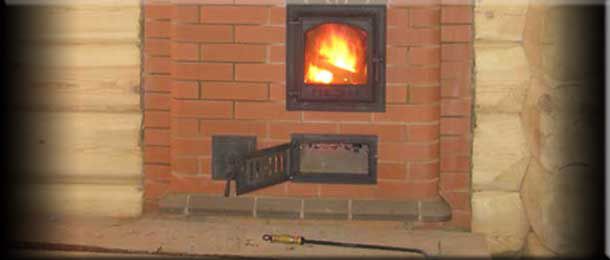
Step 8. Kindling the furnace
After the complete lining of the furnace, it is necessary to take a technological break for 10-14 days until the structure is completely dried. Leave the door wide open.
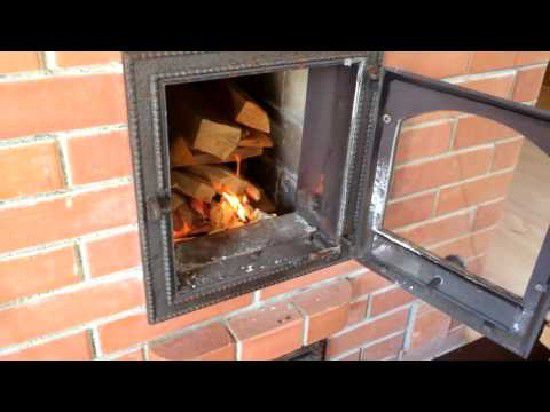
Kindling the furnace
When you are sure that the masonry mortar is completely dry, you can carry out the first test kindling of the stove. No need to rush and immediately, after laying, kindle firewood.
Premature kindling of a damp stove can cause it to crack. For the first time, use ¼ of the wood, lay small logs. This will allow the structure to dry well from the inside. Do not exceed the maximum temperature of 60-65 degrees in the first week of operation.
- Do not use trash for kindling.
- The firebox door must be closed when kindling.
- Warm up the oven gradually, do not immediately give a strong heat.
- Use high-quality, well-dried firewood.
For the convenience of using a country stove, you can make a stylish one with your own hands. firewood, which will become a decorative and functional element in everyday life.
As you can see, if you follow a clear ordering scheme, it is not so difficult to put together a beautiful and solid country stove.
Video: Laying a dry brick oven
Below we provide a detailed master class on laying a brick oven for a summer residence.
Video. Master class on laying a stove for a summer residence


I like it very much, thanks for the info