In Russia, Buleryan stoves also exist under the names Breneran, Bulleryan, Bullerian or Canadian stove. The design comes in five different modifications for space heating up to a maximum of 1000 m3.

Do-it-yourself buleryan oven
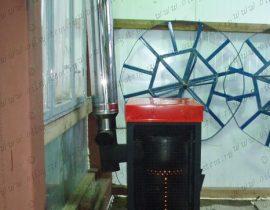
In addition, Buleryan is successfully used in baths, supplementing the main part of the stove with a heater.
Content
The design of the Buleryan furnace
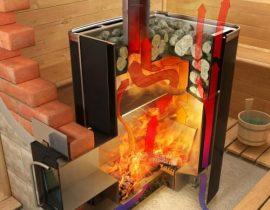
The Buleryan furnace is made from heat-resistant steel. There are two combustion chambers inside the furnace: the lower one (gasification) and the upper one (where the afterburning of flue gases takes place). A distinctive feature of the furnace is large-diameter pipes-air ducts encircling the all-welded cylindrical body, fastened together by a unifying manifold. Sometimes not steel, but aluminum pipes are used. On the rear wall of the furnace are located: a chimney pipe, which is connected with a chimney by a tee; chimney with a glass-plug to collect the resulting condensate and with a regulator of the amount of incoming oxygen. A metal plate is installed on top of the stove body, on which it is convenient to cook food. The front of the firebox is closed by a hermetic door with a power regulator.

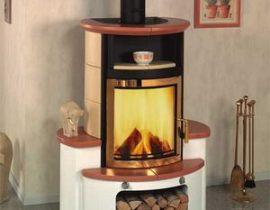
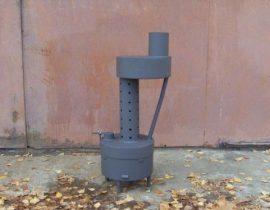
Buleryan oven sample
For the Buleryan furnace, the following types of fuel are used:
- peat briquettes;
- firewood;
- various waste paper and woodworking industries.
Burning hard coal in a kiln can damage structural elements. Flammable liquids or gases must not be used as fuel.
How does the Buleryan oven work?

The principle of operation of the Buleryan furnace
Thanks to the pipes encircling the stove, it heats up quickly and the warm air is distributed smoothly throughout the room. In each branch pipe in contact with the furnace, the air is heated to a temperature of 60-150 degrees (cold air enters each pipe from below, heats up and exits from the upper end of the pipe), while the metal structure does not glow red.
In order to achieve rapid heating of the room, it is necessary to constantly add fuel (intensive mode). In the case when the room is warmed up, and it is only necessary to maintain the set temperature in it, fuel is added and it slowly smolders, emits heat for up to 8 hours in a row (gasification mode).
Furnace installation
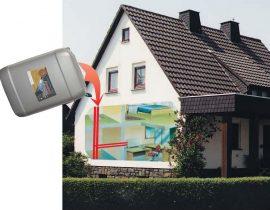
It is necessary to install the Buleryan furnace, maintaining a distance from the walls of at least half a meter (to protect against fire), and there must be at least one and a half meters of free space in front of the furnace. Under the stove, we must place a solid non-combustible foundation - brick or metal.
The furnace is installed at a height of up to three hundred millimeters from the floor level. The chimney should be insulated with mineral wool and equipped with a visor to protect it from wind and precipitation.

Scheme of installing a stove in a house
Furnace operation
During operation, you must follow these rules:
- We set both damper regulators (on the door and on the chimney) to the closed position.
- We put the maximum amount of fuel in the lower chamber of the furnace, kindle a fire.
- We regulate the intensity of combustion and temperature with a damper-regulator.
- To make additional fuel loading, we open both dampers completely, and after a few minutes, we put firewood into the stove.
When cleaning the furnace, it is not necessary to completely remove the ash from the surface of the pipes. A small layer of ash is desirable for good fuel gasification.
Do-it-yourself Buleryan oven: step-by-step instructions for creating
It will be quite difficult to make a Buleryan oven with your own hands, without having the necessary industrial equipment and welding experience. In this case, we are dealing with thick steel 4 mm thick, and to weld such a thick metal, enough skills are required! Necessarily needed: a pipe bender and a welding machine, as well as the ability to use them.
Necessary materials and tools for work:
- heat-resistant boiler steel (4 mm) 1x2 meters in size;
- steel 6 mm thick, size 0.7x0.4 meters;
- pipe with a diameter of 110 mm and a length of 4 meters;
- another pipe ten meters long, 57 mm in diameter and 4 mm thick;
- metal fittings (hinges, handles, locks);
- pipes 350 mm;
- grinder with all the necessary circles.
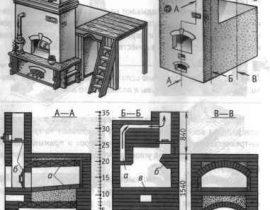
On paper, be sure to make a drawing of each detail on a scale of 1: 1. According to these sketches, we will perform bending, cutting and welding.

Drawing furnace buleryan
In the place where the furnace will be installed, we will prepare a brick platform for it or lay a sheet of steel. This is necessary to protect the floor from possible fire.
We take a pipe with a diameter of 5-7 cm, cut it with a grinder into sections of 1.2 m each and bend each of them on the machine (we take a diameter of 225 mm or 80 degrees).

We bend pipes for the furnace
Using a welding machine, it is necessary to connect the pipes to each other in a checkerboard pattern, and weld the resulting “skeleton” together. The ends of the pipes must face outward. It is very convenient to prepare a frame of metal profiles welded together before welding, which will hold the pipes and allow the most accurate work to be done.

We make a frame from metal guides

We weld the frame
We insert the pipes into the frame and connect their edges with a welding machine.

We insert the pipes into the frame and fasten with a welding machine

Side view
We take out the pipes from the frame-support. We weld pieces of metal corners into the inner space of the “skeleton”, which will hold the perforated metal sheet and further strengthen the structure.
We install convection pipes that will communicate with the firebox during the operation of the furnace and provide oxygen access. Thin pipes must be inserted into the two front "ribs" of the furnace.

We install convection pipes
We make two cuts on the inside of the frame and insert the injection tubes. Seal the holes.

We make an incision in the pipe and insert the injection pipes
The voids between the “skeleton” of the furnace must be welded with strip steel. We make measurements, draw a strip on paper, cut it out of steel with a grinder, weld each strip between the pipes.

At the seventh step of building a buleryan furnace, it should look like this
Next, we make a "maze" for afterburning gases. To do this, again using the drawing and the cardboard pattern, we cut out two metal plates, one of which will not reach the front door, the second - to the back. The distance between the plates is about 5 cm.

We make a labyrinth for afterburning gases
It is better to entrust the manufacture of the front wall, the door and the lock with an eccentric to an experienced turner, since it is difficult to make this structural detail with your own hands.
To cut out the front and back walls, you should prepare a cardboard pattern, mark it on steel and cut both parts with a grinder.

Cut out the front and back walls with a grinder
On the back wall of the furnace, we cut out a round hole for the chimney pipe and weld a piece of pipe there. We will connect the chimney to this segment.
The chimney itself is made in a T-shape with a gate valve. In the pipe, which will be located vertically, we cut out a hole to which we weld another piece of pipe perpendicularly. We install a valve inside.

Making a chimney for a buleryan stove
To do this, we drill two small holes in the walls, we pass a metal bar through them. Bend one end of the rod at an angle of 90 degrees. We weld a metal circle inside to the bar (we cut off 1/4 of the circle with a grinder), we take the size slightly less than the inner diameter of the pipe.

We install the valve inside the chimney pipe
We make the door round. We cut a hole under it in the front wall and weld the loops (they can be made from hollow tubes and rods of suitable size). On the door itself, we install a branch pipe with a gate valve (similar to the gate valve on the chimney, but completely blocking the branch pipe when the rod is turned).

Making a round door

A sample of the door for the Buleryan oven
We mount seals on the oven wall and on the door (we bend two strips of steel into a circle and weld them to the door and wall, respectively, so that the two parts fit snugly into each other).
The door lock is a hinge and a latch with a handle that catches the hinge when the handle is turned. In this case, the furnace door is pressed tightly against the front wall of the furnace.

We make a lock on the oven door

lock for our stove
It remains only to install the stove on a brick stand or on a frame made of metal corners, connect the pipe on the back wall to the chimney and chimney (we connect the pipes with clamps and seal with mineral wool, such as asbestos) and, if desired, put a grate for cooking on the upper part of the structure food.

Brick stand for buleryan oven

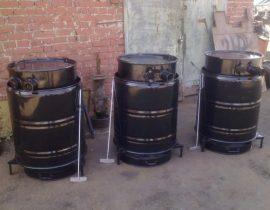
Stand for stove with legs
Video instruction for welding the Buleryan furnace with your own hands at home