How everything should look in the final version - you can see in this video:
In this article, we will consider the technology for creating a waste oil furnace, everything is very simple and accessible to everyone. Having the necessary materials and tools at hand and mastering the basic skills of welding and cutting metals, you can do everything yourself without involving specialists. Let everything be not so beautiful, but functional!
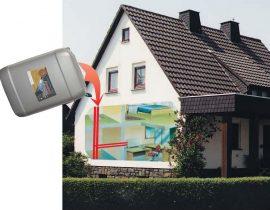
Each caring owner makes sure that they remain dry and warm as long as possible: a garden house and a greenhouse, a crop in a cellar, a personal car in a garage, and similar premises and objects dear to the heart. At the same time, important factors are the possibility of manufacturing a heating device independently, environmental friendliness and safety of the heating element. And also the cheapness of the raw materials used to produce thermal energy.

Content
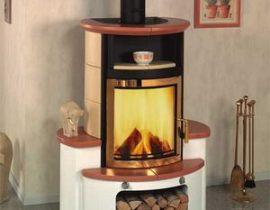
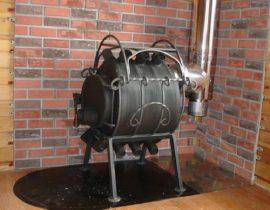
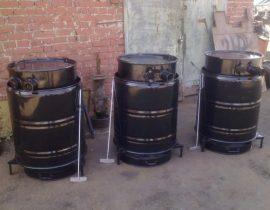
Appearance of the waste oil furnace
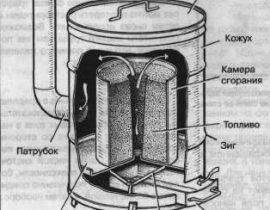
Structurally, a waste oil furnace consists of two metal tanks of round, square or rectangular cross-section, connected by a perforated pipe, equipped with a lid and a chimney.The tank located below is the firebox, the middle part (pipe with holes) is the burner, the upper part of the furnace is the heated module. The firebox is equipped with a hole with a lid for fuel ignition and draft control.
There are waste oil furnaces that have been modified in accordance with the requirements of manufacturers.

Operating principle
Fuel is refueled into the lower tank of the furnace using a funnel, set on fire with a burning rag, paper or match. It is allowed to use a small amount of gasoline, kerosene or a special liquid for quick ignition. After a few minutes, the surface layer of the fuel begins to boil, and the resulting vapors escape into the burner, where they are enriched with oxygen and burned. The products of combustion enter the upper tank, and then are discharged through the chimney into the atmosphere.
The following oils can serve as fuel for this furnace:
- industrial;
- machine;
- transformer;
- transmission;
- shale;
- diesel fuel (solar oil);
- heating oil;
- fuel oil;
- some waste from the paint and varnish industry.
Do not use flammable liquids as fuel - solvents, gasoline and the like.

The positive aspects of the design of the furnace
- A waste oil furnace is very economical. Fuel consumption 0.5-2 liters per hour.
- When burned, used oils do not emit soot and smoke.
- Simplicity of design is a guarantee of durability, ease of installation and operation.
- Possibility of connecting the furnace to a heating system with a water or air circuit.
- Energy independence of the furnace (no need for electricity or gas supply).
- Environmentally friendly (waste oil is burned, and not disposed of in drains and soil).
- Mobility.
- Fire safety.
- The ability to control the heating temperature, fuel consumption and choose its type.
- You can cook food on the top of the oven.
Furnace Disadvantages
- The design involves the mandatory installation of a chimney that does not have horizontal sections and a length of 4 meters or more.
- Frequent cleaning of the furnace and chimney is required.
- If the oven is constantly used at full power, it will wear out quickly and become dirty.
Safety
Any oven requires care when handling to avoid a fire, ours is no exception!
It is strictly forbidden:
- burn in the firebox any materials other than oils;
- make a fire in a stove that is not connected to a chimney if the chimney is connected incorrectly or is damaged;
- leave the stove running for a long time without supervision;
- allow water to enter the hot parts of the furnace, as well as into a container with oil;
- allow children and animals to operate the stove;
- block the holes in the burner;
- in no case should you refuel a running stove with fuel;
- use a faulty oven;
- install the oven in a room with poor ventilation or without it;
- store containers with flammable liquids in the immediate vicinity of the oven.
Important! In case of emergency extinguishing, sand or a carbon dioxide fire extinguisher is used.

Waste oil furnace installation
The foundation for such a furnace is not required, since the structure is very light, but the surface on which the furnace is installed must be strictly horizontal. Install the stove in such a way that it is convenient to pour fuel. For the convenience of pouring fuel, a funnel (watering can) is used.If the floors are wooden, then before installing the stove, a metal sheet is laid on the floor.
Among the important aspects regarding the design are the following:
- the inner diameter of the chimney must be at least 10 cm, the wall thickness must be at least 1 mm;
- steel thickness for tanks - 4 mm, for the bottom of the firebox and the cover of the upper tank - 6 mm;
- the length of the burner must be greater than the value of its diameter;
- the optimal volume of the tank intended for fuel is from 8 to 15 liters;
- pipes are selected from such materials as: stainless steel, copper, painted tin;
- the chimney must be able to be dismantled for ease of maintenance of the furnace;
- the inclined position of the parts of the chimney located in the room is allowed (to improve the heating of the room), however, outside the room, the pipe must be strictly vertical (to prevent wind blowing).
What is required for work
- drawing;
- welding machine and electrodes;
- grinder, cutting wheels for metal, file, sandpaper;
- steel corners or fittings;
- a set of drills and a drill;
- steel sheets 4 and 6 mm thick;
- chimney and burner pipes;
- a hammer;
- tape measure and level.
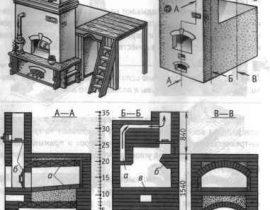
Preparation and assembly of the furnace (drawing)

- We print the drawing and start preparing for assembly. We connect all parts with a welding machine. An exception is tank elements marked on the drawing as "tightly fitting". We make them collapsible. All welds are carefully checked for tightness. We clean the scale with a grinder or a file.

- We lay out sheet steel on a flat surface, make markings and cut parts with a grinder. We perform bending on a bending machine, preparing the details - the walls of the tanks.We check the tightness of the parts.
- On the left in the photo is the finished cover of the lower tank, on the right is its lower part. We do not weld them together, the parts should remain collapsible, but fit snugly against each other. The hole for pouring fuel into the furnace is about 5 cm in diameter.
- We assemble the upper tank (we weld the walls to the bottom).
- We weld a baffle baffle in the upper tank (closer to the hole for the burner). Attach the exhaust pipe. We will subsequently connect a chimney to it.
- On the pipe intended for the burner, we drill 48 holes with a diameter of 9 mm each. We connect the upper chamber and the burner by welding.
- We check the dimensions of the parts. Install the sealing ring.
- We weld a tank designed to fill the oil. We equip it with an overflow pipe.
- We cut out three legs 20 cm long from a metal corner and connect them to the bottom of the furnace.


Creating a waste oil furnace with your own hands - video lesson
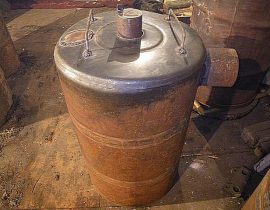
Some details of this furnace can be cut from a thick-walled pipe, a used gas cylinder. But if there were no cylinders, there is no possibility or desire to bend the metal into a radius, you can mount a similar furnace, but square section. Cutting out the details of this design is much easier. In the absence of a grinder, we use guillotine shears for metal.
- Prepare the bottom of the oven. To do this, we connect together the legs, bottom and side walls of the fuel tank.
- The upper part of the firebox must be hermetically put on the lower one. We carefully check the dimensions of the walls before cutting metal. We attach the fuel tank cap to a screw or steel riveting to make it possible to turn the cap if necessary.
- We install a partition in the upper tank.
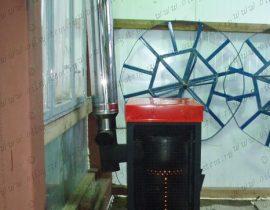
- We weld the pipe, which we will connect to the chimney.


Since the chimney will have several sections with a slope of 45 degrees, we install special bends at the junctions of the pipes. In the place where the pipe passes through the ceilings, we additionally sheathe it with non-combustible materials (mineral wool) and a layer of metal (a special “pass through the roof” element is sold in hardware stores for this, which facilitates installation). In addition to the bends, clamps and a metal fungus are useful, which prevents rain and snow from entering the pipe.
This is where we end, we advise you to read the article on how to build - bake bubafonya with your own hands, because its design resembles what we reviewed yours.