Despite the rich assortment of electric and gas boilers on the modern market, solid fuel stoves are in no hurry to give up their positions. Due to the autonomy of use and affordable price, they are the best choice for country houses, cottages and baths.
For the correct and safe operation of the furnace, it is necessary to correctly design and install the chimney. But often, at the stage of building a house, people miss the need to install a chimney at the same time as building walls. This problem has many solutions: output through floors, roofs. The best option would be to install a chimney through the wall, which will help not only significantly save the area of \u200b\u200bthe interior, but also reduce the number of nodes, passages through the floors.
How to properly install, and what materials are best to use - we will tell in this article.
Installation of a chimney from a sandwich pipe through the wall
Content
Design features
Despite the huge choice of materials for the construction of chimneys, double-circuit steel pipes, popularly referred to as "sandwich", are the most widely used today.
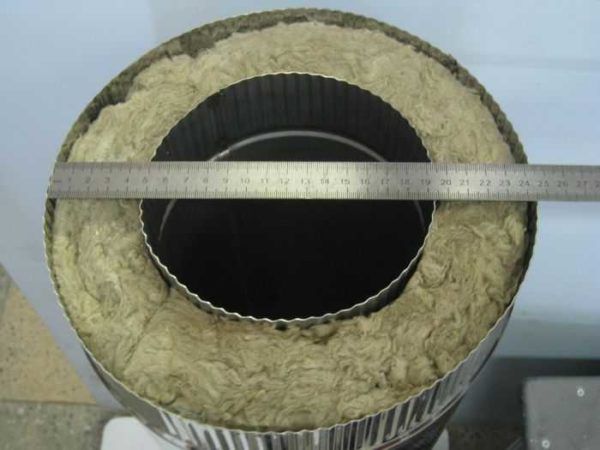
The chimney type "sandwich" is a two-layer structure. Between two metal pipes of different diameters, a layer of heat-insulating material is laid, which simultaneously serves as an insulator and a heater.
Video: Sandwich pipe chimney
Compared with single-circuit pipes, which are made from steel with a thickness of 0.5 mm, the double-circuit design is characterized by increased fire safety and better technical characteristics. For installation of a chimney outside the building, single-circuit pipes are not recommended. Indeed, due to just one layer, they are simply not able to retain heat in the cold season. Due to a sharp temperature drop in such a chimney, condensate forms, which reduces draft and creates plugs in the pipe.
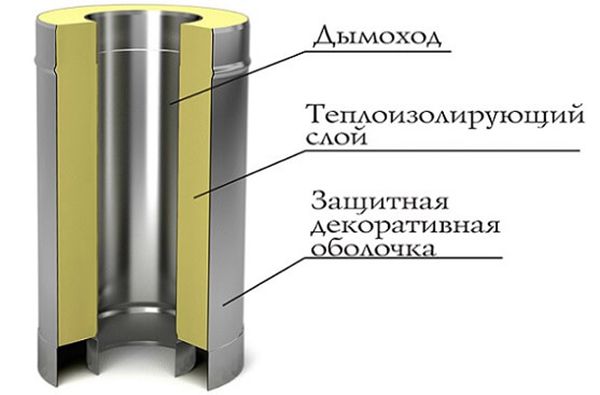
The device of a double-circuit sandwich pipe
Therefore, for installing a chimney through a wall, the best option would be to buy a sandwich pipe. The popularity of such a double-circuit chimney is due to the low price compared to a brick chimney, attractive appearance, excellent technical characteristics, fire safety and long-term operation.
In addition, the installation of a chimney from this material can be done by hand. And although there are some nuances and subtleties here, even a beginner can cope with the task if you strictly follow our detailed instructions.
Advantages and disadvantages of a sandwich pipe
- The heat-insulating layer prevents the outer pipe from heating up to a critical temperature.
- Compactness and versatility of use.
- The smooth surface of the inner casing increases the draft of the chimney.
- Low price compared to ceramic material.
- Operating temperature up to 850 degrees (for single-circuit pipes, for comparison, 5000).
- Easy assembly.
- Increased fire safety of the home.
- Easy maintenance compared to a solid pipe chimney (less soot accumulates).
- Does not create additional noise when drafting smoke.
The only drawback of the multi-layer construction can be called a decrease in sealing after a long time. Due to sudden changes in temperature, air can penetrate at the junction of sections.
Specifications of sandwich pipe
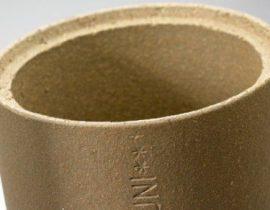
- Material. As a heat-insulating material, basalt fiber (mineral wool) is mainly used. This type of insulation is resistant to high temperatures and chemicals. Mineral wool has excellent heat-insulating/sound-insulating properties and is laid with a thickness of 30-60 mm. Due to their fireproof properties, multilayer pipes can be used in houses built from any material. For the inner casing, more expensive alloys with a high degree of heat resistance are used.
The inner layer of the sandwich pipe is mainly produced by galvanized steel, while the outer layer can be made of copper, brass, stainless steel, etc. The scope of the pipe and the price depend on the content of alloying materials, various alloys and the thickness of the heat-insulating layer.
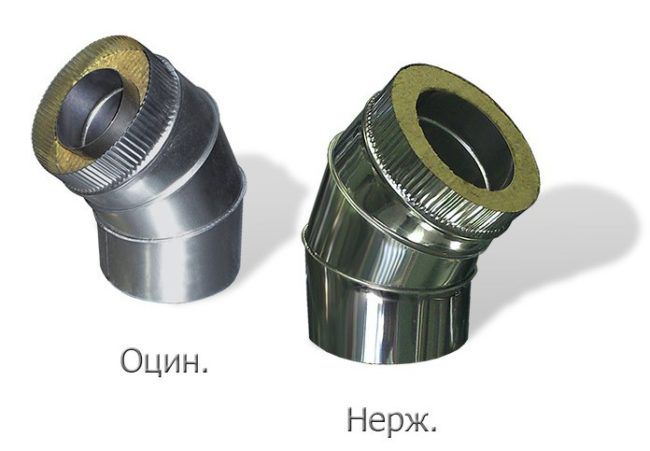
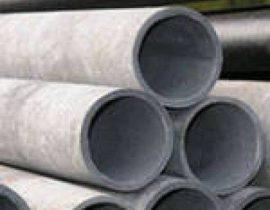
Sandwich pipes galvanized and stainless steel
- Connection type. Elements of sandwich pipes are connected in two ways: corrugated edges and sockets.The advantage of a corrugated connection is ease of installation, but a large amount of sealant is needed to ensure tightness, and this increases the cost of the chimney. With a socket connection, a high degree of tightness is achieved due to the presence of a wider chamfer on one side of the pipe. The advantage is a high degree of tightness, so that the design can be used for gas boilers. But the downside is the complexity of installation and the need for a very precise fit of all parts.
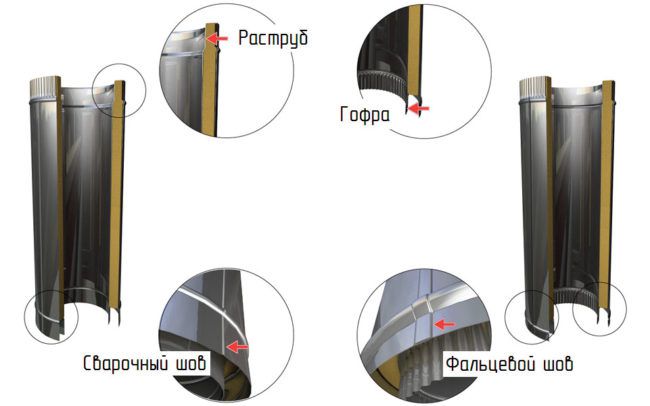
Connection types of sandwich pipes
Chimney installation rules
- In no case should the chimney be laid in the place where communications pass (electrical wiring, sewerage, etc.).
- To minimize heat loss, most of the structure is recommended to be located indoors.
- The outer part of the chimney must end with the installation of a deflector to prevent precipitation from entering. Don't forget about the snow guard. They will protect the gas outlet from damage.
- Observe the step of fixing the structure to the wall no more than one meter in order to avoid further curvature of the chimney.
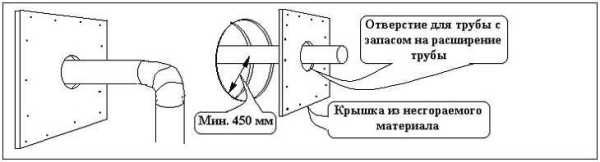
- The place where the pipe passes through the wall must be additionally protected with heat-insulating material. To do this, the diameter of the hole must be made slightly larger than the diameter of the pipe.
- The sandwich pipe cannot be installed as the first pipe above the firebox. It is preceded by the so-called "sandwich start".
- The length of horizontal straight sections of the chimney should not exceed 1 m.
- When designing a chimney, keep in mind that when passing through the wall there is a solid pipe without joints. All connections must be visible and directly accessible.
Choosing the type of chimney outlet
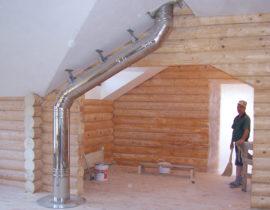
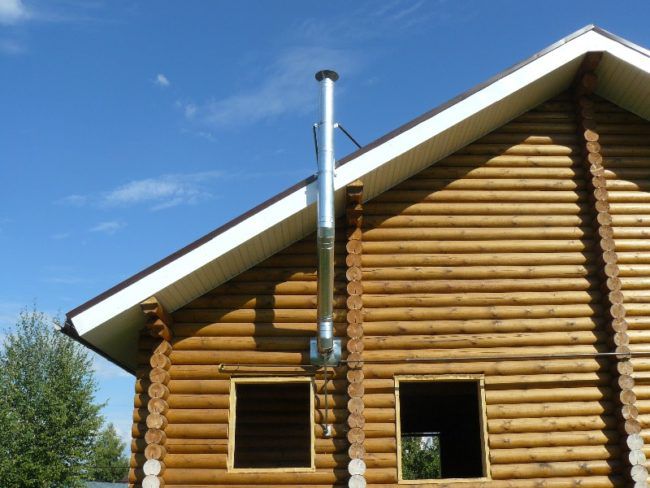
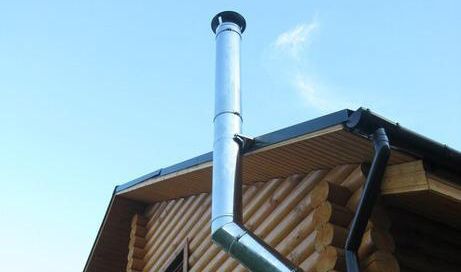
The chimney through the wall can be done in two ways. The first option involves raising the pipe closer to the ceiling with a subsequent exit. The second option is a design that goes immediately from the boiler in a straight line.
In the second option, almost the entire chimney is outside the house. The advantage of this type of design is that only one elbow will need to be used, which will affect the traction efficiency. Yes, and the likelihood of soot plugs is much less.
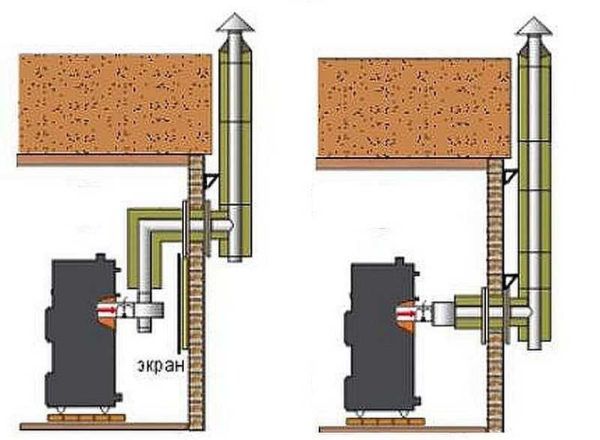
Chimney outlet options
Before performing installation work, it is necessary to draw an assembly plan, calculating the diameter of the chimney and its height. In doing so, some factors should be taken into account.
Warm air rises, which means that the higher the chimney, the greater the thrust. It also depends on the diameter, so it is very important to correctly determine what size chimney you need. The power of the heater also affects its size.
You can get acquainted with the variety of chimneys and choose the right option for your home.
We calculate the diameter of the structure
The diameter of the double-circuit pipe directly depends on the size of the nozzle of the boiler plant. Therefore, it is difficult to draw an installation diagram without knowing what type of heater will be used. A simple rule applies here: the inner casing of the sandwich should in no case be smaller than the nozzle itself. You can take more.
For example, if the diameter of the outlet pipe is 120 mm, then the internal diameter of the sandwich pipe must be the same size or larger. In no case should "narrowing" at the junction of pipes and throughout the entire chimney be allowed, otherwise this may affect the draft.
Determination of the diameter of the chimney
The type of heater also affects the diameter of the chimney. Therefore, if you are building a smoke exhaust structure before buying a stove or boiler, then immediately consider its power.
If the power of the heater does not exceed 3.5 kW, then the diameter of the inner casing can be limited to 80 mm. For more powerful boilers (up to 5.2 kW), the pipe size should be increased to 95 mm. The larger the diameter of the inner tube, the faster it will cool.
Determine the height of the chimney
The calculation of the height of the chimney pipe depends on the overall height of the house. With an insignificant height of the house (up to 5 meters), the height of the chimney in any case should be at least 5 meters. A short chimney can cause "smoke" at home, and the power of the device is significantly reduced due to poor draft. And an excessively long pipe will increase fuel consumption, as if “forcing” the operation of the heater, which affects the low efficiency of the heating system.
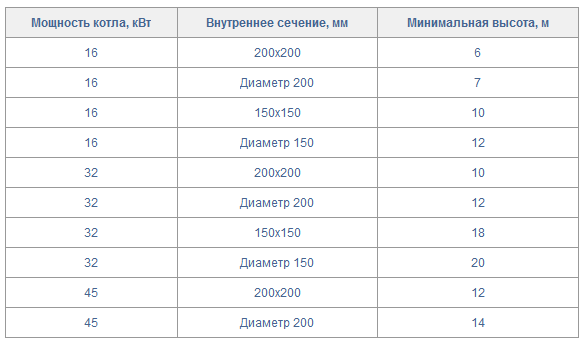
Calculation of the height of the chimney according to the boiler power
The optimal length of the pipe is considered to be a range of 5-10 meters.
If the house is higher than 10 meters, then we are guided by the roof ridge. The chimney must be 0.5 meters higher than the ridge so that no turbulence is created. Consider the material from which the roof is made. If the roof is covered with combustible material, then the upper part of the chimney must be at a distance of 1 meter from the ridge.
How will we assemble the sandwich: by smoke or condensate?
Before starting construction work, you should decide on the type of assembly of the pipes themselves: “by smoke” or “by condensate”.
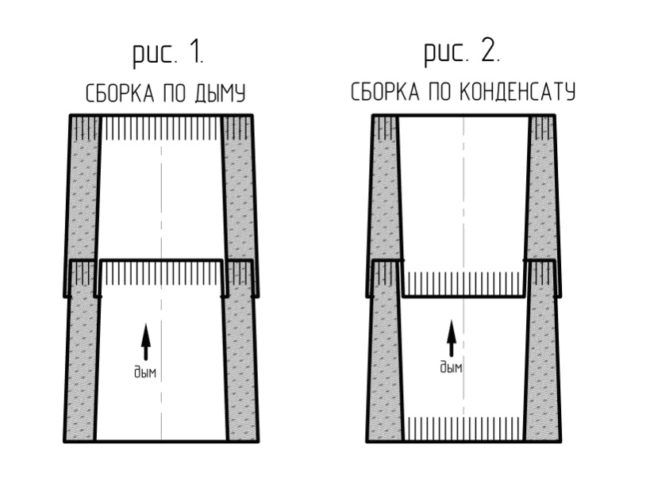
Sandwich pipe assembly options
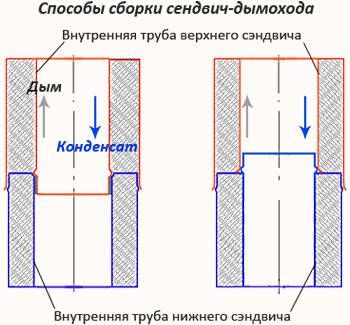
The construction “by smoke” is characterized by the build-up of sections inward (clearly seen in the figure):
Inner tube: the lower element is inserted inside the upper element of the sandwich.
The outer tube is built in the same way as the inner tube. The lower section is inserted inside the upper contour.
Each next section builds up on the previous element, as if dressing from above. This type of chimney connection is best used in stoves with high combustion temperatures.
The condensate structure is built in the opposite way:
Inner Tube: Take the top section of the sandwich and insert it into the bottom section.
Outer pipe: Here you must proceed in the opposite way. Take the bottom element of the outer tube, and insert it inside the outer tube of the upper element.
With this construction, the condensate flows freely along the outer casing of the chimney into a special sump.
When is it better to use such an assembly scheme?
- at a low temperature of combustion products;
- for external installation of the chimney;
- in ovens with a long burning function;
- in furnaces with smoldering combustion.
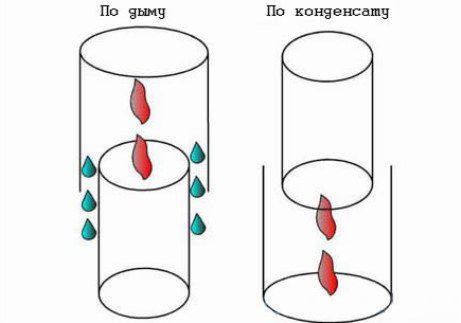
Differences between smoke and condensate connections
Considering our task - to assemble a chimney outside the house, the choice of the type of sandwich connection is obvious. The pipes outside the house, under the influence of low temperatures, will cool faster, which means that the likelihood of condensation is high. Under the influence of moisture, soot begins to dissolve, forming acids. These substances pose a serious threat to the pipe surface.
What tools do you need to mount through a brick or concrete wall?
- screwdriver;
- construction gloves for hand protection;
- stairs;
- knife;
- electric drill (for attaching the bracket);
- building level (to check the verticality of the chimney installation);
- perforator (for holes in the wall).
What materials are needed for installation?
- metal box (pipe);
- dowel;
- set of sandwich pipes;
- silicone sealant (necessarily heat-resistant!);
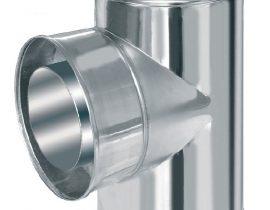
- tee (necessary in order to change the direction of the smoke and connect the pipe directly to the furnace of the heating apparatus).
- knee (450 or 900);
- support console, bracket (the whole structure rests on it);
- clamps for connecting sections;
- foil mineral wool (for insulating the pipe opening);
- plug (protective umbrella from precipitation and debris).
Step-by-step instructions for installing a chimney through a wall (brick or concrete)
- Preparatory work. Determine the location of the chimney.
- Installation of a heating device (fireplace, boiler, stove, etc.)
- Making a pipe exit hole through the wall.
- Installation of a branch pipe (metal box)
- Pipe and boiler connection.
- Pipe outlet and connection with a tee.
- Mounting the bracket to the wall and connecting with a tee.
- Installation of the chimney of the required height.
- Roof fixing and plug installation.
Video instruction for installing a chimney through the wall
Now let's take a closer look at each step of the instruction:
 Place for a chimney | We determine the place where the heater will be located, and therefore the chimney will be laid. Consider the overall design of the house, the exterior and laid communications. Ideally, the outer part of the chimney should run from the side of the gable. If this is not possible, then it will be necessary to install from the side of the slope, taking care of the safety and stability of the structure. |
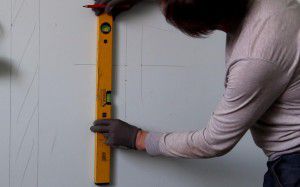
 Preparing the chimney outlet | We are preparing the place where the heater will be installed. The stove itself (fireplace, boiler) is installed on a non-combustible base. Make sure that the plane is perfectly flat. To do this, check it with a building level. |
 Chimney wall marking | With a marker on the wall we designate the future opening for the chimney passage. To do this, measure the height of the furnace and the flue pipe. Consider not only the diameter of the pipe, but also the fire safety standards of the heat-insulating layer that will need to be laid between the pipe and the wall. It doesn't matter what shape you make the hole: square or round. This does not affect fire safety in any way, if all standards are met. Consider box size. Double-check the size of the box and the markings on the wall several times. If everything matches, then proceed to cutting a hole. |
 Pipe insulation and its output through the wall | We make a hole in the wall through and through with a puncher. We carry out insulation from non-combustible materials. Mounting foam is suitable for brick or concrete walls, but asbestos sheeting can also be used. |
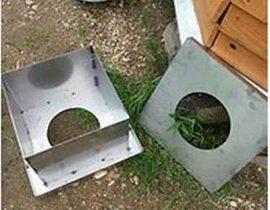
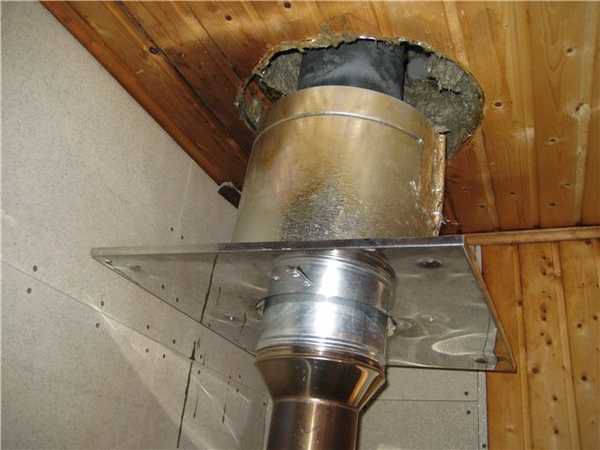
 The scheme of the passage of the pipe through the wall | We insert a box of non-combustible material into the resulting opening. According to the PB norms, the thickness of the branch pipe must exceed the thickness of the ceilings by 7 cm. |
 Installation of the horizontal part of the chimney | We mount the horizontal part of the chimney. To do this, we connect a single chimney (starting sandwich) with a branch pipe using the “smoke” method, that is, insert the starting sandwich inside the branch pipe. Make sure that the connection runs strictly at an angle of 90 degrees. |
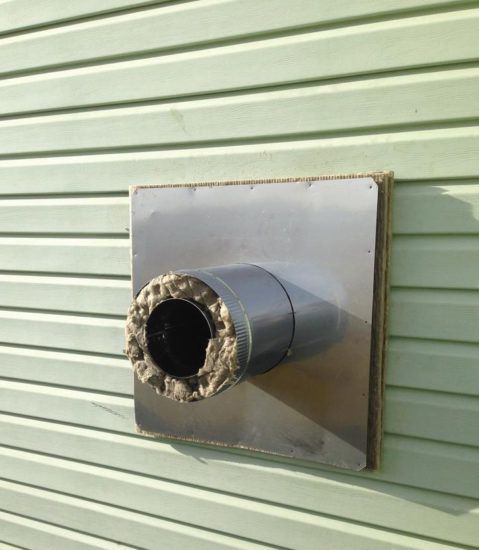
 Conclusion of the pipe to the outside and its fixation | We fix the sandwich strictly in the center of the box, and lay the distance between the walls of the pipe and the opening with heat-resistant insulation (foiled mineral wool can be used). From the outside of the wall (from the street), we close the opening with a box plate. |
 Tee installation | We bring the pipe through the wall to the street and connect the tee.The lower part of the tee is allocated for the collection of condensate. The element may end with a removable glass, which will periodically have to be removed and cleaned during the operation of the chimney. And it is better to purchase a model with a fitting and a small tap. Maintaining such a chimney will be much easier. It is enough to bring a hose to the fitting and unscrew the rotary valve, thus draining all the condensate. But keep in mind that the substances accumulated at the bottom of the tee are very toxic. Therefore, do not drain them through the hose directly to the house, but take them aside to a safe distance. Also, make sure that there are not a single joint in the way the sandwich passes through the wall. If the length of the pipe is not enough to lay through the hole with a solid structure, then cut the previous element with a hacksaw and make a joint to the entrance. |
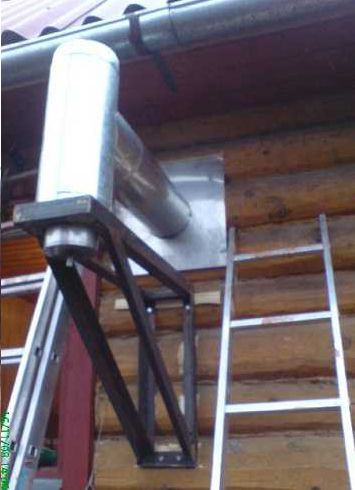
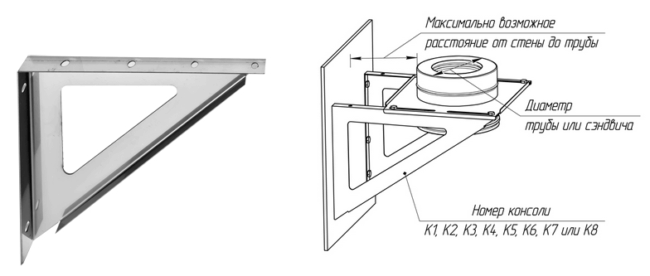 Support bracket for chimney | We mount the support bracket with dowels from the outer wall of the house. It will account for the main structure, so take care of its reliability and stability. The bracket can also be built independently, using stainless pipes that are welded at an angle of 90 degrees, with an additional support. |
 Sandwich pipe connection | We assemble the chimney from separate sections of the sandwich according to the previously selected method (“by smoke” or “by condensate”). You can easily figure out how to do this, since one part of a double-circuit pipe is always of a smaller diameter. We “reinforce” the joints of the connected sections with metal clamps. Just wrap the clamp around the pipe, tighten it tightly around the diameter of the sandwich and twist it with bolts or nuts. Treat additionally the joint with sealant.The fastening step should be approximately at least 1 meter, but more frequent fixing is also allowed in order to avoid curvature of the chimney. Whichever assembly element you choose, it is best to mount elbows and tees “by condensate”. All joints are well treated with sealant. |
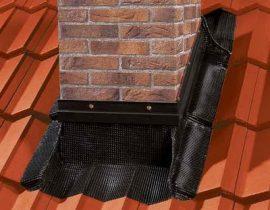
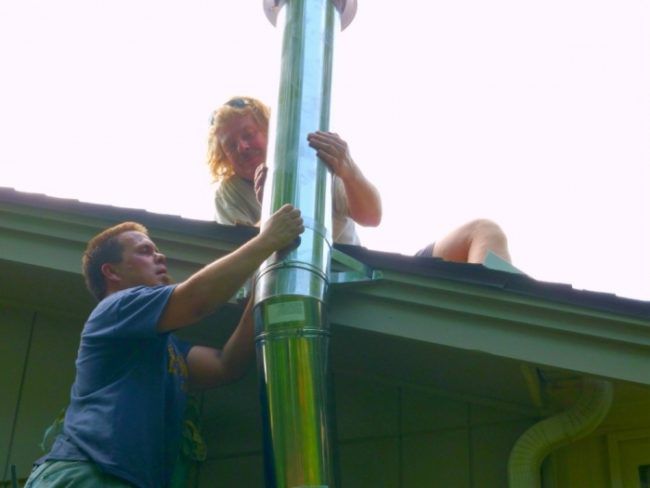
 Pipe made of sandwich panels, fixed with brackets | Along the length of the entire chimney, we fix the structure with additional ties and brackets. Make sure that the retainer does not fall on the junction of the pipes. The integral part of the double-circuit pipe is fixed. If the height of the pipe above the roof exceeds 2 meters, then it is necessary to fix it with a metal cable or an additional bracket under the roof. |
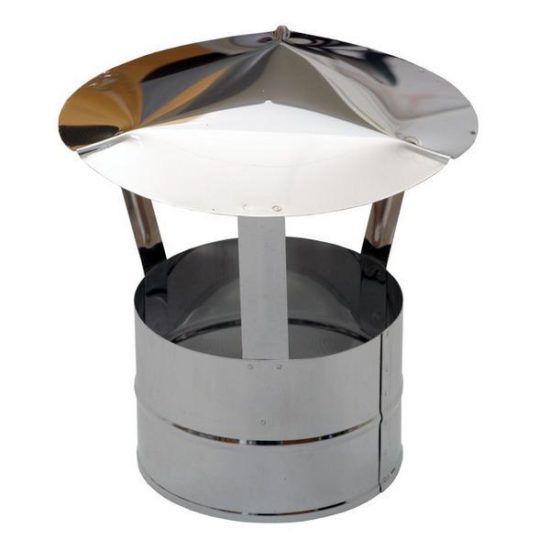
 Deflector | We put on a deflector or a protective umbrella on the upper part of the pipe, which prevents debris and precipitation from getting inside. The choice of deflector or protective hood determines the type of heater. According to building codes, the installation of a deflector on the chimney of a gas boiler is not performed. For such a device, it is better to install a weather vane. It will prevent the blowing of the gas boiler, the creation of turbulence and improve traction. |
Instructions for installing a chimney through a wooden wall
In general, the installation process through wooden walls is similar to installing a chimney through a concrete or brick wall, however, some nuances related to fire safety should be taken into account. The maximum temperature at which wood begins to char is 2000. At 3000 she starts to burn.
Unlike the previous installation, here it is necessary to pay great attention to the insulation of the chimney channels through the floors, so as not to burn the house and smoke the interior.Moreover, this applies to the entire length of the chimney, starting from the heating boiler and ending with the roof of the house.
We need the following tools to work:
- screwdriver;
- sharp knife;
- electric drill (for attaching the bracket);
- jigsaw;
- drill;
- building level (to check the verticality of the chimney installation).
From the materials prepare:
- a metal box for passing through a wooden wall;
- dowel;
- sandwich pipes;
- sealant;
- tee;
- knee (450 or 900) depending on the design of the chimney;
- bracket;
- clamps for connecting sections;
- asbestos cloth;
- foil mineral wool (for insulating the pipe opening);
- protective cap, spark-extinguishing mesh.
 Wall marking | We determine the place where the pipe exits (along a horizontal line from the furnace or under the ceiling). We draw with a pencil or marker the required diameter of the hole. When calculating the overall design scheme, do not get carried away with too many bends and transitions, as this may affect the further efficiency of the heating system. Two or three transitions with a change in direction will be enough, and even then try to use a leading angle of 450. Also consider the distance of the chimney from the wall. According to fire safety requirements, it should be at least 50 cm for wooden walls. |
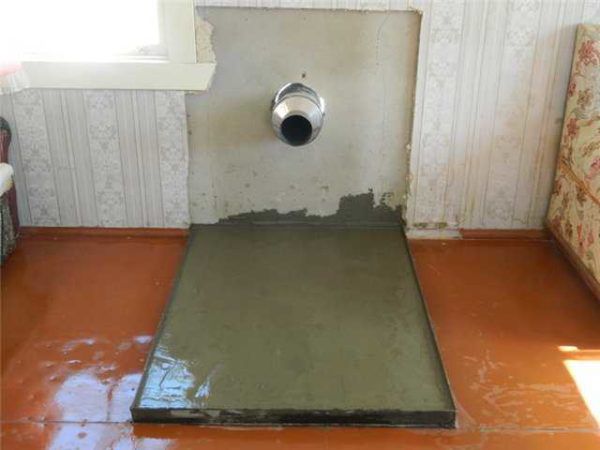
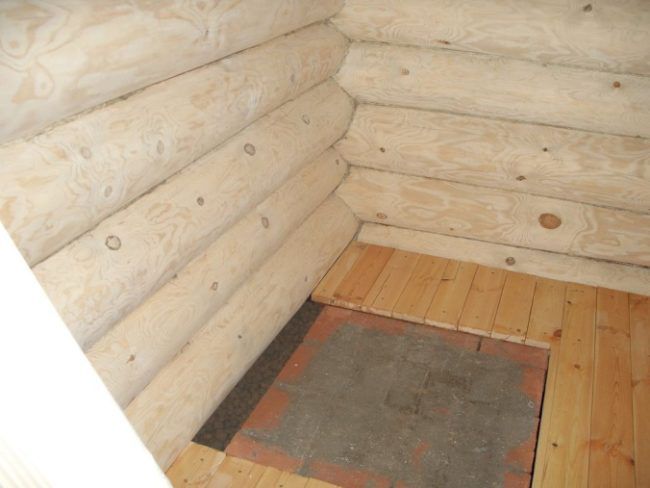 Preparing the podium for the boiler | We are preparing a place on which the heating device will stand (fireplace, stove, boiler). Given the wooden floors, it is necessary to make a podium of cement screed above the floor to a height of 20 cm or (if this is not possible) lay a heat-resistant coating of galvanized steel - asbestos cardboard. |
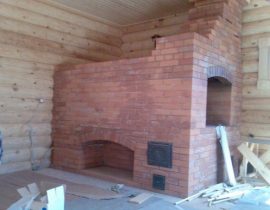
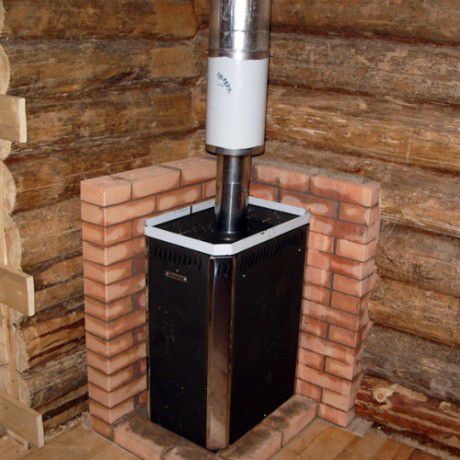 Boiler with protective screen | If there are wooden walls at a distance of less than 50 cm, then it is necessary to build a protective screen made of bricks to the height of the boiler. When installing a solid fuel stove (potbelly stove), it is desirable to separate the brickwork from the wooden wall with additional thermal insulation (asbestos-cement sheet). Make sure that the plane is perfectly flat. Check all the time with a building level. |
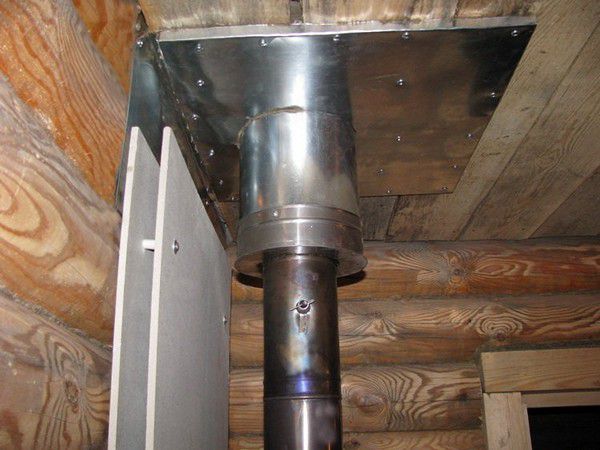
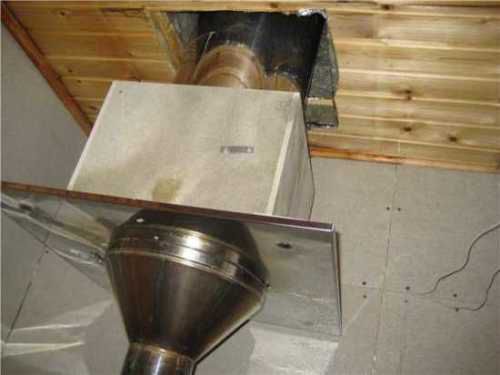 Pipe with protective box | We make a hole in the wall (consider not only the diameter of the pipe, but also the place where the heat-insulating layer is laid between the pipe and the wall). We install a protective metal box. The distance between the inserted box and the wall is carefully isolated with basalt fiber. Additionally, to increase fire safety, we wrap the passing pipe with an asbestos cloth. |
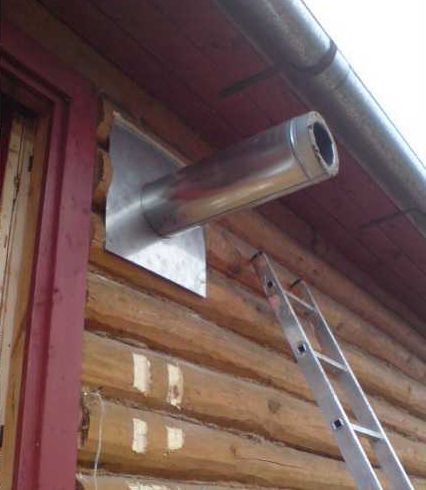
 Chimney outlet through the wall | We remove the pipe from the boiler strictly at an angle of 900. This is a very important point and any deviations are not allowed here, since this will subsequently affect the efficiency of the heater. We make sure that there is no pipe joint on the section of the transition through the wall. If you see that the length of the pipe is not enough, you need to cut the previous pipe and build up a solid sandwich element on it. |
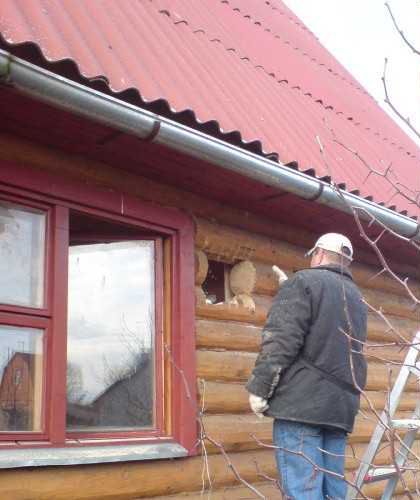
 Installing an outdoor screen | We carefully isolate the passage of the pipe through the wall with a heat-insulating material, and fasten a metal plate to the outer part of the house with self-tapping screws, protecting the wooden surface from overheating. |
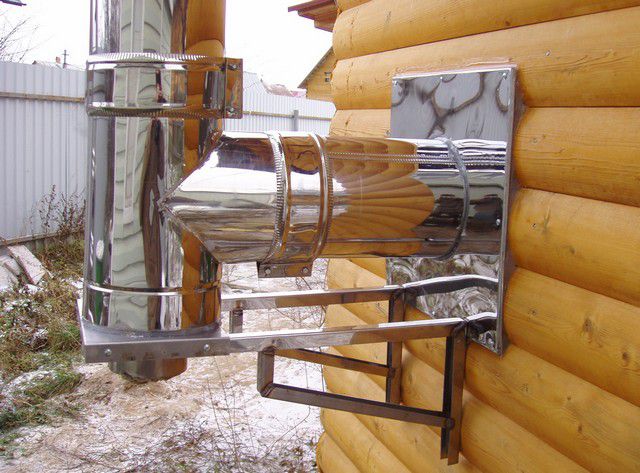 Chimney tee with support | We install a tee on the pipe, which will serve as a smoke direction vector. The lower part of the tee is designed to collect condensate. We make sure that it is clearly located perpendicular to the chimney outlet pipe through the wall.All seams are carefully treated with sealant. We fix a stable support to the wall of the house or to the ground, depending on the overall design of the chimney channel. |
Sandwich pipe connection | We begin the vertical build-up of the gas outlet channel from the bottom up according to the previously selected type (“by smoke” or “by condensate”). |
 Mounting the chimney on brackets | Every 100 cm (60 cm is possible) we fix the chimney to the wall with metal brackets. We follow the strict verticality of the structure. To do this, use the level, checking if there is any deviation. It is also very important to fasten against the solid part of the chimney channel, and not at the junction. We fix the upper part of the pipe with a metal clamp and be sure to install a snow retainer on the roof so that the structure is not damaged under the influence of precipitation. |
 protective cap | We install a cap on the cut of the sandwich with the help of bolts or self-cutting screws. To improve traction, use a deflector. When installing a chimney in a wooden house, you can play it safe and attach a spark-extinguishing mesh to the deflector. It will protect the roof from sparks. This metal mesh will also reliably protect the chimney from getting leaves, birds, debris inside. |
As you can see, installing a chimney through a wall does not require high qualifications and more experience. The main thing is to correctly calculate the height and diameter of the chimney and purchase high-quality material.
If you carefully consider all the points and clearly follow the instructions, then you will definitely cope with this task. And the video will help you visually study the process of installing the chimney.
Video. Installation of a chimney for a fireplace